Cut Plan
Introduction
Section titled “Introduction”The Cut Plan module is part of the Fabric Saver product and manages the entire cutting floor planning process — from organizing order quantities to scheduling the physical cutting of fabric.
It keeps track of all cutting activities, ensuring that the right quantities are planned and executed while maintaining control over overproduction. The module is designed to be flexible, allowing for both automated suggestions and manual adjustments to fit the specific needs of each style and order.
Functional Breakdown
Section titled “Functional Breakdown”Here’s what it covers:
Cut Planning (Master Plan) — The foundation of the whole module. It acts as a master reference for a work order, style and color, pulling in order quantities per size automatically from the system. It also supports defining an overproduction threshold — so the cutting floor can cut slightly more than the order quantity within a controlled limit — ensuring compliance at the Ex-Factory level to avoid overproduction per PO.
Cut Plans (Child Plans) — Under the master plan, separate cut plans are created for different material categories — the main body/track fabric and accessories (like netting, pocketing, facing, fusing, hood). Each cut plan is tied to specific Purchase Orders and controls which panels are being cut.
Markers — A marker represents the fabric layout used for cutting. The module supports both auto-generated markers (where the system intelligently suggests how many plies and size ratios to use based on thresholds) and manually defined ones. Users can customize size ratios and plies even after auto-generation.
Cut Jobs — Cut jobs are the actual physical cutting tasks generated from the markers. They can be auto-generated or manually added, and each cut job can have a planned date and cutting table assigned to it.
Controls & Validation — The system enforces rules before a cut plan can be submitted — for example, planned quantities cannot exceed the allowed maximum per size, ensuring no overproduction sneaks through. Plans can also be aborted, which frees up the associated POs to be reassigned.
In essence, the module bridges the gap between orders and the cutting floor — ensuring the right quantities are planned, allocated to the right fabric types, and executed in a controlled, trackable manner.
Complete Workflow
Section titled “Complete Workflow”Prerequisites
Section titled “Prerequisites”As a pre-requisite, to start a cut plan, we only need to ensure that the order has some size-wise quantity defined in the order booking module.
Cut Planning
Section titled “Cut Planning”The cut planning (also referred to as master plan) contains the whole information about the order quantity with overproduction, fabric that will be used and its size-wise consumption, and which panels will be cut in cut plans.
Process of Cut Planning
Section titled “Process of Cut Planning”Cut planning is defined against a combination of work order, style and color. Once we select the combination, the system will automatically pull the order quantity per size from the system and populate it in cut planning.
Cut Planning is sub-divided into five parts:
-
Panels and Fabric Selection — Define which fabric will be used for the body or other accessories and which panels will be cut in these cut plans. One cut plan type (i.e. body or accessories — netting, pocketing, facing, fusing, hood) can only have one fabric associated with it, but one fabric can be associated with multiple cut plan types. Multiple panels can be planned within the same cut plan type, but a panel cannot be repeated in another cut plan type.
-
Fabric Inventory and Grouping — View the inventory of the fabric selected in the previous step. Width grouping of the fabric can also be configured here.
Width grouping is the process of grouping fabric rolls with variable widths into the same batch. This allows the system to layer these fabric rolls on top of each other in the marker.
For example, if we have fabric rolls of width 50 inches and 52 inches — in the textile industry every inch matters for cost optimization. If the 2-inch difference cannot be optimized and will always be wasted, we simply group these fabrics together and treat them as the same width in the marker.
-
Fabric Consumption — Define how much fabric area will be consumed for one unit of each size.
-
Order Quantity — View the order quantity per size that the system pulled from the order booking module. The overproduction percentage can also be defined here for individual Purchase Order, Kit, and Ex-Factory. Once the percentage is defined, the system will automatically calculate the maximum quantity that can be cut for each size.
-
Re-Cut Plan (optional) — If the main plan is executed completely and there is still a need for more cutting — whether due to rejection or faults in the previous cutting — a recut plan can be created. In a recut plan, quantities can be defined against a dummy Purchase Order, for the same sizes that were available in the original planning.
Cut Plan
Section titled “Cut Plan”A cut plan is created based on the cut planning already defined. It is associated with a specific category (body or accessories). A single cut plan may contain all or some of the Purchase Orders from a cut planning.
The cut plan is further broken down into markers and cut jobs.
Each cut plan has two classification properties:
| Property | Values | Notes |
|---|---|---|
| Cut Plan Type | Body, Accessories | Determines whether the plan covers the main fabric or accessory materials |
| Cut Type | Netting, Pocketing, Facing, Fusing, Hood | Only applicable when Cut Plan Type is Accessories |
Process of Cut Plan
Section titled “Process of Cut Plan”Creating a New Cut Plan
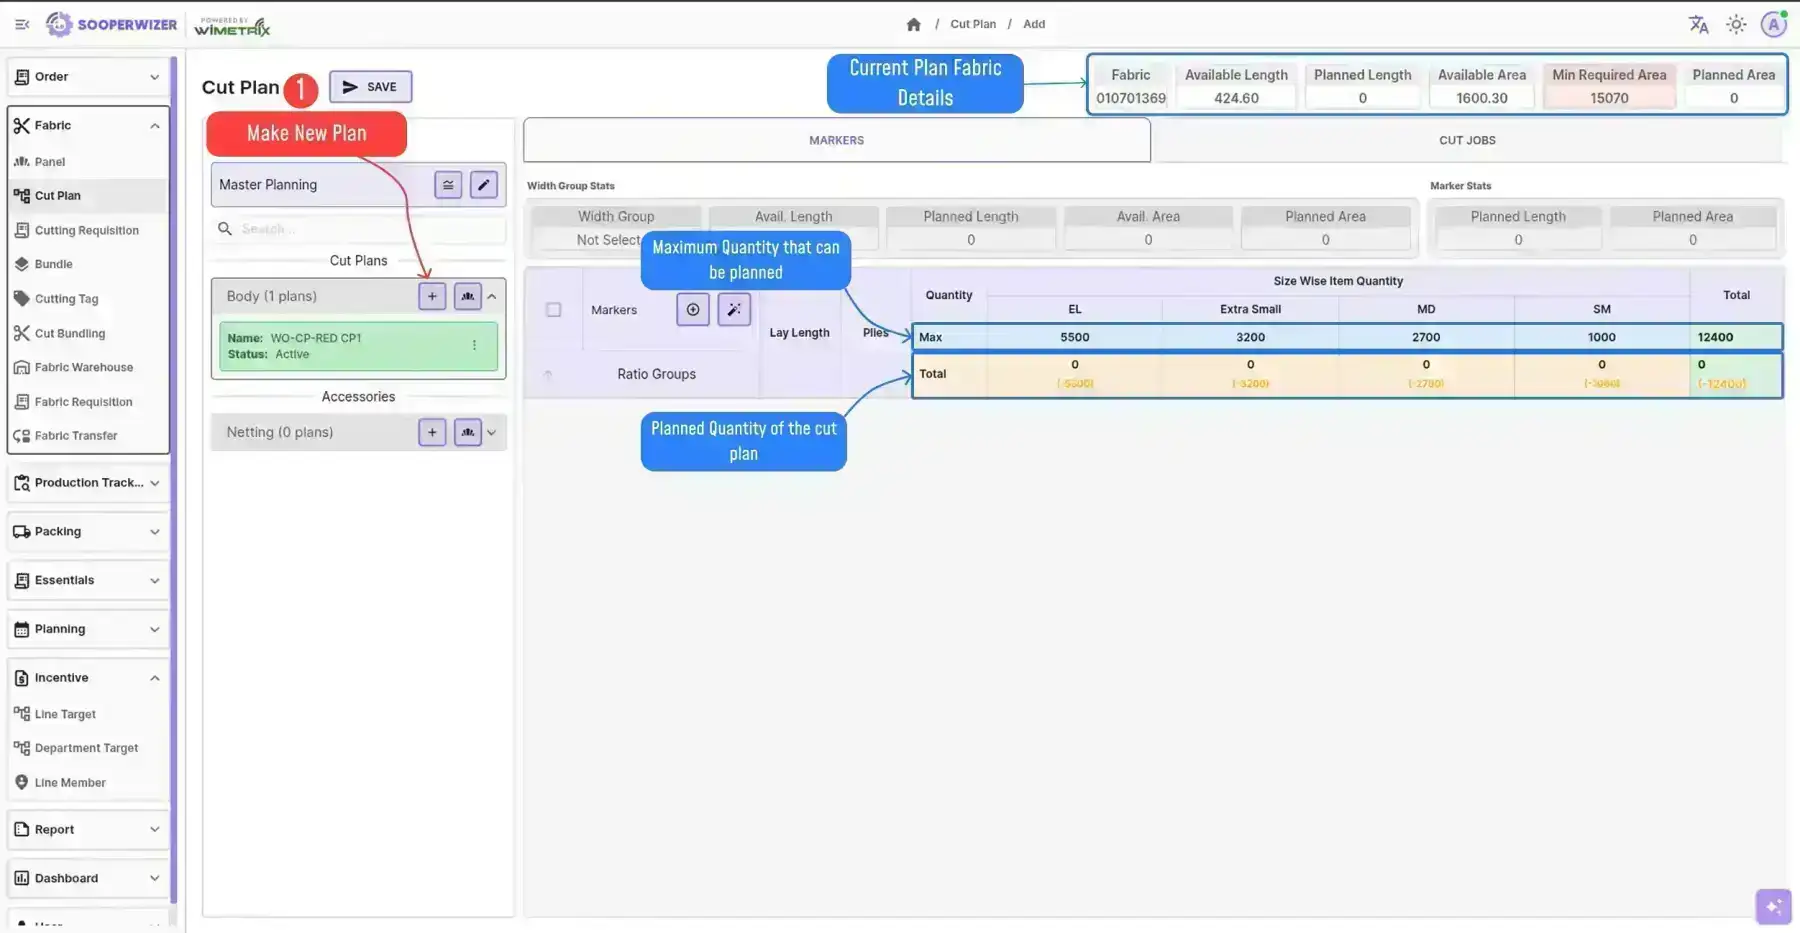
Section titled “Creating a New Cut Plan”-
Click the add button next to the desired cut plan type (Body or Accessories) in the left panel.
-
Select the Purchase Orders you want to include in this plan. Additional Purchase Orders can be added to the plan later.
A template will appear in the left section of the screen showing the total quantity for the selected Purchase Orders and the fabric details for the current plan.
Adding More Purchase Orders in the Same Plan
Section titled “Adding More Purchase Orders in the Same Plan”Purchase Orders that have some uncut quantity can also be added to an existing cut plan at any time, as long as the plan has not been aborted.
- Click the action icon (⋮) on the plan card in the left panel.
- Select View/Add Purchase Orders from the dropdown menu.
- In the drawer, select the additional Purchase Orders you want to add to this plan and click Add button.
Adding Markers
Section titled “Adding Markers”Markers can be added in two ways:
- Auto-Generated Marker
- Manual Marker Creation
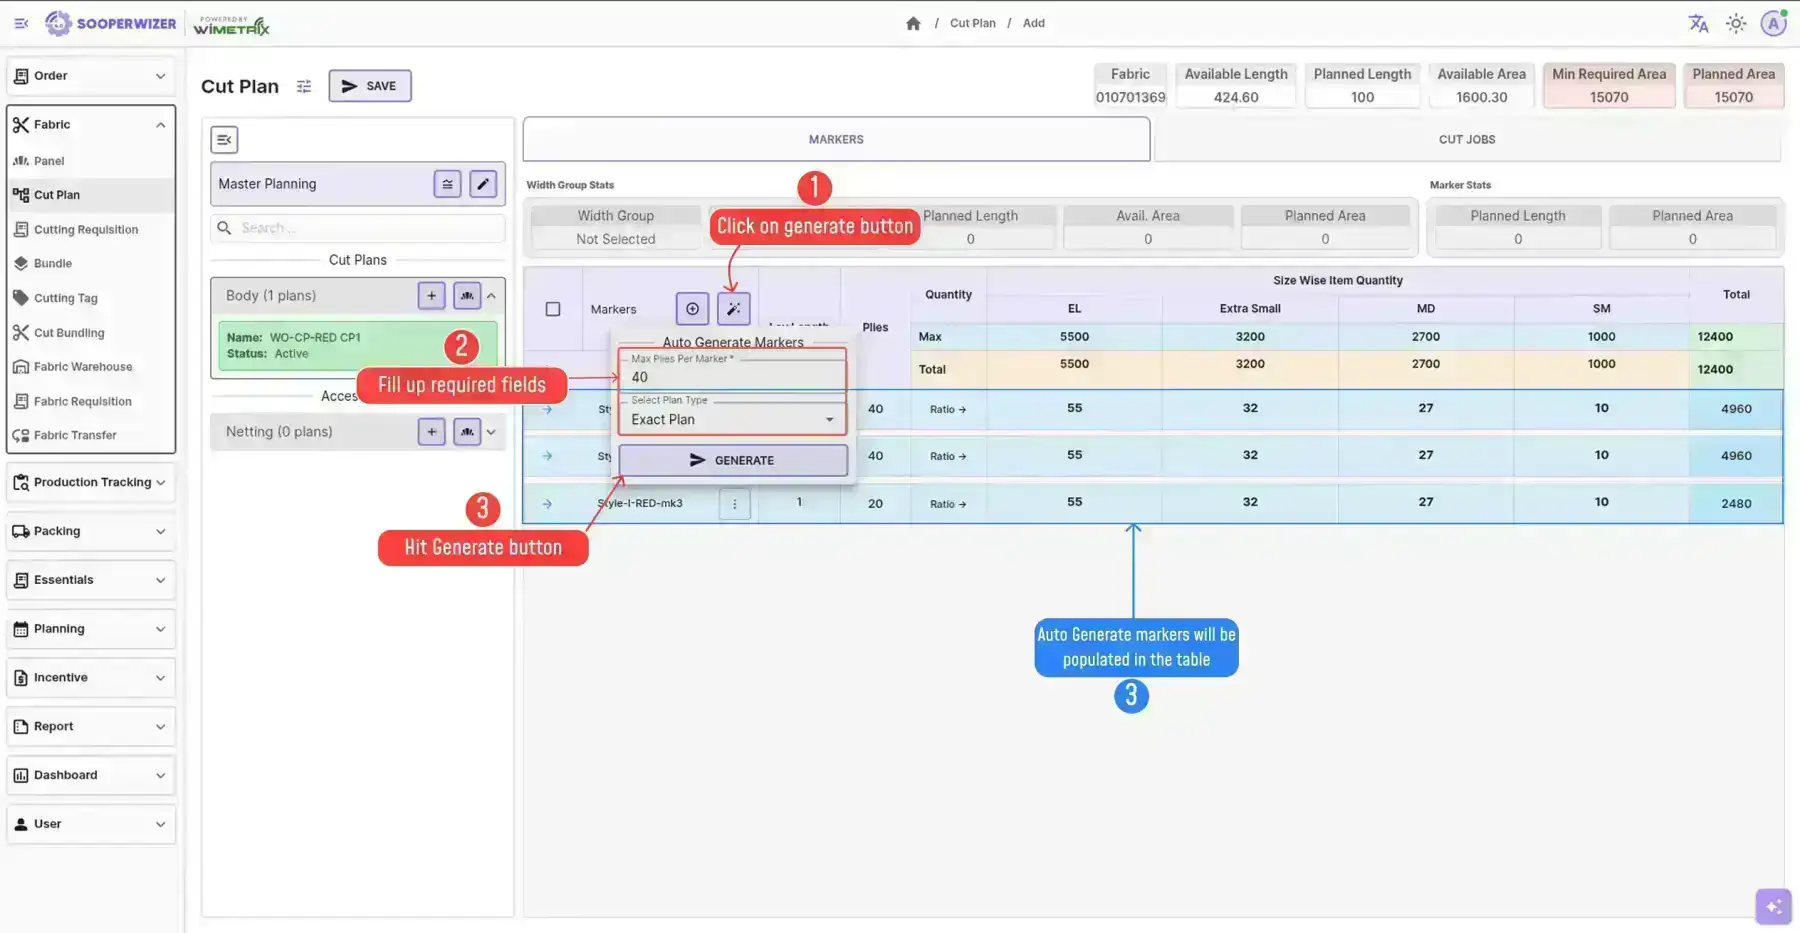
Auto-Generated Marker
Section titled “Auto-Generated Marker”The system automatically generates markers with an optimal size ratio and ply count, based on the maximum plies you specify.
- Click the auto-generate button in the top-right corner of the marker column.
- Define the maximum plies per marker and select the desired plan.
- Click Generate — markers will be created according to the defined plies and selected plan.
Manual Marker Creation
Section titled “Manual Marker Creation”-
Click the add button in the marker column. This adds a ratio group to the table.
A ratio group defines a shared size-wise ratio that applies across multiple width-group markers.
-
Enter the lay length and the desired size-wise ratio in the ratio group.
-
Expand the ratio group to see all available width groups, each of which can have its own marker.
-
Add plies to the marker.

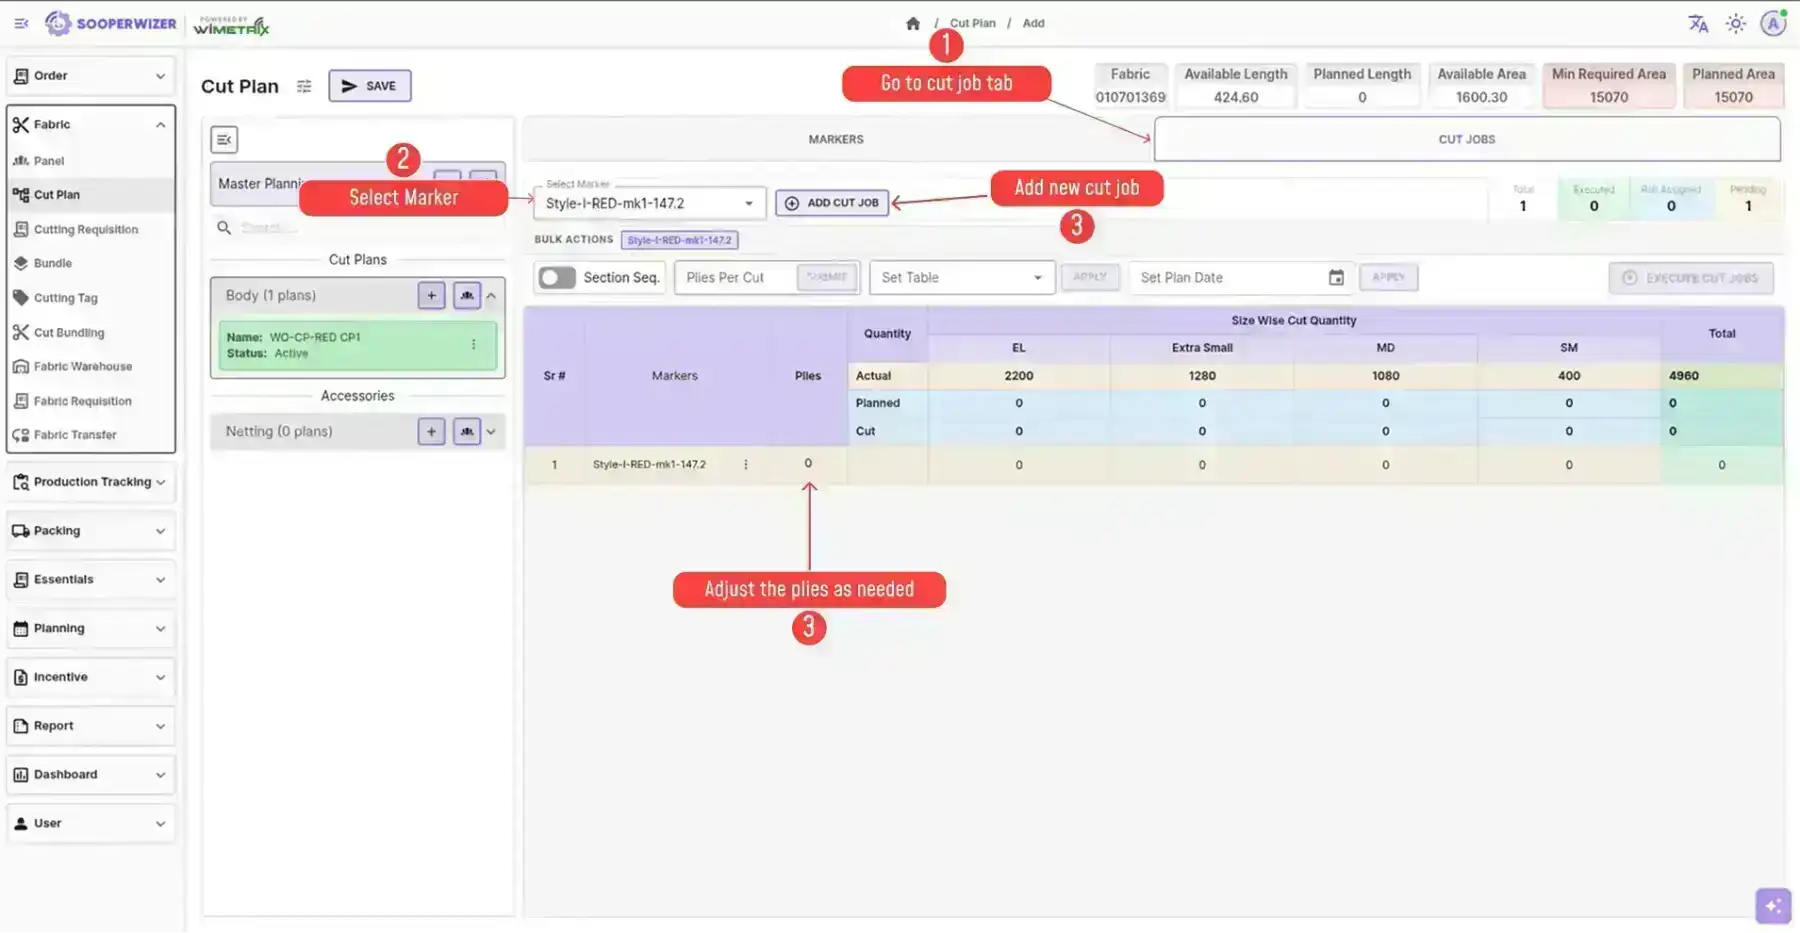
Adding Cut Jobs
Section titled “Adding Cut Jobs”Cut Jobs are the individual cutting tasks derived from a marker, executed on the cutting floor.
- Go to the Cut Job section.
- Select the marker you want to generate cut jobs from.
- Click the add button — a cut job will be created with 0 plies. Adjust the plies and add more cut jobs as needed.
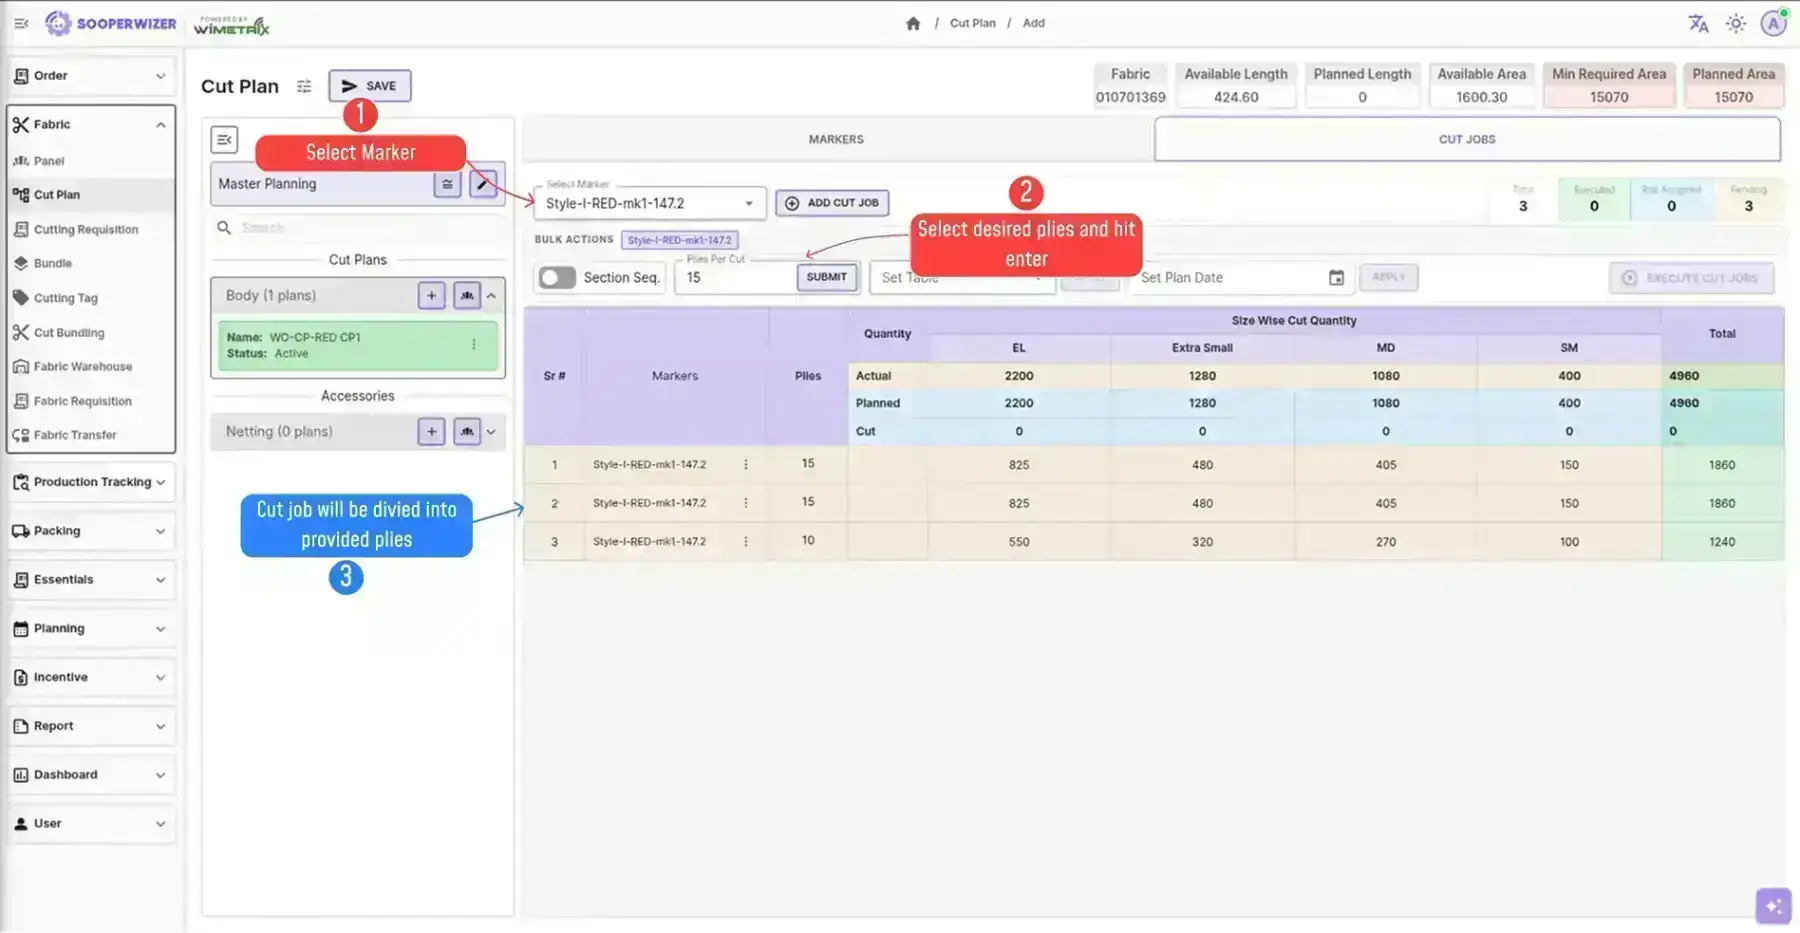
Cut Jobs can also be generated automatically for all markers at once:
- Got to the shared actions section at the top of the cut job tab.
- Enter the maximum plies per cut job.
- Click Generate — cut jobs will be created for every marker in the plan.
Submitting a Cut Plan
Section titled “Submitting a Cut Plan”Once all markers and cut jobs are finalized, the cut plan can be submitted. The system runs validation before accepting the submission — if any check fails, the submission is rejected.
Aborting a Cut Plan
Section titled “Aborting a Cut Plan”Aborting a cut plan permanently deactivates it. Once aborted, the plan can no longer be used or modified.
When a cut plan is aborted, the following changes take effect:
- The cut plan’s status is set to Aborted.
- All pending cut jobs under that cut plan are also set to Aborted.
-
In the left panel, locate the active cut plan you want to abort.
-
Click the action icon (⋮) in the top-right corner of the plan card.
-
Select Abort Cut Plan from the dropdown menu.
-
A confirmation prompt will appear — click Confirm to proceed.