Getting Started
This documentation is intended to serve as the place to record the processes, preferences, and code conventions used by the organization.
You can explore the documentation from the sidebar.
✍️ Contributing
Section titled “✍️ Contributing”The docs use Astro Starlight for documentation.
This doc will only cover the specifics of the WiMetrix docs, and not how Starlight works.
Read the Starlight docs to learn about how to use it.
The documents are written in MDX, an extension of markdown that supports JSX syntax and breaking files into logical chunks.
There are 2 ways to contribute new content to the docs:
-
Recommended
Use Visual Studio Code. - Live preview - Automatic formatting - Autocomplete and AI suggestions - Syntax highlighting - Spellcheck
-
Use a markdown GUI to create the document and then copy the contents to the
src/content/docsfolder.StackEdit is a web based markdown editor that can be used for this.
✅ Prerequisites
Section titled “✅ Prerequisites”Before setting up:
- Make sure you have access to the WiMetrix Sooperwizer repository on GitHub. The install script handles everything else.
🚀 Setup
Section titled “🚀 Setup”-
Clone the Sooperwizer monorepo.
Terminal window git clone https://github.com/WiMetrixDev/sooperwizer.gitcd sooperwizerOr download the repo from GitHub.
-
Run the install script to set up Git, Node.js, and pnpm.
Run the following command in the terminal:
Terminal window ./install.shRun the following command in an elevated command line:
Terminal window ./install.batOr
Right click on
./install.batand Run as Administrator. -
Install Visual Studio Code. (Download here)
-
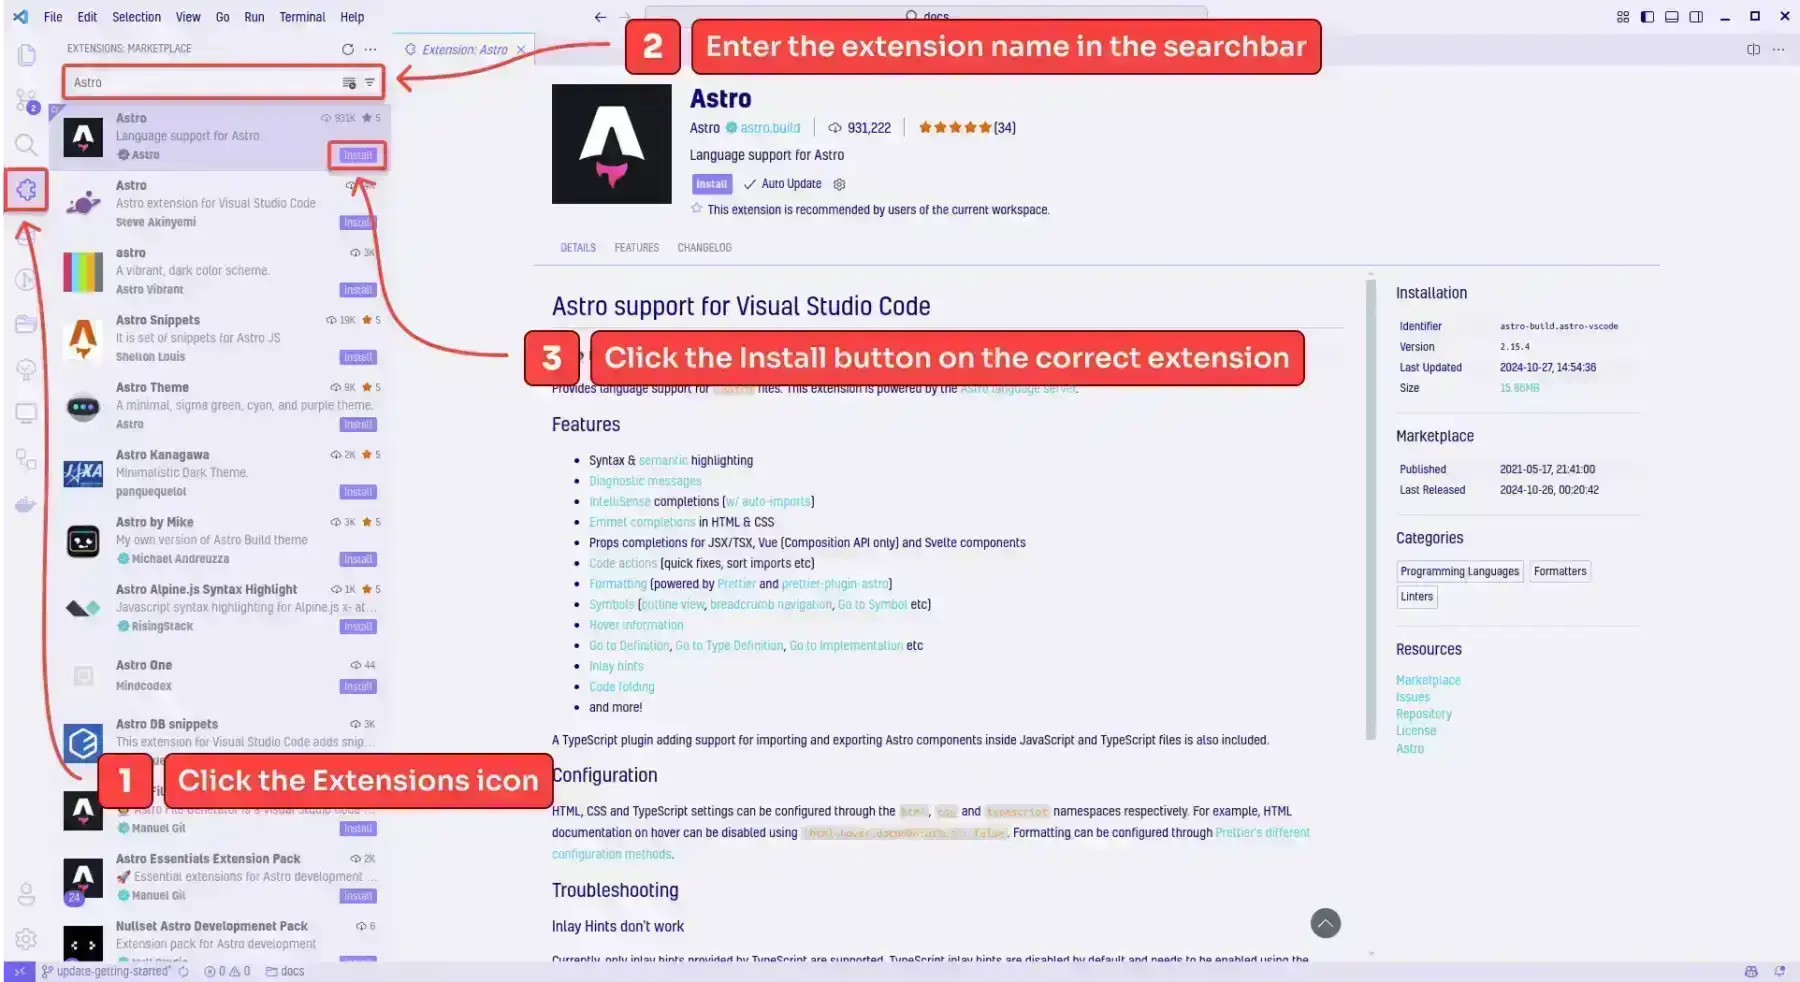
Install the following VSCode extensions:
-
Install project dependencies from the repo root.
Terminal window pnpm install -
Start the development server.
Terminal window cd apps/docspnpm devor
Terminal window pnpm dev:docs -
Open the site in your browser at
localhost:4321. Adding or updating documents should automatically show the changes in the browser.
🧞 Commands
Section titled “🧞 Commands”All commands are run from apps/docs/, unless noted otherwise:
| Command | Action |
|---|---|
pnpm install | Installs dependencies (run from repo root) |
pnpm dev | Starts local dev server at localhost:4321 |
pnpm build | Build your production site to ./dist/ |
pnpm preview | Preview your build locally, before deploying |
pnpm format | Format all files with Prettier |
pnpm spellcheck | Run spellcheck on the repo |
pnpm optimize-images | Convert and optimize all images in assets/ folders to WebP |
pnpm lint | Run format, spellcheck, astro validations, and image optimization |
pnpm astro ... | Run CLI commands like astro add, astro check |
pnpm astro -- --help | Get help using the Astro CLI |
📂 Folder Structure
Section titled “📂 Folder Structure”Directoryapps/
Directorydocs/
Directorypublic/
- …
Directorysrc/
Directoryassets/
- …
Directorycomponents/
- …
Directorystyles/
- …
- content.config.ts
Directorycontent/
Directorydocs/
- …
- …
- astro.config.ts
- sidebar.ts
- package.json
- tsconfig.json
- …
Starlight picks up .md or .mdx files in the src/content/docs/ directory.
Images and other assets can be colocated in the same folder as the .md or .mdx file, and linked using a relative path.
Shared assets (used by multiple docs) can be added to src/assets/.
Static assets, like favicons or pdf files, are placed in the public/ directory.
While the content folder structure and file names are not enforced, consistent structure makes content easier to navigate and find.
📄 Naming conventions
Section titled “📄 Naming conventions”It is recommended to follow the following conventions:
- Use kebab-case for file and folder names
- Use lowercase alphabet.
- Use dashes
-to separate words in file names.
- Folder structure should correspond to the content hierarchy.
- Create a folder for each page, to colocate assets.
- Store page assets in the
assetsfolder inside the page folder. - File names should match the page’s url slug.
- Exception: section index files (file name = parent folder name, e.g.
products/spts/spts.mdx) use the parent folder path as the slug (products/spts), not the full file path.
- Exception: section index files (file name = parent folder name, e.g.
- Add the page to the sidebar by updating the
./sidebar.tsfile
📝 Adding Content
Section titled “📝 Adding Content”Content is stored in the src/content/docs directory as markdown files.
Each mdx has metadata at the top of the file, which is used to generate the page.
Common metadata includes:
title: The title of the page.description: A short description of the page.slug: The URL of the page.sidebar(optional): Overrides the default sidebar setting for the page.sidebar.label: The label to display in the sidebar.titleis used by default. Only pass if the label is different from the title
For example, when creating reference for a module named Bar of the Foo product, do the following:
-
Create a folder at
src/content/docs/products/foo/bar(Create any folder in the path that doesn’t exist).
-
Create a file called
bar.mdxin the new folder. -
Add the metadata to the top of the file.
---title: "Bar Module"description: Overview of the Bar module of the Foo Productsidebar: { label: "Bar" }slug: products/foo/bar--- -
Add the page to the sidebar in
./sidebar.tsSidebar entries can be route path strings, or detailed config objects. Check the starlight docs for more info.
export const sidebar = [...{label: "Products",collapsed: true,items: [...{label: "Foo",collapsed: true,items: ["products/foo","products/foo/bar",],},],},]; -
The page should show in the sidebar. You can now add content to the page.
🔤 Spell Checking
Section titled “🔤 Spell Checking”The Code Spell Checker VSCode extension will underline words it doesn’t recognize.
If the flagged word is a valid technical term, product name, or acronym used by WiMetrix, add it to the words array in cspell.json at the root of the repository (not inside apps/docs/).
This can also be done via suggest edits in VSCode.
{ "words": [ ... "YourNewWord" ]}🏗️ Assets
Section titled “🏗️ Assets”Like stated above, images and other assets should be colocated in the same folder as the content file, and linked using a relative path.
If an asset needs to be referenced from multiple places, it should be added to src/assets/.
Before committing images, run the optimize script to convert them to WebP and reduce size:
pnpm optimize-imagesThis will:
- Convert all images in
assets/folders (PNG, JPG, JPEG, GIF, AVIF) to WebP at 60% quality - Scale any image wider than 1800px down to 1800px, preserving aspect ratio
- Update all MDX references to the converted filenames automatically
To also convert existing WebP files (e.g. to re-optimize them), pass --include-webp:
pnpm optimize-images --include-webpMermaid Diagrams
Section titled “Mermaid Diagrams”Mermaid diagrams are supported natively, and can be added in a markdown codeblock directly.
Example:
```mermaid%%{ init: {"theme": "forest"} }%%
flowchart TD    A[Node A] -->|A to B| B{Node B}```
This will be rendered as:
%3b%7d%23mermaid-0 .cluster rect%7bfill:%23cdffb2%3bstroke:%236eaa49%3bstroke-width:1px%3b%7d%23mermaid-0 .cluster text%7bfill:%23333%3b%7d%23mermaid-0 .cluster span%7bcolor:%23333%3b%7d%23mermaid-0 div.mermaidTooltip%7bposition:absolute%3btext-align:center%3bmax-width:200px%3bpadding:2px%3bfont-family:arial%2csans-serif%3bfont-size:12px%3bbackground:hsl(78.1578947368%2c 58.4615384615%25%2c 84.5098039216%25)%3bborder:1px solid %236eaa49%3bborder-radius:2px%3bpointer-events:none%3bz-index:100%3b%7d%23mermaid-0 .flowchartTitleText%7btext-anchor:middle%3bfont-size:18px%3bfill:black%3b%7d%23mermaid-0 rect.text%7bfill:none%3bstroke-width:0%3b%7d%23mermaid-0 .icon-shape%2c%23mermaid-0 .image-shape%7bbackground-color:%23e8e8e8%3btext-align:center%3b%7d%23mermaid-0 .icon-shape p%2c%23mermaid-0 .image-shape p%7bbackground-color:%23e8e8e8%3bpadding:2px%3b%7d%23mermaid-0 .icon-shape .label rect%2c%23mermaid-0 .image-shape .label rect%7bopacity:0.5%3bbackground-color:%23e8e8e8%3bfill:%23e8e8e8%3b%7d%23mermaid-0 .label-icon%7bdisplay:inline-block%3bheight:1em%3boverflow:visible%3bvertical-align:-0.125em%3b%7d%23mermaid-0 .node .label-icon path%7bfill:currentColor%3bstroke:revert%3bstroke-width:revert%3b%7d%23mermaid-0 .node .neo-node%7bstroke:%2313540c%3b%7d%23mermaid-0 %5bdata-look='neo'%5d.node rect%2c%23mermaid-0 %5bdata-look='neo'%5d.cluster rect%2c%23mermaid-0 %5bdata-look='neo'%5d.node polygon%7bstroke:url(%23mermaid-0-gradient)%3bfilter:drop-shadow( 1px 2px 2px rgba(185%2c185%2c185%2c0.5))%3b%7d%23mermaid-0 %5bdata-look='neo'%5d.node path%7bstroke:url(%23mermaid-0-gradient)%3bstroke-width:1px%3b%7d%23mermaid-0 %5bdata-look='neo'%5d.node .outer-path%7bfilter:drop-shadow( 1px 2px 2px rgba(185%2c185%2c185%2c0.5))%3b%7d%23mermaid-0 %5bdata-look='neo'%5d.node .neo-line path%7bstroke:%2313540c%3bfilter:none%3b%7d%23mermaid-0 %5bdata-look='neo'%5d.node circle%7bstroke:url(%23mermaid-0-gradient)%3bfilter:drop-shadow( 1px 2px 2px rgba(185%2c185%2c185%2c0.5))%3b%7d%23mermaid-0 %5bdata-look='neo'%5d.node circle .state-start%7bfill:black%3b%7d%23mermaid-0 %5bdata-look='neo'%5d.icon-shape .icon%7bfill:url(%23mermaid-0-gradient)%3bfilter:drop-shadow( 1px 2px 2px rgba(185%2c185%2c185%2c0.5))%3b%7d%23mermaid-0 %5bdata-look='neo'%5d.icon-shape .icon-neo path%7bstroke:url(%23mermaid-0-gradient)%3bfilter:drop-shadow( 1px 2px 2px rgba(185%2c185%2c185%2c0.5))%3b%7d%23mermaid-0 :root%7b--mermaid-font-family:arial%2csans-serif%3b%7d%3c/style%3e%3cg%3e%3cmarker id='mermaid-0_flowchart-v2-pointEnd' class='marker flowchart-v2' viewBox='0 0 10 10' refX='5' refY='5' markerUnits='userSpaceOnUse' markerWidth='8' markerHeight='8' orient='auto'%3e%3cpath d='M 0 0 L 10 5 L 0 10 z' class='arrowMarkerPath' style='stroke-width: 1%3b stroke-dasharray: 1%2c 0%3b'/%3e%3c/marker%3e%3cmarker id='mermaid-0_flowchart-v2-pointStart' class='marker flowchart-v2' viewBox='0 0 10 10' refX='4.5' refY='5' markerUnits='userSpaceOnUse' markerWidth='8' markerHeight='8' orient='auto'%3e%3cpath d='M 0 5 L 10 10 L 10 0 z' class='arrowMarkerPath' style='stroke-width: 1%3b stroke-dasharray: 1%2c 0%3b'/%3e%3c/marker%3e%3cmarker id='mermaid-0_flowchart-v2-pointEnd-margin' class='marker flowchart-v2' viewBox='0 0 11.5 14' refX='11.5' refY='7' markerUnits='userSpaceOnUse' markerWidth='10.5' markerHeight='14' orient='auto'%3e%3cpath d='M 0 0 L 11.5 7 L 0 14 z' class='arrowMarkerPath' style='stroke-width: 0%3b stroke-dasharray: 1%2c 0%3b'/%3e%3c/marker%3e%3cmarker id='mermaid-0_flowchart-v2-pointStart-margin' class='marker flowchart-v2' viewBox='0 0 11.5 14' refX='1' refY='7' markerUnits='userSpaceOnUse' markerWidth='11.5' markerHeight='14' orient='auto'%3e%3cpolygon points='0%2c7 11.5%2c14 11.5%2c0' class='arrowMarkerPath' style='stroke-width: 0%3b stroke-dasharray: 1%2c 0%3b'/%3e%3c/marker%3e%3cmarker id='mermaid-0_flowchart-v2-circleEnd' class='marker flowchart-v2' viewBox='0 0 10 10' refX='11' refY='5' markerUnits='userSpaceOnUse' markerWidth='11' markerHeight='11' orient='auto'%3e%3ccircle cx='5' cy='5' r='5' class='arrowMarkerPath' style='stroke-width: 1%3b stroke-dasharray: 1%2c 0%3b'/%3e%3c/marker%3e%3cmarker id='mermaid-0_flowchart-v2-circleStart' class='marker flowchart-v2' viewBox='0 0 10 10' refX='-1' refY='5' markerUnits='userSpaceOnUse' markerWidth='11' markerHeight='11' orient='auto'%3e%3ccircle cx='5' cy='5' r='5' class='arrowMarkerPath' style='stroke-width: 1%3b stroke-dasharray: 1%2c 0%3b'/%3e%3c/marker%3e%3cmarker id='mermaid-0_flowchart-v2-circleEnd-margin' class='marker flowchart-v2' viewBox='0 0 10 10' refY='5' refX='12.25' markerUnits='userSpaceOnUse' markerWidth='14' markerHeight='14' orient='auto'%3e%3ccircle cx='5' cy='5' r='5' class='arrowMarkerPath' style='stroke-width: 0%3b stroke-dasharray: 1%2c 0%3b'/%3e%3c/marker%3e%3cmarker id='mermaid-0_flowchart-v2-circleStart-margin' class='marker flowchart-v2' viewBox='0 0 10 10' refX='-2' refY='5' markerUnits='userSpaceOnUse' markerWidth='14' markerHeight='14' orient='auto'%3e%3ccircle cx='5' cy='5' r='5' class='arrowMarkerPath' style='stroke-width: 0%3b stroke-dasharray: 1%2c 0%3b'/%3e%3c/marker%3e%3cmarker id='mermaid-0_flowchart-v2-crossEnd' class='marker cross flowchart-v2' viewBox='0 0 11 11' refX='12' refY='5.2' markerUnits='userSpaceOnUse' markerWidth='11' markerHeight='11' orient='auto'%3e%3cpath d='M 1%2c1 l 9%2c9 M 10%2c1 l -9%2c9' class='arrowMarkerPath' style='stroke-width: 2%3b stroke-dasharray: 1%2c 0%3b'/%3e%3c/marker%3e%3cmarker id='mermaid-0_flowchart-v2-crossStart' class='marker cross flowchart-v2' viewBox='0 0 11 11' refX='-1' refY='5.2' markerUnits='userSpaceOnUse' markerWidth='11' markerHeight='11' orient='auto'%3e%3cpath d='M 1%2c1 l 9%2c9 M 10%2c1 l -9%2c9' class='arrowMarkerPath' style='stroke-width: 2%3b stroke-dasharray: 1%2c 0%3b'/%3e%3c/marker%3e%3cmarker id='mermaid-0_flowchart-v2-crossEnd-margin' class='marker cross flowchart-v2' viewBox='0 0 15 15' refX='17.7' refY='7.5' markerUnits='userSpaceOnUse' markerWidth='12' markerHeight='12' orient='auto'%3e%3cpath d='M 1%2c1 L 14%2c14 M 1%2c14 L 14%2c1' class='arrowMarkerPath' style='stroke-width: 2.5%3b'/%3e%3c/marker%3e%3cmarker id='mermaid-0_flowchart-v2-crossStart-margin' class='marker cross flowchart-v2' viewBox='0 0 15 15' refX='-3.5' refY='7.5' markerUnits='userSpaceOnUse' markerWidth='12' markerHeight='12' orient='auto'%3e%3cpath d='M 1%2c1 L 14%2c14 M 1%2c14 L 14%2c1' class='arrowMarkerPath' style='stroke-width: 2.5%3b stroke-dasharray: 1%2c 0%3b'/%3e%3c/marker%3e%3cg class='root'%3e%3cg class='clusters'/%3e%3cg class='edgePaths'%3e%3cpath d='M64.242%2c62L64.242%2c68.167C64.242%2c74.333%2c64.242%2c86.667%2c64.242%2c98.333C64.242%2c110%2c64.242%2c121%2c64.242%2c126.5L64.242%2c132' id='mermaid-0-L_A_B_0' class='edge-thickness-normal edge-pattern-solid edge-thickness-normal edge-pattern-solid flowchart-link' style='%3b' data-edge='true' data-et='edge' data-id='L_A_B_0' data-points='W3sieCI6NjQuMjQyMTg3NSwieSI6NjJ9LHsieCI6NjQuMjQyMTg3NSwieSI6OTl9LHsieCI6NjQuMjQyMTg3NSwieSI6MTM2fV0=' data-look='classic' marker-end='url(%23mermaid-0_flowchart-v2-pointEnd)'/%3e%3c/g%3e%3cg class='edgeLabels'%3e%3cg class='edgeLabel' transform='translate(64.2421875%2c 99)'%3e%3cg class='label' data-id='L_A_B_0' transform='translate(-21.3515625%2c -12)'%3e%3cforeignObject width='42.703125' height='24'%3e%3cdiv xmlns='http://www.w3.org/1999/xhtml' class='labelBkg' style='display: table-cell%3b white-space: nowrap%3b line-height: 1.5%3b max-width: 200px%3b text-align: center%3b'%3e%3cspan class='edgeLabel'%3e%3cp%3eA to B%3c/p%3e%3c/span%3e%3c/div%3e%3c/foreignObject%3e%3c/g%3e%3c/g%3e%3c/g%3e%3cg class='nodes'%3e%3cg class='node default' id='mermaid-0-flowchart-A-0' data-look='classic' transform='translate(64.2421875%2c 35)'%3e%3crect class='basic label-container' style='' x='-56.2421875' y='-27' width='112.484375' height='54'/%3e%3cg class='label' style='' transform='translate(-26.2421875%2c -12)'%3e%3crect/%3e%3cforeignObject width='52.484375' height='24'%3e%3cdiv xmlns='http://www.w3.org/1999/xhtml' style='display: table-cell%3b white-space: nowrap%3b line-height: 1.5%3b max-width: 200px%3b text-align: center%3b'%3e%3cspan class='nodeLabel'%3e%3cp%3eNode A%3c/p%3e%3c/span%3e%3c/div%3e%3c/foreignObject%3e%3c/g%3e%3c/g%3e%3cg class='node default' id='mermaid-0-flowchart-B-1' data-look='classic' transform='translate(64.2421875%2c 189.6875)'%3e%3cpolygon points='53.6875%2c0 107.375%2c-53.6875 53.6875%2c-107.375 0%2c-53.6875' class='label-container' transform='translate(-53.1875%2c 53.6875)'/%3e%3cg class='label' style='' transform='translate(-26.6875%2c -12)'%3e%3crect/%3e%3cforeignObject width='53.375' height='24'%3e%3cdiv xmlns='http://www.w3.org/1999/xhtml' style='display: table-cell%3b white-space: nowrap%3b line-height: 1.5%3b max-width: 200px%3b text-align: center%3b'%3e%3cspan class='nodeLabel'%3e%3cp%3eNode B%3c/p%3e%3c/span%3e%3c/div%3e%3c/foreignObject%3e%3c/g%3e%3c/g%3e%3c/g%3e%3c/g%3e%3c/g%3e%3cdefs%3e%3cfilter id='mermaid-0-drop-shadow' height='130%25' width='130%25'%3e%3cfeDropShadow dx='4' dy='4' stdDeviation='0' flood-opacity='0.06' flood-color='black'/%3e%3c/filter%3e%3c/defs%3e%3cdefs%3e%3cfilter id='mermaid-0-drop-shadow-small' height='150%25' width='150%25'%3e%3cfeDropShadow dx='2' dy='2' stdDeviation='0' flood-opacity='0.06' flood-color='black'/%3e%3c/filter%3e%3c/defs%3e%3clinearGradient id='mermaid-0-gradient' gradientUnits='objectBoundingBox' x1='0%25' y1='0%25' x2='100%25' y2='0%25'%3e%3cstop offset='0%25' stop-color='hsl(78.1578947368%2c 18.4615384615%25%2c 64.5098039216%25)' stop-opacity='1'/%3e%3cstop offset='100%25' stop-color='hsl(98.961038961%2c 60%25%2c 74.9019607843%25)' stop-opacity='1'/%3e%3c/linearGradient%3e%3c/svg%3e)
Generating Mermaid ERD from DB
Section titled “Generating Mermaid ERD from DB”Mermerd is used to automatically generate ERDs from DB tables.
ERD is generated as a Mermaid diagram in a markdown file.
The script at db/gen-erd.sh is used to generate the file.
While complex and large ERD diagrams may not be suitable for automatic generation due to the size of the diagram, simpler diagrams can be generated automatically.
-
Create a config file in the
dbfolder.The config file should be named after the ERD file, and end with
.yaml.For example, if the ERD file is named
carton-audit.md, the config file should be namedcarton-audit.yaml. -
Add a script to
package.jsonthat invokes thegen-erd.shscript.- Generate the erd file in the same folder as the content file.
- The generated
.mdfilename should be prefixed with and underscore (_). This will make sure Starlight will not pick it up as a content file.
{..."scripts": {..."gen:erd:<name>": "./db/gen-erd.sh ./db/<name>.yaml <output-path>.md",}} -
Run the script to generate the file.
Terminal window pnpm gen:erd:<name> -
Link the generated file in the content file.
The file must be an
.mdxfile, and not a.mdfile.import Erd from "<path>.md";<Erd />
Creating Screenshots and Diagrams
Section titled “Creating Screenshots and Diagrams”Screenshots and diagrams can be created using Figma.
Use this figma file to create diagrams and screenshots.
📥 Generating PDF
Section titled “📥 Generating PDF”Starlight to PDF is used to generate PDF files from the content pages.
-
Add a script file to the
pdffolder.The script is a
mjsfile.Use the
generatePdffunction from thepdf/pdf.mjsfile.The function takes the following parameters:
-
path: The base route path of the docs website.(
productsmeanshttps://docs.wimetrix.com/productswill be the base path) -
fileName: The path of the output pdf file. -
depth: An optional number of levels to include in the PDF.Using depth of
2with pathproductsfor example meansproducts, andproducts/pack-and-shipwill be included, butproducts/spts/sewingwill be excluded.All matched routes are included if not provided.
-
routes: An optional array of route paths to include in the PDF.["guides", "guides/odoo"]will only include the routesguidesandguides/odoo. All other routes will be excluded.All matched routes are included if not provided.
import { generatePdf } from "./pdf.mjs";generatePdf({baseUrl: "https://docs.wimetrix.com",path: "products/foo",fileName: "foo",routes: ["products/foo", "products/foo/bar"],}); -
-
Add a script to the
package.jsonfile.{..."scripts": {..."gen:pdf:foo": "node ./pdf/gen-foo.mjs",}} -
Run the script to generate the PDF.
Terminal window pnpm gen:pdf:foo
🌿 Git Workflow
Section titled “🌿 Git Workflow”All changes must go through a pull request. Never commit directly to main.
Creating a branch
Section titled “Creating a branch”Create a new branch from main before making any changes.
git checkout maingit pullgit checkout -b feat-add-spts-sewingBranch naming:
feat-<description>— new content or new featurefix-<description>— corrections, typos, broken links- Use lowercase kebab-case throughout.
Committing changes
Section titled “Committing changes”Stage and commit your changes with a short, descriptive message.
git add .git commit -m "Add SPTS sewing module docs"Pushing changes to remote branch
Section titled “Pushing changes to remote branch”If this is your first time pushing to the remote branch, use the -u flag to set the upstream branch:
git push origin -u feat-add-spts-sewingIf you have already pushed, or the remote branch is already set:
git pushLinting for potential issues
Section titled “Linting for potential issues”Run the lint script before creating a pull request.
This will check for formatting, spelling, and incorrect link issues, and also convert images to WebP and optimize them.
pnpm lintIf the script reports any issue, resolve them.
If there are no issues reported, you can proceed with the pull request
Opening a pull request
Section titled “Opening a pull request”Then go to the repository on GitHub and
open a pull request against the main branch on GitHub.
For more information on how to open a pull request, see the GitHub docs.
Review process
Section titled “Review process”All pull requests are reviewed by the tech lead. Address any requested changes by pushing additional commits to the same branch. Once approved, the tech lead will merge the PR.