Cutting
This document serves as a reference for the implementation details and the flow of the Cutting Module.
Piece Status
Section titled “Piece Status”PieceStatus is a bitwise flag stored as a bigint in the database.
The bit mapping, from least to most significant, is as following:
| Bit | Status | Bit # | Value (decimal) |
|---|---|---|---|
| 1 | Synced | 0 | 1 |
| 2 | CardWritten | 1 | 2 |
| 3 | IssuedToSewing | 2 | 4 |
| 2 | Reserved | 3 | 8 |
| 2 | Reserved | 4 | 16 |
| 4 | Induction | 5 | 32 |
| 5 | SewingLastOperation | 6 | 64 |
| 6 | Reserved | 7 | 128 |
| 6 | QualityPass | 8 | 256 |
| 6 | Reserved | 9 | 512 |
| 7 | FinishingFirstOperation | 10 | 1024 |
| 7 | FinishingLastOperation | 11 | 2048 |
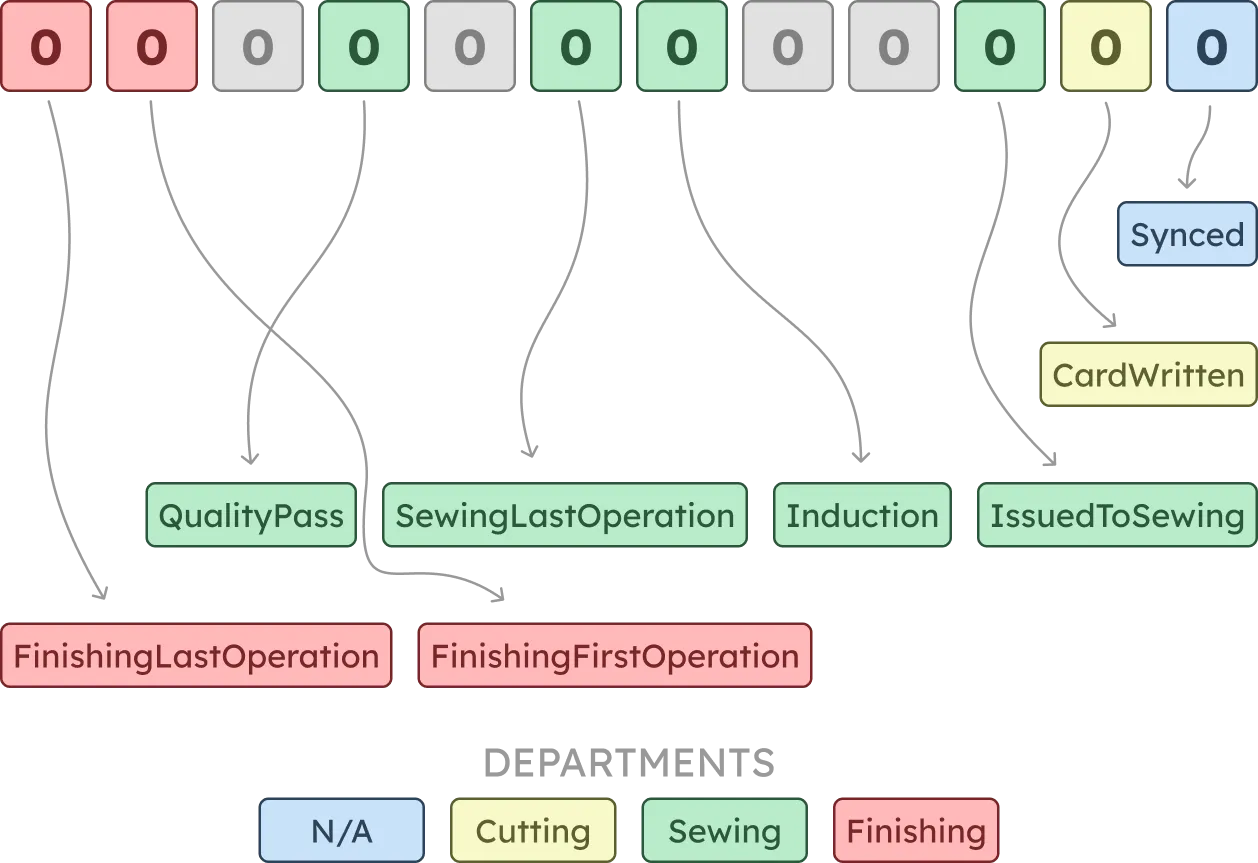
For example: A
PieceStatusof2343corresponds to a boolean of100100100111, which means the following operations have been performed on the piece:Synced,CardWritten,IssuedToSewing,Induction,QualityPass,FinishingLastOperation.
Checking if an operation has been performed can be done by simply checking if the corresponding bit is set to 1. This can be done by performing a bitwise AND operation between the PieceStatus and the operation’s value.
const sewingBit = 2;const sewingValue = BigInt(2 ** sewingBit); // 2^2 = 4const isIssuedToSewing = (PieceStatus & sewingValue) === sewingValue;Similarly, updating an operation can be done by performing a bitwise OR operation between the PieceStatus and the operation’s value.
const sewingBit = 2;const sewingValue = BigInt(2 ** sewingBit); // 2^2 = 4// PieceStatus updated to flip `IssuedToSewing` to `true`const updatedPieceStatus = PieceStatus | sewingValue;Cut Plan
Section titled “Cut Plan”The Overhauled Cut Plan module aims to provide a streamlined and efficient workflow for managing cutting plans, markers, cut jobs.
The module will provide a complete overview of the cutting process from a single page. This means that the UI needs to present a lot of information on a single screen.
As such, the module’s design is expected to go through several iterations. Please consider this document a work in progress.
The following data sheet serves as the basis for the reworked UI:
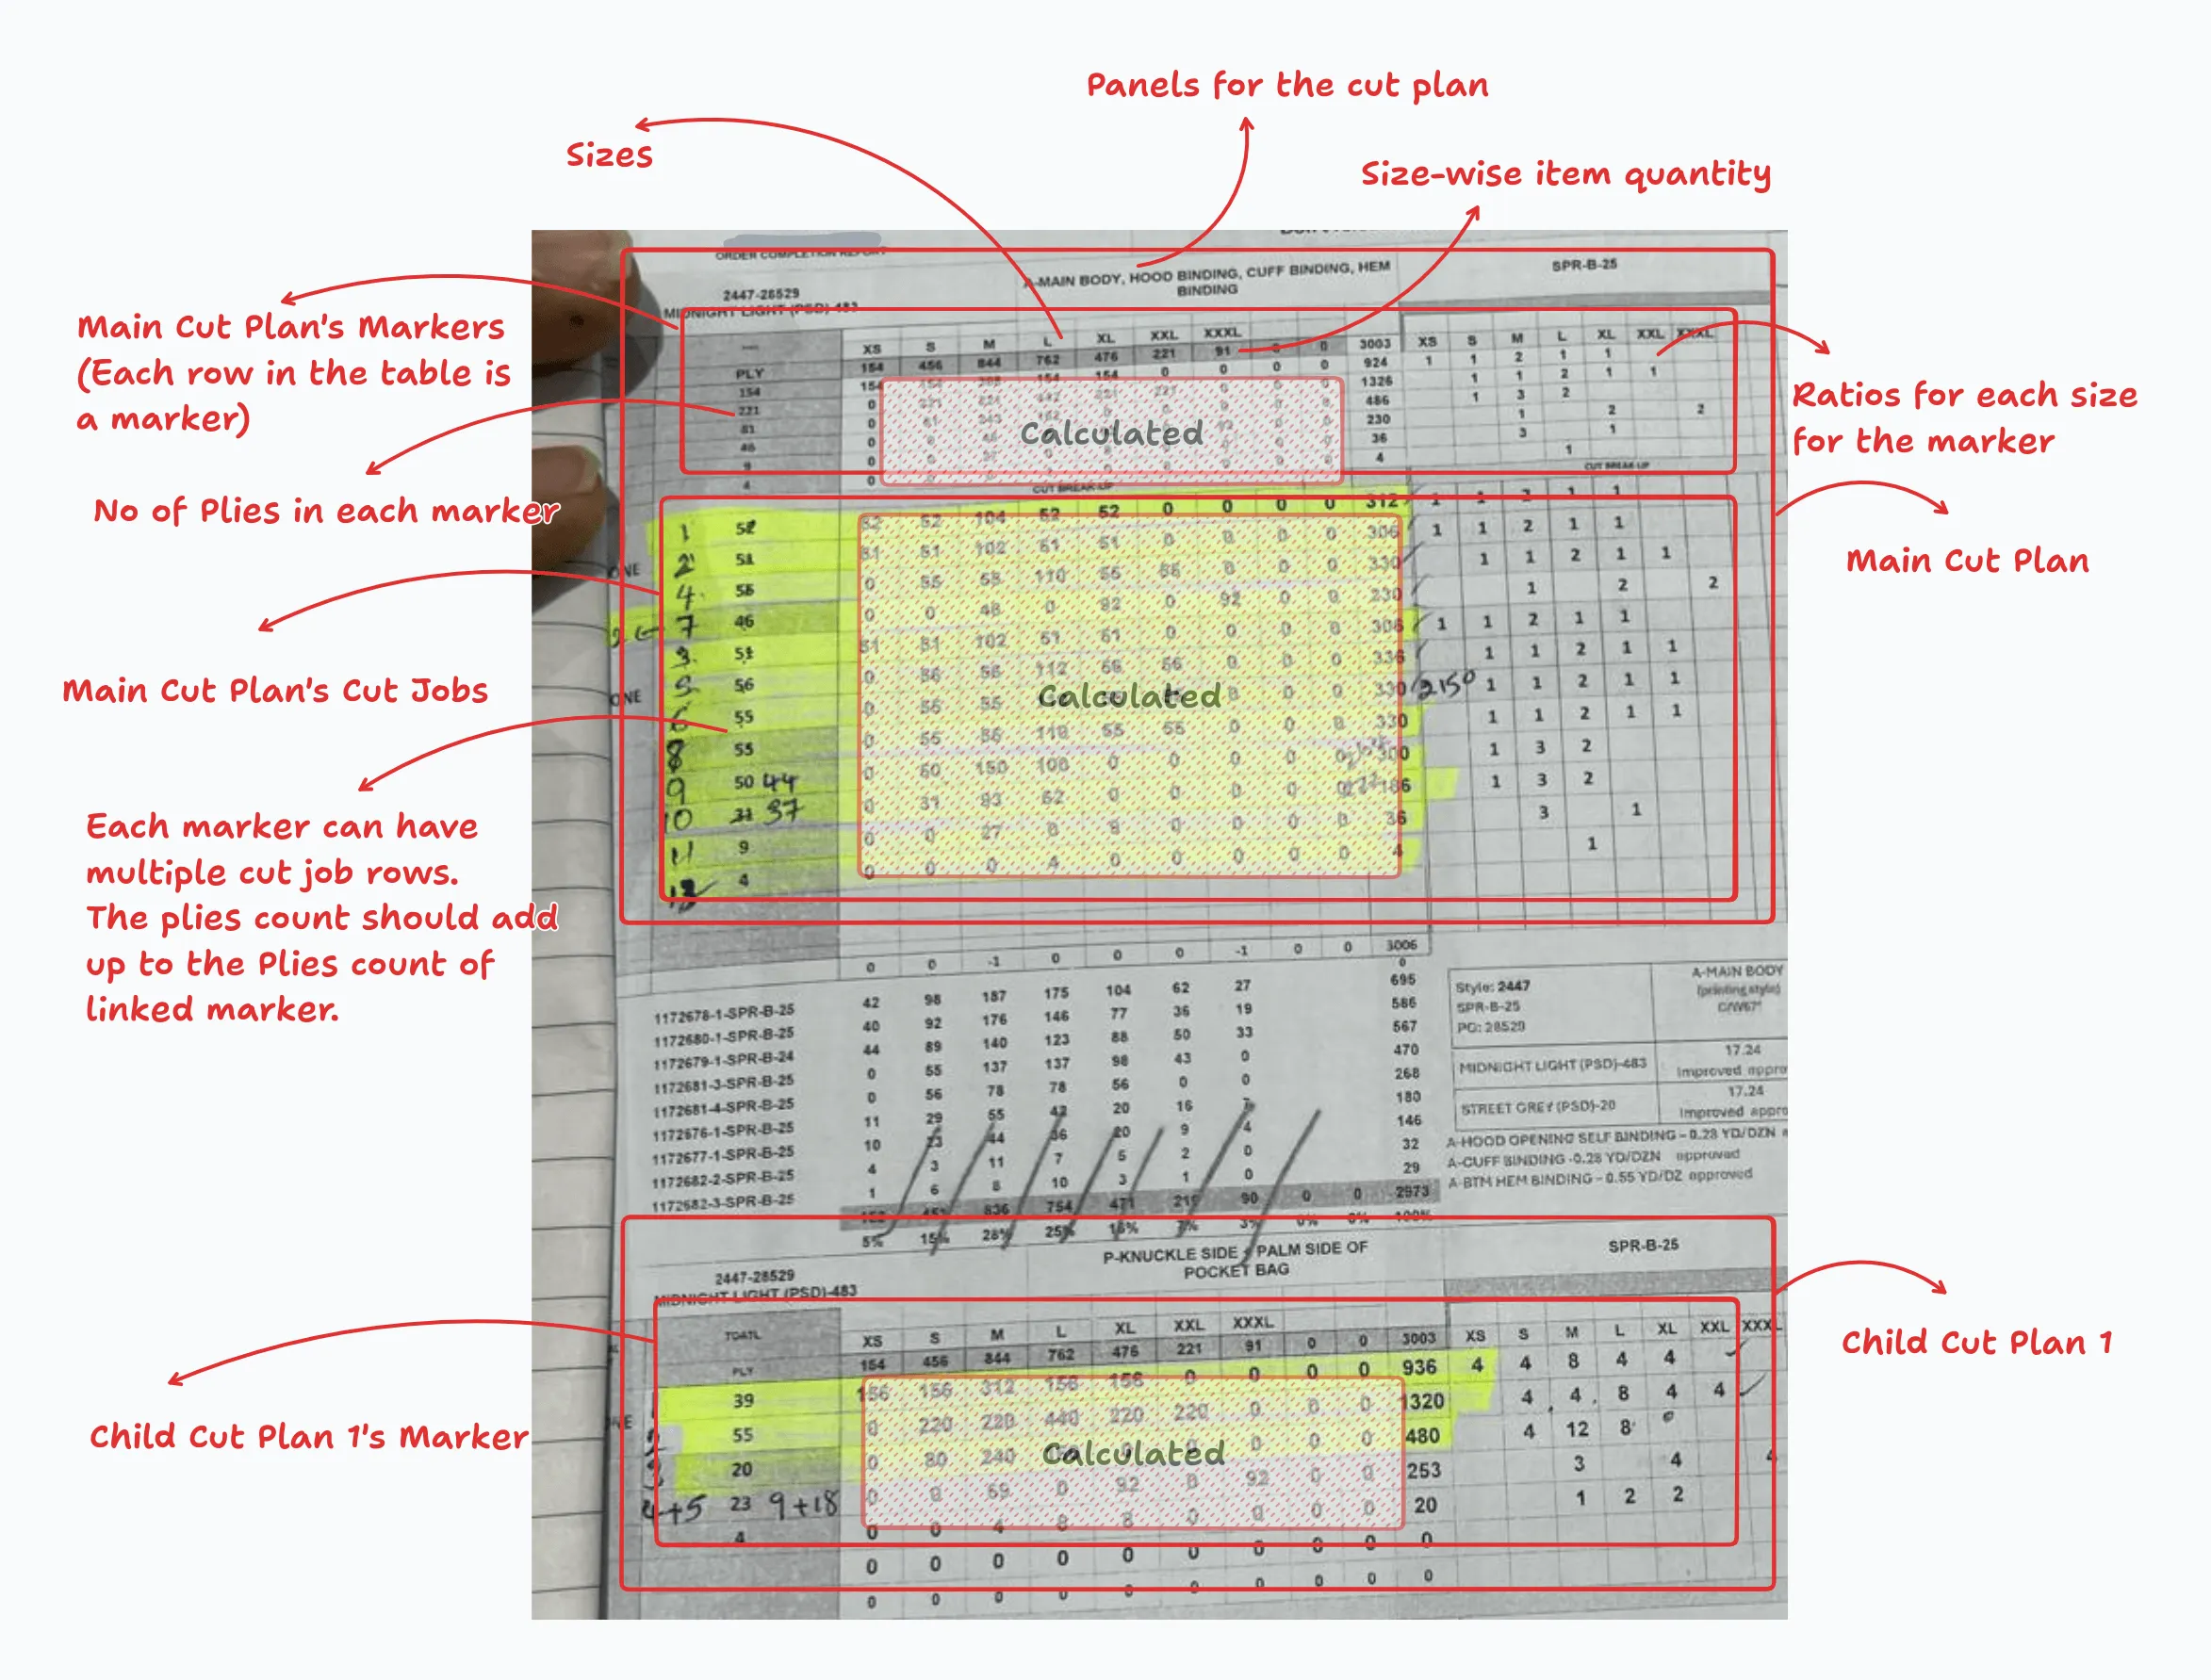
Overview
Section titled “Overview”- The user can create a main cut plan grouped by the following:
- Work Order
- Style No
- Buy Month
- Color Code
- Multiple child cut plans can be created for each main cut plan
- Child cut plans will be correctly linked to the main cut plan
- Each child cut plan can be created for a single work order
- Child plans will maintain their own cut jobs and markers
- Bundles and Pieces will only be generated for the main cut plan
- Select a Work Order
- Select a Style No
- (Optional) Select a Buy Month
- Select a Color Code
- A cut plan will be loaded if it exists
- If no cut plan exists, a new cut plan will be created
- Cut Plans can be updated as long as no part of it has been executed
- Add/Update the sizes to include in the current cut plan, and the quantities for each size
- Sizes and quantities will be loaded for the selections and populated as default but editable values
- A main cut plan will exist
- Main cut plan can not be deleted
- Add/Update the panels for the cut plan
- Add/Update the markers for the cut plan
- Each marker must have a no of plies
- Each marker must have a ratio for each selected size
- The cut quantity for the marker for each size will be calculated by multiplying the plies to the ratio
- Markers can be added, deleted, and reordered as long as they are not executed
- Each marker will show it’s execution status
- Define the cut jobs for each marker
- Marker’s cut jobs must match the plies entered for the marker
- Enter the no of plies for each marker
- Cut job can be added, deleted, and reordered as long as they are not executed
- Each cut job will be show it’s execution status
- Add the child cut plans as necessary.
- Repeat steps 7-9 for each child cut plan
- At any point in the the process, the cut plan can be saved to the database
UI Mockup
Section titled “UI Mockup”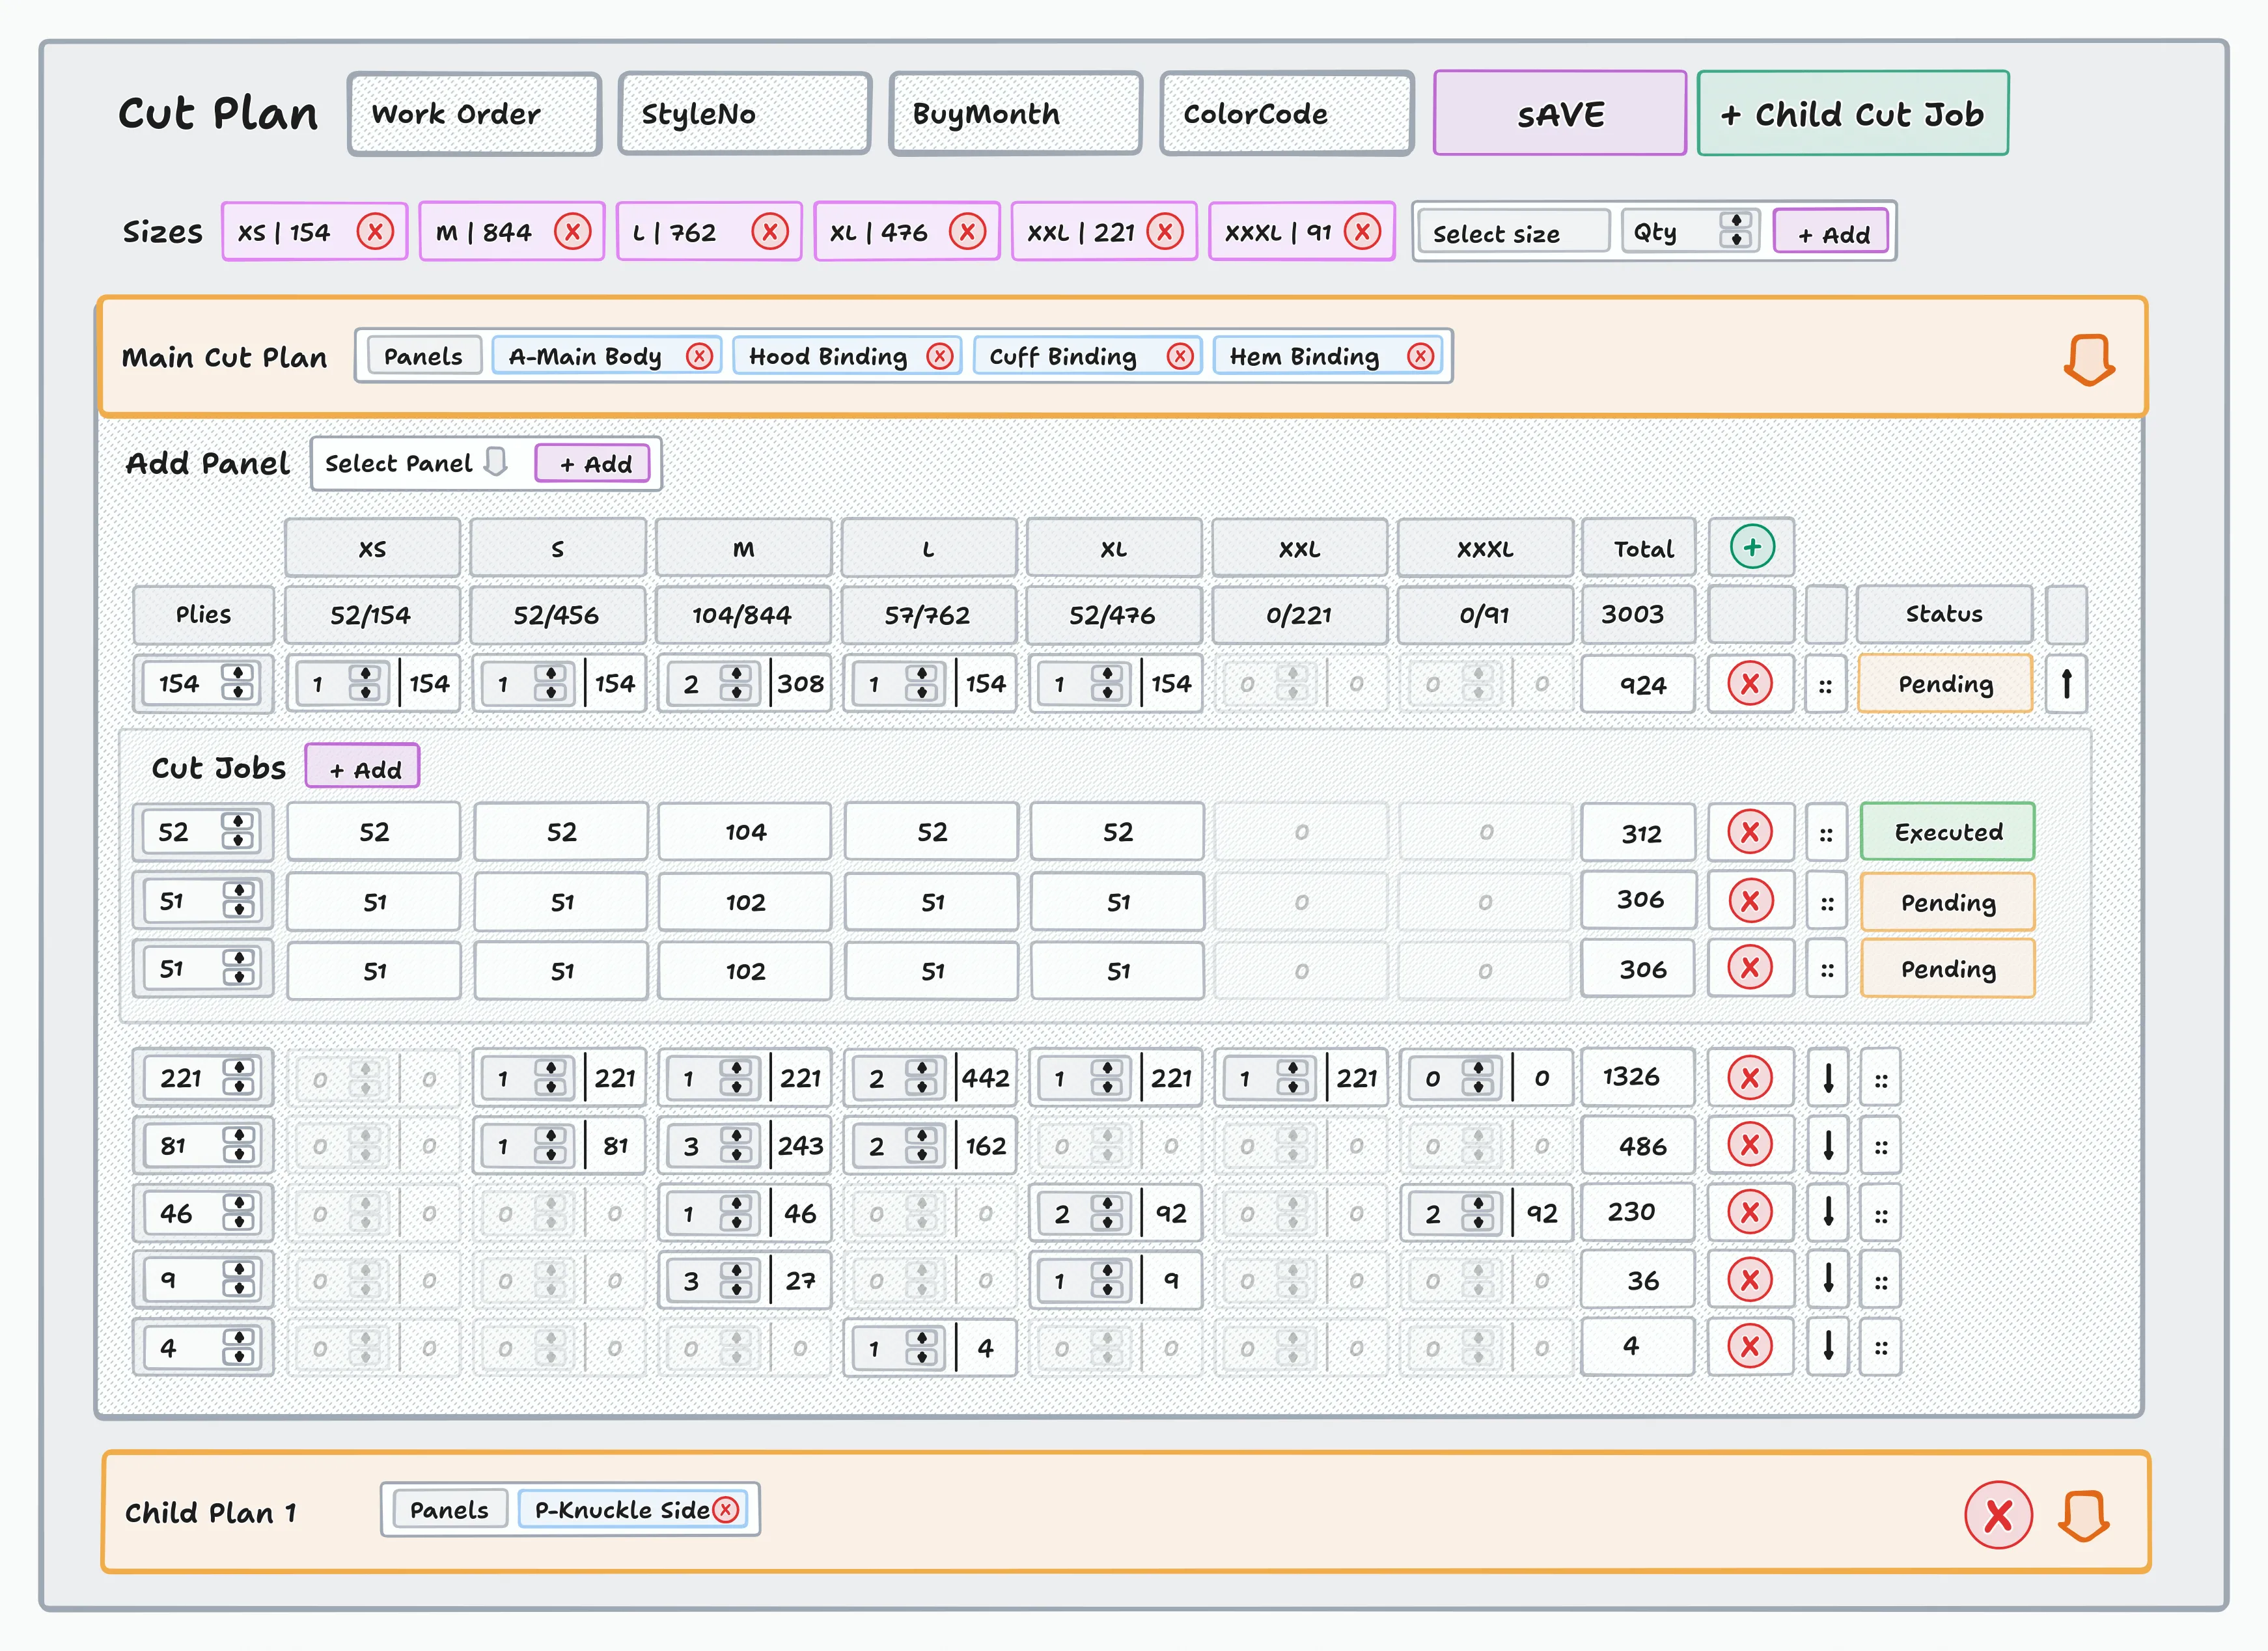
Card Writing
Section titled “Card Writing”Available to: admin erp cutting
Required Roles: spts:cut_report:get spts:cut_report:assign_tag
This module provides the ability to assign cards/tags to a bundle’s panels and pieces. A simple offline mode is implemented to retry any failed API requests after card printing.
Pre-Requisites
Section titled “Pre-Requisites”For a bundle to be available for card writing, the following conditions must be met:
- A card must not be assigned to all the bundle pieces
- In
PieceWiseCutReport,PieceStatusis less than3
- In
- At least one card printer must be connected
- The user must have the required permissions
- Select a Work Order to issue
- All bundle with its panels will be shown in the data table
- The bundles can be filtered by:
PO(multiple can be selected)CutNo(multiple can be selected)Panel(multiple can be selected)Bundle(multiple can be selected)- PieceStatus (
Synced,CardWritten,IssuedToSewing) - Scan status (
all,scanned,pending)
- Open card writing drawer
- Only bundles without cards will be shown
- If one ore more printers are connected, they will automatically be assigned in round-robin fashion
- Select the order of card writing
- Selecting
Panelwill print all the labels for one panel before moving to the next panel - Selecting
Bundlewill print all the labels for one bundle before moving to the next bundle - Updating the order will reassign printers automatically
- Selecting
- Make sure at least one printer is connected
- (Optional) Disable any printers that should not be used
- (Optional) Change the printer assignment if required
- Start printing
- Printing will start on each printer
- The screen will show the progress of the printing on each printer
- All the available printers will be shown at the top along with their progress and currently printed panel and any error on it
- When a panel finishes printing the Tag will be saved in local storage to be synced with the database and the next panel will start printing
- Printing finished when all panels are printed
- After printing finishes, close the print drawer
- The printed tags can be synced with the database by clicking the
Sync Card Writingbutton inCuttingmodule- The sync drawer will open
- Check
Skip Deleting Existing Groupto avoid deleting existing entries inPieceWiseGroupfor printed panels - Clicking on
Syncbutton will send the request to the backend to sync the tags- If
Skip Deleting Existing Groupis unchecked:- Delete existing entries in
PieceWiseGroupbyBundleID,CutBundleGarDtlID, andPieceID
- Delete existing entries in
- In
ScanGroup, Create a new entry - In
PieceWiseGroup, add an entry for eachBundleID,CutBundleGarDtlID, andPieceIDof the bundle with the newGroupID - In
Tag:- If the Tag doesn’t exist, add it
- If the Tag exists, update the
GroupID,extInfo, andTagCount
- In
PieceWiseCutReport, PieceStatus is updated to include theCardWrittenoperation
- If
Screenshots
Section titled “Screenshots”Work in progress
Line Assignment
Section titled “Line Assignment”Available to: admin erp cutting
Required Roles: spts:cut_report:get spts:cut_report:assign_line spts:factory:get
This module provides the ability to assign lines to a bundles and pieces.
Pre-Requisites
Section titled “Pre-Requisites”For a bundle to be available for line assignment, the following conditions must be met:
- A card must be assigned to all the bundle pieces
- The user must have the required permissions
- For bundles not yet issued to
Sewing, assignment is available to all groups listed above - For bundles already issued to
Sewing, assignment is not available tocuttinggroup users
- For bundles not yet issued to
- Select a Work Order to issue
- All bundle with its panels will be shown in the data table
- The bundles can be filtered by:
PO(multiple can be selected)CutNo(multiple can be selected)Panel(multiple can be selected)Bundle(multiple can be selected)- PieceStatus (
Synced,CardWritten,IssuedToSewing) - Scan status (
all,scanned,pending)
- Open assignment drawer
- (For reassignment) An error will be shown if the user is missing permissions
- A warning will be shown if not some bundle already have assignment
- For each bundle, select the
Lineto assign - Assign bundles to the line
- For each bundle piece, In
PieceWiseCutReport:LineIDis set to the selectedLine- If
OriginalLineIDisNULL, set it the selectedLine
- For each bundle piece, In
Screenshots
Section titled “Screenshots”Work in progress
Cutting Issuance
Section titled “Cutting Issuance”Available to: admin erp cutting
Required Roles: spts:cut_report:get spts:cut_report:issuance spts:factory:get
This module provides the ability to issue panels of a piece to different departments and track the progress.
The panels can be issued to the following departments from the Cutting department:
EmbroideryPrintingFusingSewing
Issuance to Sewing Department
Section titled “Issuance to Sewing Department”A bundle with all its pieces and panels can be issued to the Sewing department.
Pre-Requisites
Section titled “Pre-Requisites”For a bundle to be available for issuance, the following conditions must be met:
- A card must be assigned to all the bundle pieces
- In
PieceWiseCutReport,PieceStatusis3
- In
- All the bundle pieces must be in the cutting department
- In
PieceWiseCutReportall of the following must be true- Either
CuttingOutToEmbroideryDateisNULLorCuttingInFromEmbroideryDateis notNULL - Either
CuttingOutToPrintingDateisNULLorCuttingInFromPrintingDateis notNULL - Either
CuttingOutToFusingDateisNULLorCuttingInFromFusingDateis notNULL
- Either
- In
- Select a Work Order to issue
- All bundle with its panels will be shown in the data table
- The bundles can be filtered by:
PO(multiple can be selected)CutNo(multiple can be selected)Panel(multiple can be selected)Bundle(multiple can be selected)- PieceStatus (
Synced,CardWritten,IssuedToSewing) - Department (
N/A,Cutting,Embroidery,Printing,Fusing,Sewing)
- Scan status (
all,scanned,pending)
- Select
Cuttingas the current department - UHF Reader must be connected
- Start scanning panels with the 8-port UHF reader
- After all the panels are scanned, start sewing issuance
- All scanned bundles should be available for scanning
- A warning will be shown if not all panels of a bundle were scanned
- For each bundle, select the
Lineto issue to - Issue bundles to the department
- For each bundle piece, In
PieceWiseCutReport:CuttingOutToSewingDateis set to the current time stampLineIDis set to the selectedLine
IssuanceTypeis set toIssuedFromPortal- If
OriginalLineIDisNULL, set it the selectedLine PieceStatusis set to7
- For each bundle piece, In
Screenshots
Section titled “Screenshots”Work in progress
Panel Issuance to Embroidery, Printing or Fusing Departments
Section titled “Panel Issuance to Embroidery, Printing or Fusing Departments”Individual panels can be issued for processing.
The panels are processed and returned to the Cutting department.
Issuance to these departments can only happen while the piece is in the Cutting department.
Pre-Requisites
Section titled “Pre-Requisites”For a panel to be available for issuance, the following conditions must be met:
- A card must be assigned to the panel
- In
PieceWiseCutReport,PieceStatusis3
- In
- UHF Reader must be connected
- All piece panels must be in the cutting department
- In
PieceWiseCutReportall of the following must be true- Either
CuttingOutToEmbroideryDateisNULLorCuttingInFromEmbroideryDateis notNULL - Either
CuttingOutToPrintingDateisNULLorCuttingInFromPrintingDateis notNULL - Either
CuttingOutToFusingDateisNULLorCuttingInFromFusingDateis notNULL
- Either
- In
- Select a Work Order to issue
- All bundle with its panels will be shown in the data table
- The bundles can be filtered by:
PO(multiple can be selected)CutNo(multiple can be selected)Panel(multiple can be selected)Bundle(multiple can be selected)- PieceStatus (
Synced,CardWritten,IssuedToSewing) - Department (
N/A,Cutting,Embroidery,Printing,Fusing,Sewing) - Scan status (
all,scanned,pending)
- Select
Embroidery,Printing, orFusingas the current department - Issue Panels to the selected department
- Set Issuance Type to
IssueToDepartment- The list of panels will be filtered to only show the panels available
- Start scanning panels with the 8-port UHF reader
- After all the panels are scanned, Click on the Issue button
- Confirm the issuance in the dialog
- In
PieceWiseCutReport:CuttingOutTo{Department}Dateis set to the current time stamp${Department}InDate,${Department}OutDate, andCuttingInFrom{Department}Dateare set toNULL
- In
- Set Issuance Type to
- Receive Panels to the selected department
- Set Issuance Type to
ReceiveInDepartment- The list of panels will be filtered to only show the panels available
- Start scanning panels with the 8-port UHF reader
- After all the panels are scanned, Click on the Receive button
- Confirm the receiving in the dialog
- In
PieceWiseCutReport:{Department}InDateis set to the current time stamp - In
PiecePanelIssuanceLog: create a new entry for each piece corresponding to the panel
- In
- Set Issuance Type to
- Dispatch Panels from the selected department back to
Cutting- Set Issuance Type to
DispatchFromDepartment- The list of panels will be filtered to only show the panels available
- Start scanning panels with the 8-port UHF reader
- After all the panels are scanned, Click on the Dispatch button
- Confirm the dispatch in the dialog
- In
PieceWiseCutReport:{Department}OutDateis set to the current time stamp - In
PiecePanelIssuanceLog: Update theReceiveDatefor each pending entry in the log
- In
- Set Issuance Type to
- Receive Panels in
Cutting- Set Issuance Type to
ReceiveFromDepartment- The list of panels will be filtered to only show the panels available
- Start scanning panels with the 8-port UHF reader
- After all the panels are scanned, Click on the Receive button
- Confirm the dispatch in the dialog
- In
PieceWiseCutReport:CuttingInFrom{Department}Dateis set to the current time stamp
- In
- Set Issuance Type to
Screenshots
Section titled “Screenshots”Work in progress
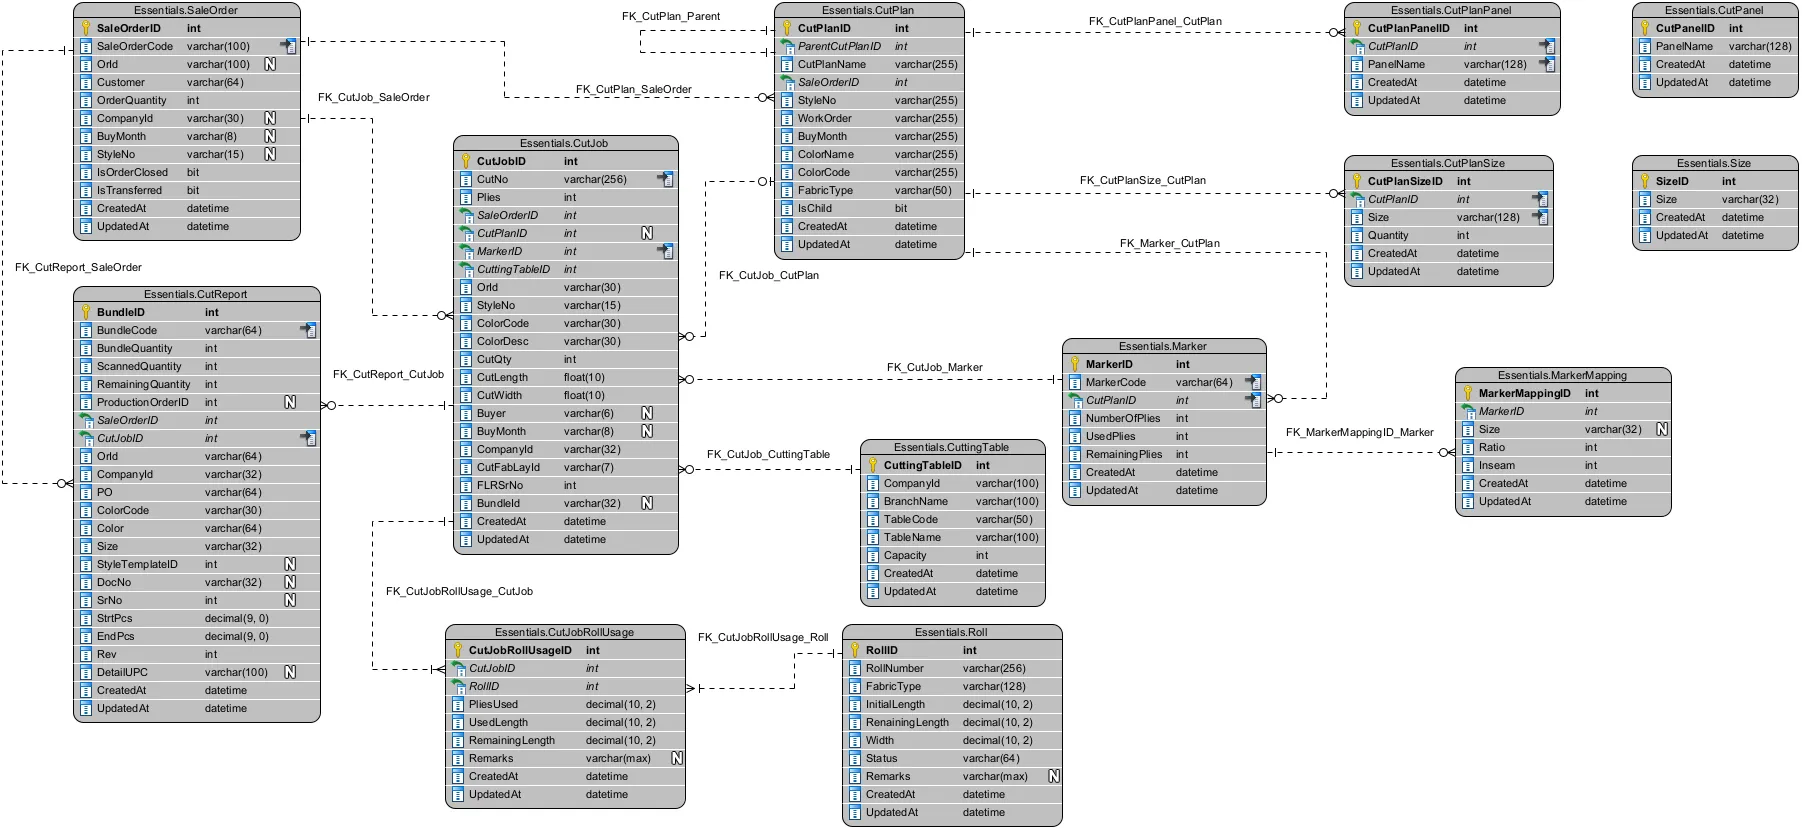
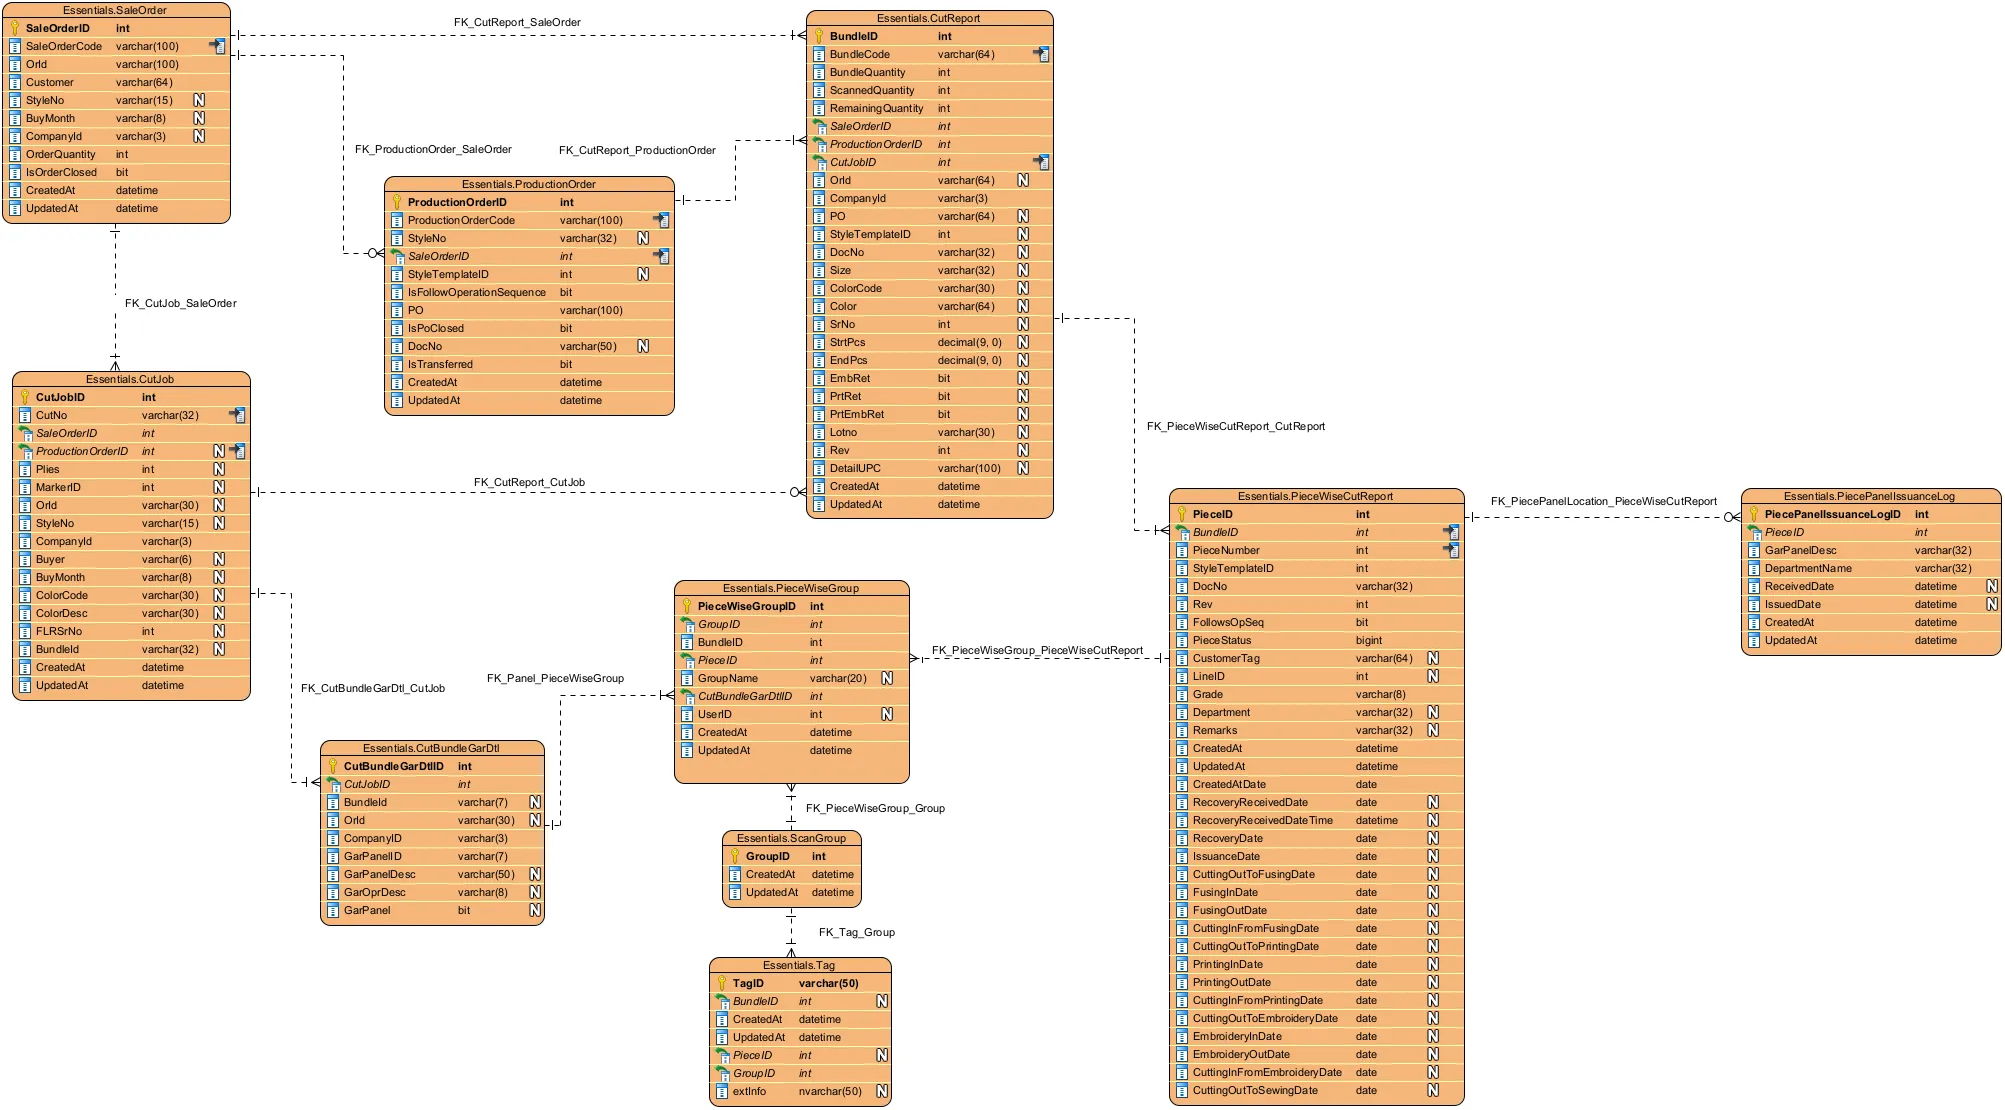
The following columns are shared by all tables and are therefore excluded:
CreatedAt,UpdatedAt,CreatedBy,UpdatedBy
