Cut Plan
The Overhauled Cut Plan module aims to provide a streamlined and efficient workflow for managing cutting plans, markers, cut jobs and cut report.
Cut Planning
Section titled “Cut Planning”Overview
Section titled “Overview”Cut Planning is used to store the shared information across the style, like POs, size wise quantities etc.
It will serve like a Master Cut Planner against which all plans of same Work Order, Style No, Buy Month and Color Code will be created.
Process
Section titled “Process”The user will create a Cutting Plan grouped by the following:
- Work Order
- Style No
- Buy Month (optional)
- Color Code
Within the cutting plan, the user will lock the following:
- Panels - Define which types of panels will be cut in the child cut plans.
- Size-wise Quantities - Locks the number of pieces to cut for each size. These quantities are the
OrderQtyof that size and are automatically fetched and submitted — they cannot be modified. - Upper Threshold - Specifies how much extra can be cut above the original quantity (in percentage).
- Thresholds are maintained at the Ex-Factory level for each PO, Season and Kit, ensuring accurate planning and avoiding overproduction.
Cut Planning Screenshot
Section titled “Cut Planning Screenshot”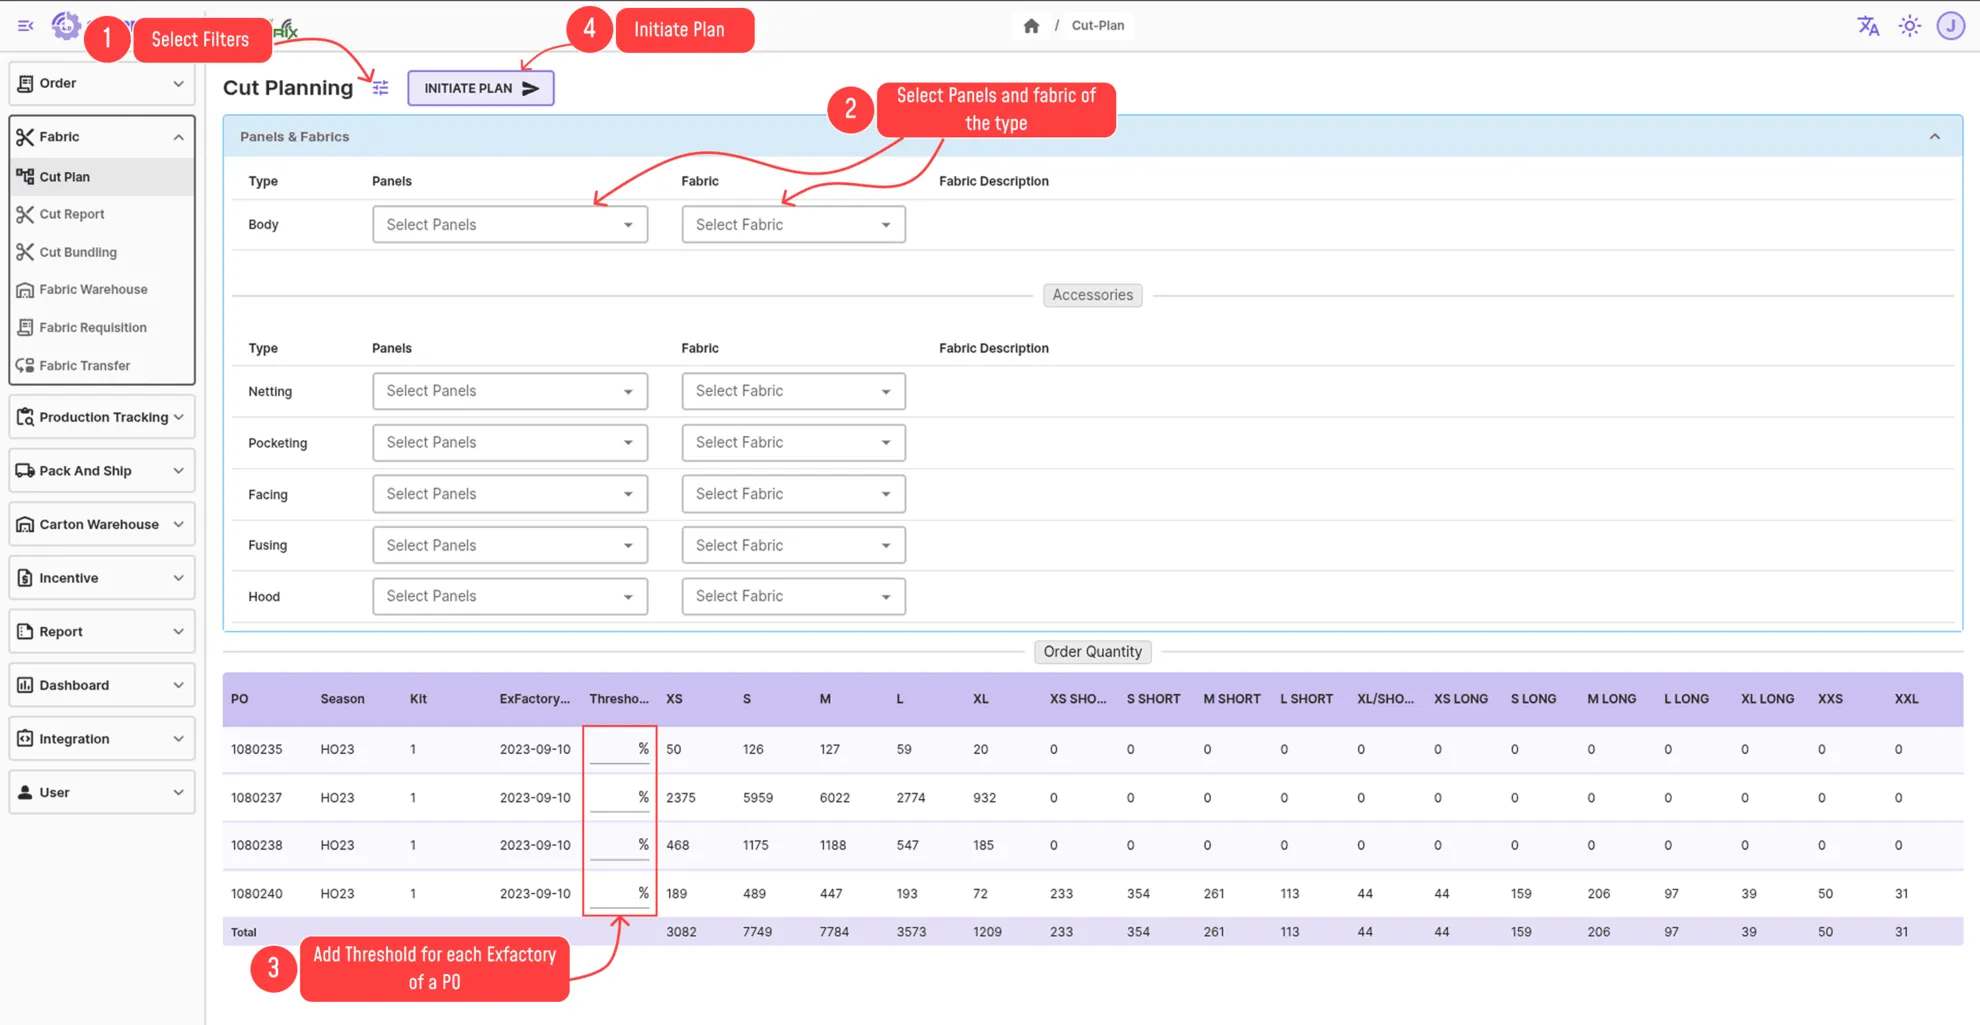
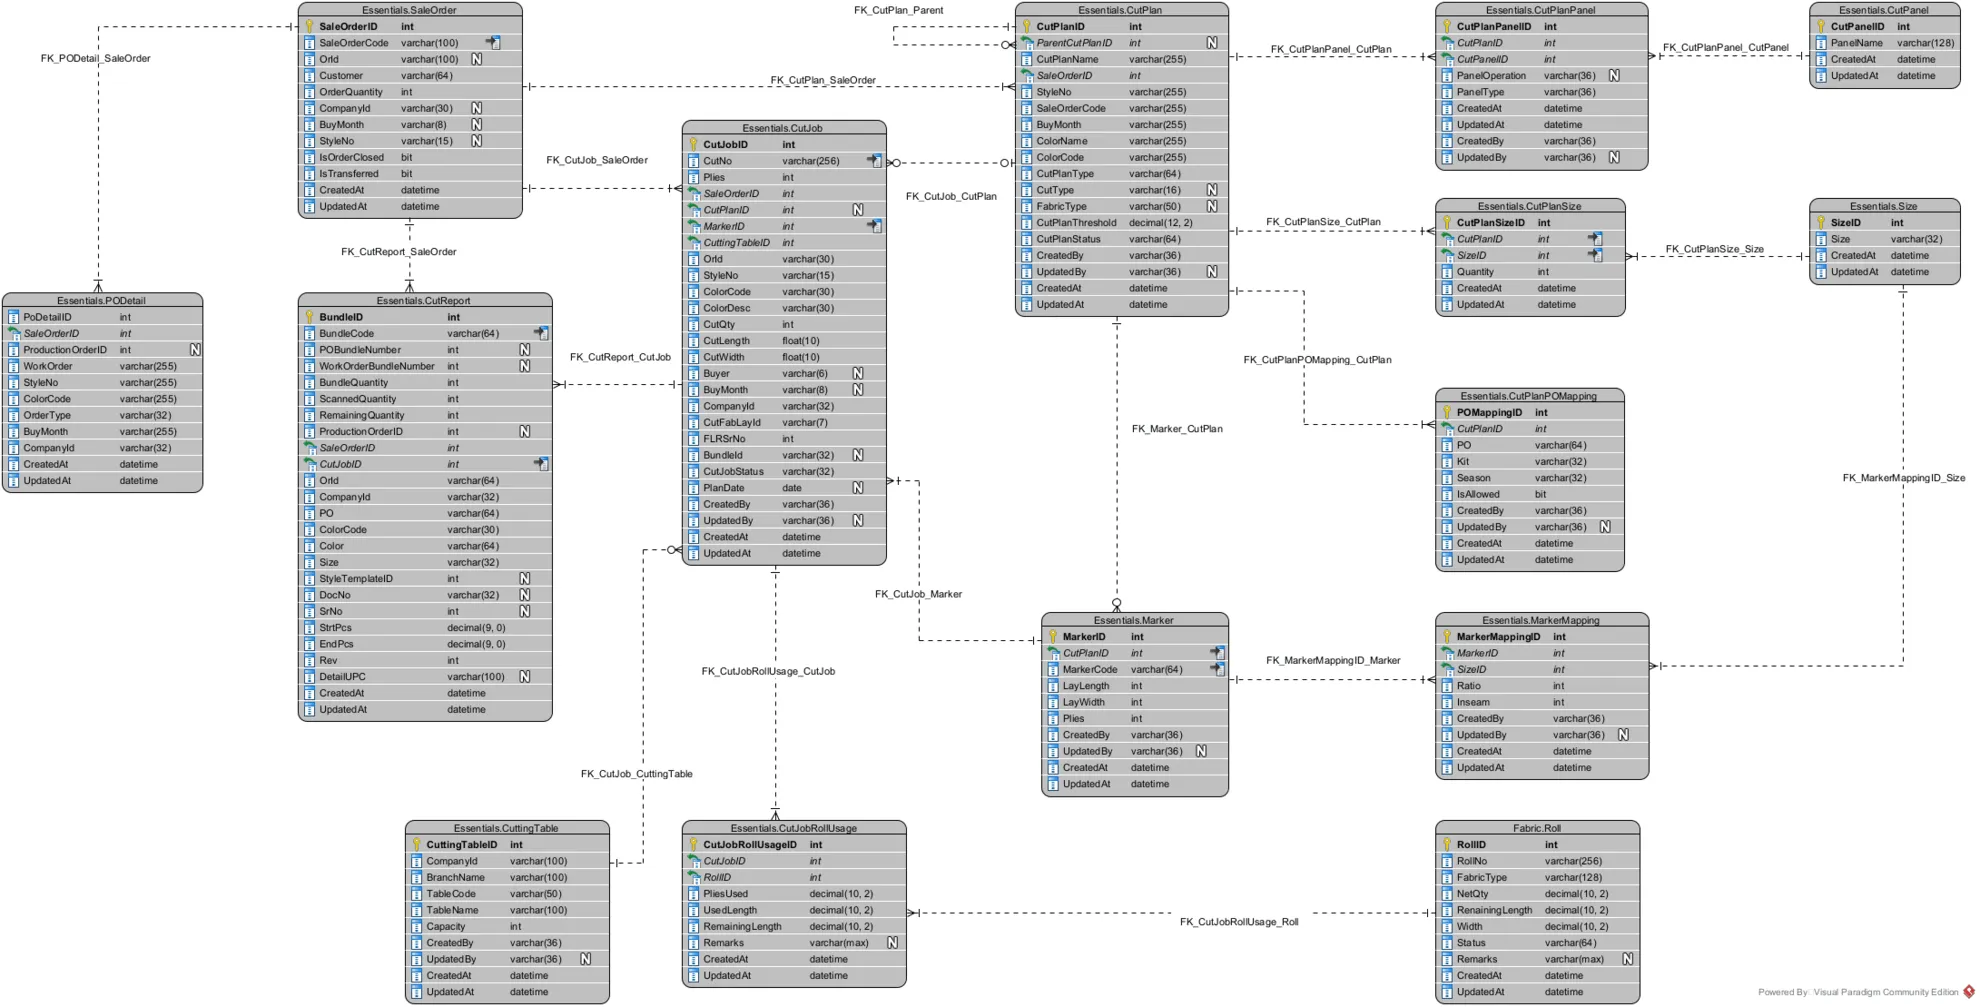
Database Population
Section titled “Database Population”After initiating a cut plan, the following database tables will be populated:
-
CutPlan
- Contains the main cut plan details, such as:
CutPlanType→ [Master, Track, Accessories] (Masterin this case)CutType→ [Netting, Pocketing, Facing, Fusing, Hood] (Nullin this case)CutPlanStatus→ [Active, Aborted, Closed] (Activein this case)WorkOrder,StyleNo,BuyMonth, andColorCodeagainst which the cut plan is created
- Contains the main cut plan details, such as:
-
CutPlanPanel
- Stores all panels with their associated Cut Plan Type and Cut Type.
-
CutPlanWorkOrderFabric
- Stores the fabric selected against the Cut Plan Type/Cut Type.
-
CutPlanPoSize
- Stores the size-wise quantities and threshold for each Kit, Season, and Ex-Factory date of a PO.
Cut Plan
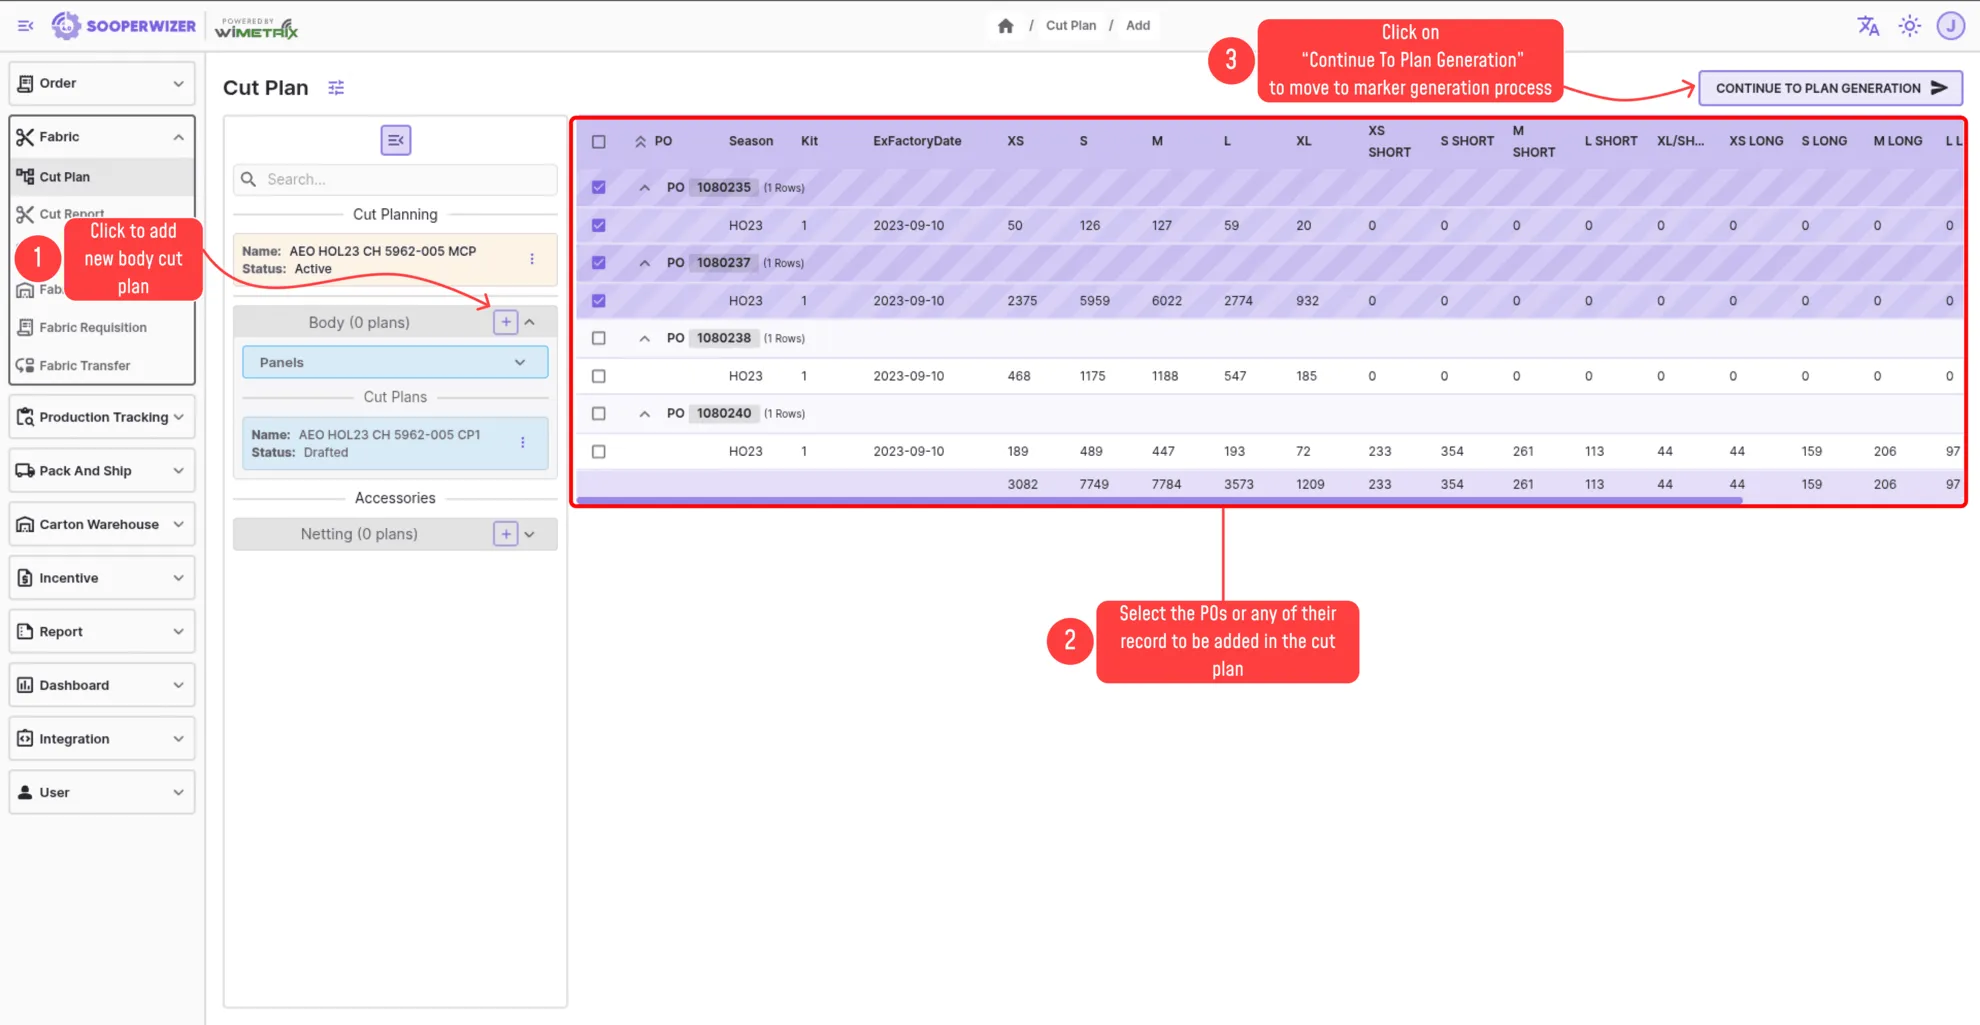
Section titled “Cut Plan”After finalizing and submitting the cut planning, the following screen will appear:
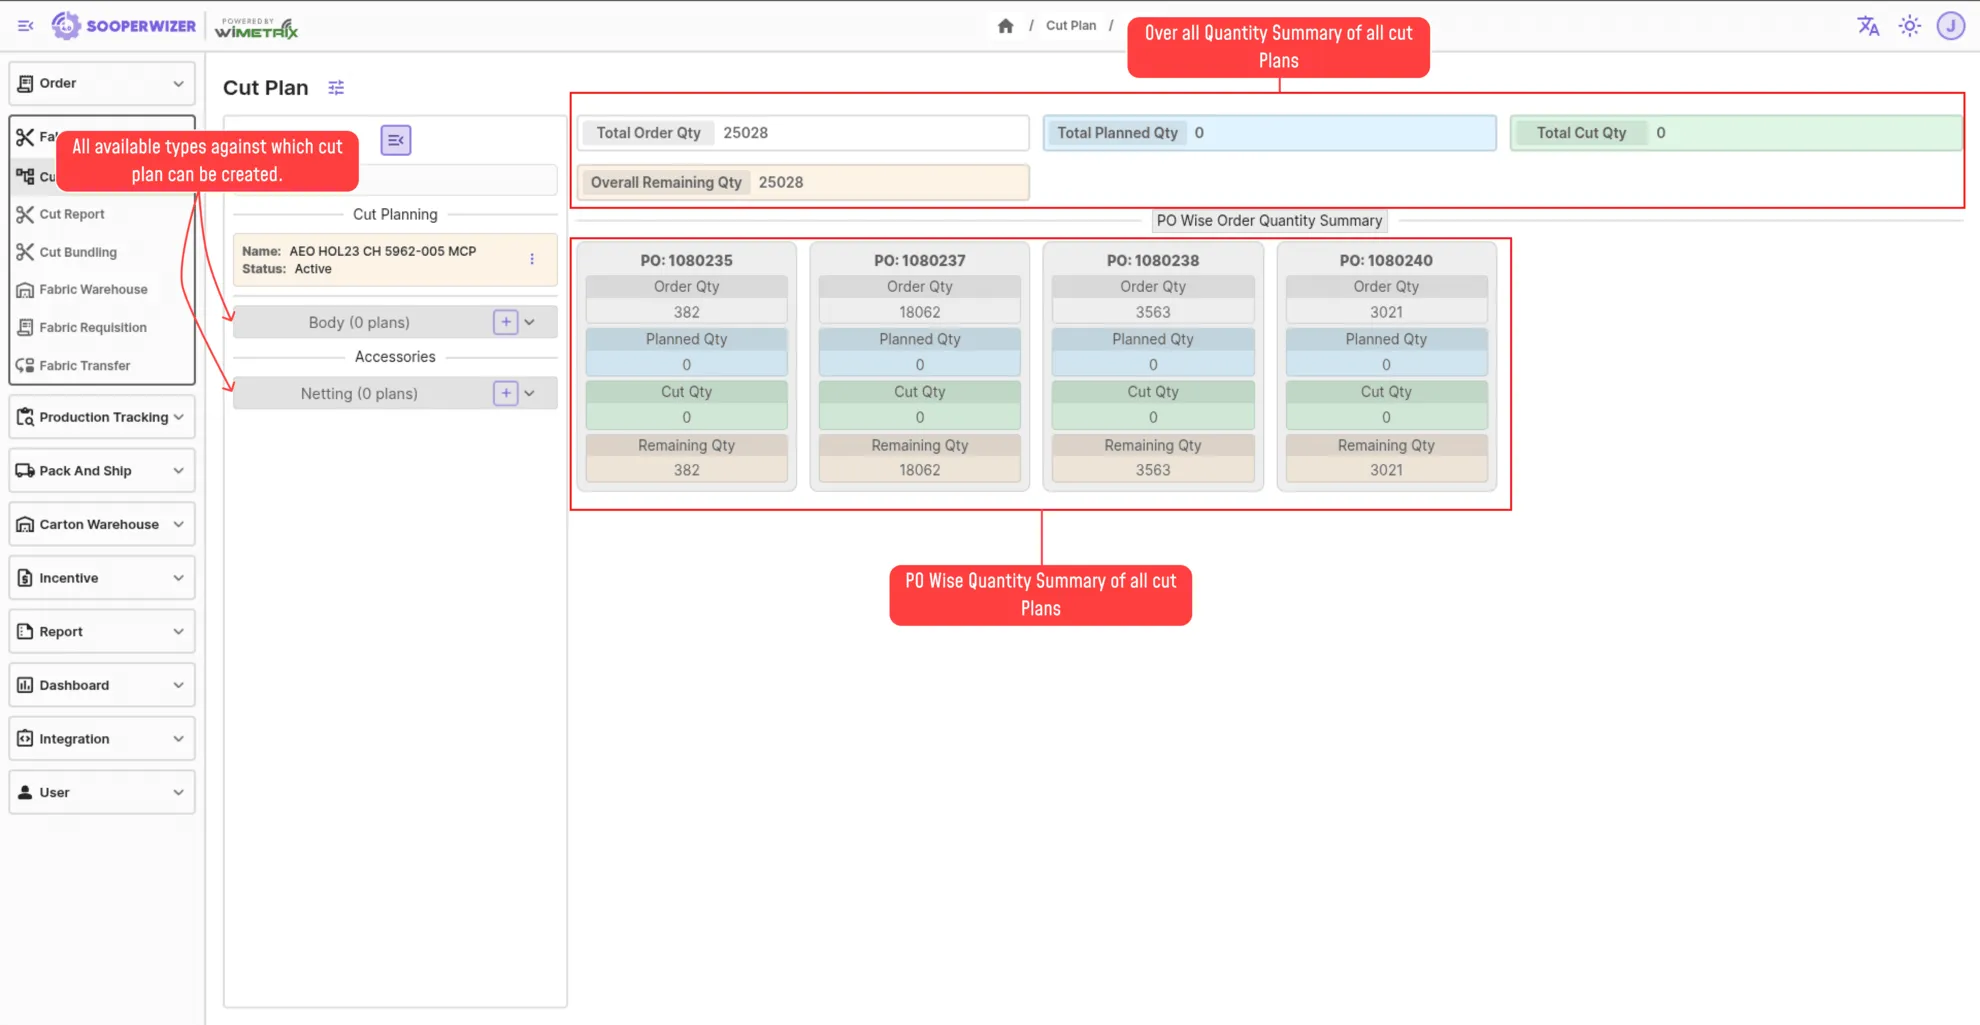
On this page User will have the all possible Types that he selected while creating cutting plan in the left side menu panel to create new cut plan.
Creating New Cut Plan.
Section titled “Creating New Cut Plan.”1. Select Cut Plan Type And POs
Section titled “1. Select Cut Plan Type And POs”-
Click on the Add icon next to the desired cut plan type from the left-side menu panel.
-
A
Draftedcut plan will be created of that type. -
Select the POs that user wants to add in this cut plan.
- Only those POs will be available for selection that are currently not a part of any other Active cut plan of same type.
- The sizes in that Pos and their order quantity will be populated in a table in left section.
Screenshot
Adding new Markers
Section titled “Adding new Markers”Marker can be added using two ways:
- Auto-Generated Marker Addition.
- Manual Marker Addition.
Auto-Generated Marker Addition
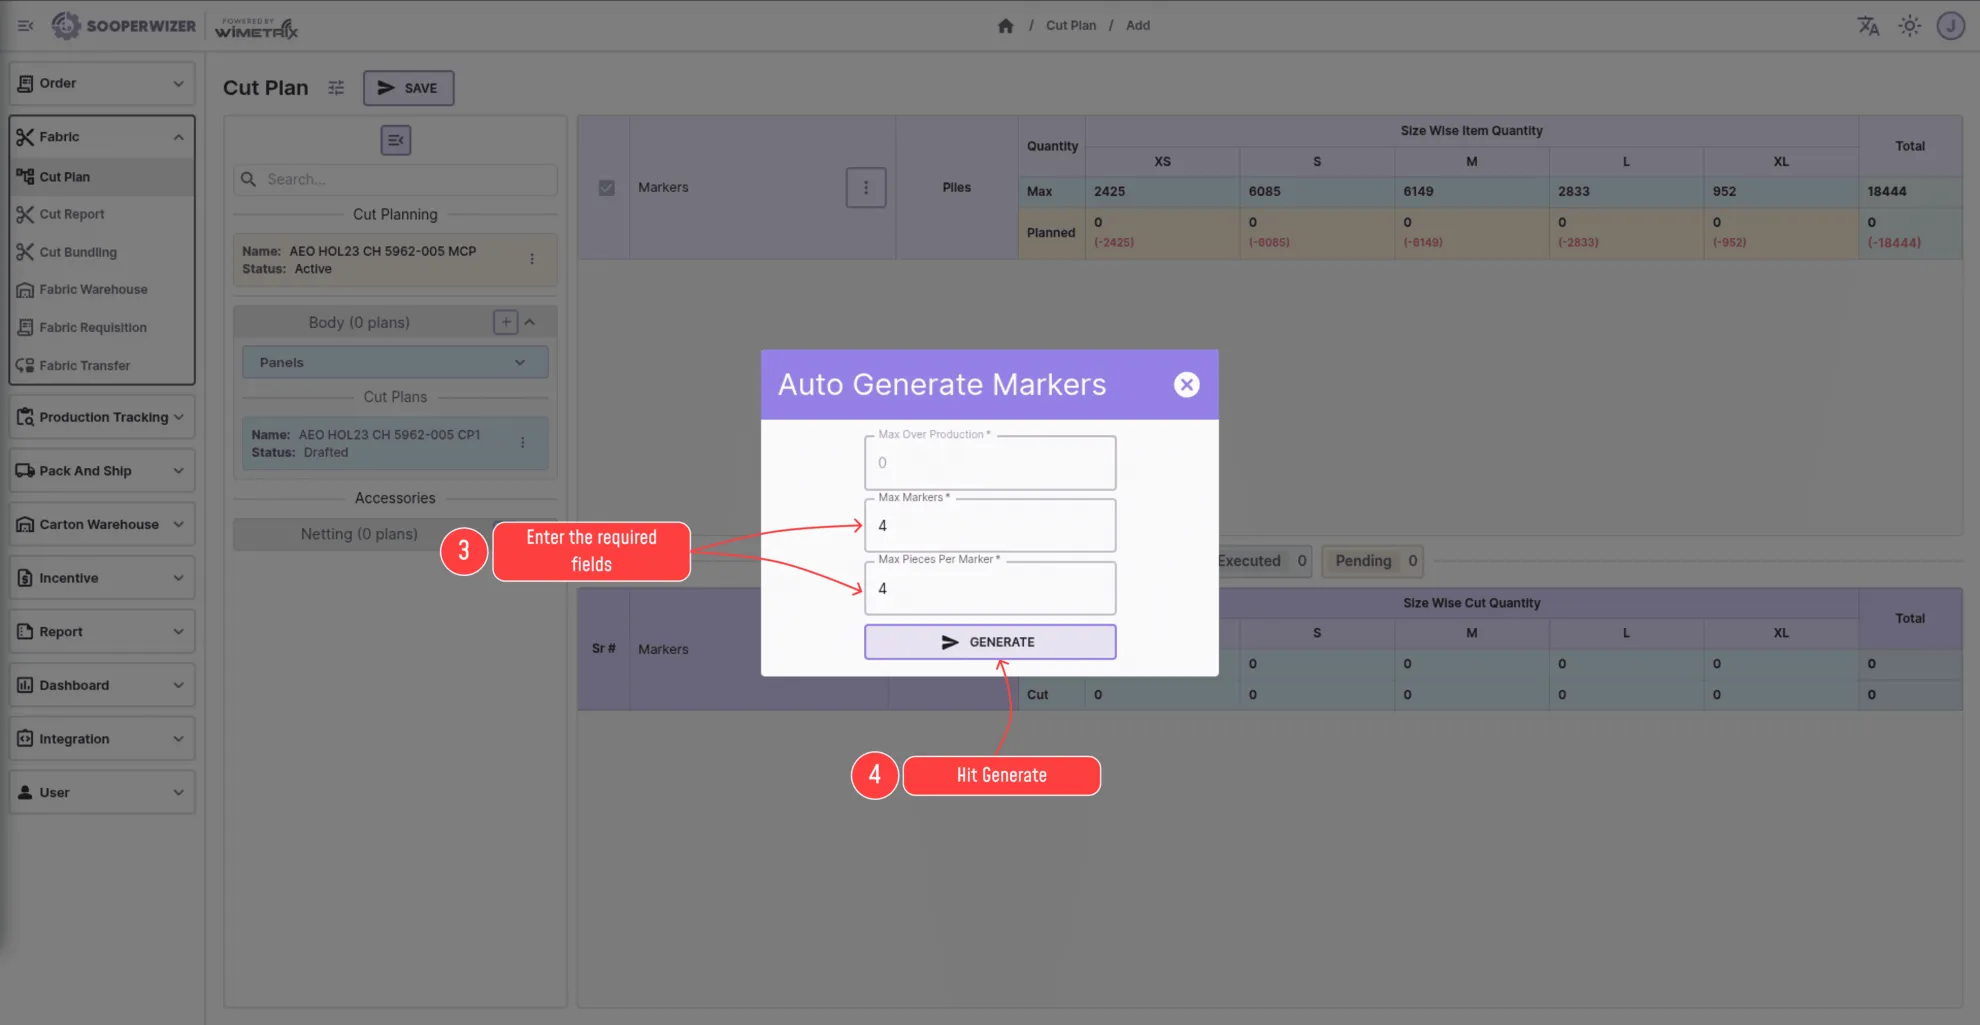
Section titled “Auto-Generated Marker Addition”In auto generation, the user is provided with a pre-filled template for markers based on:
- Maximum Overproduction (calculated automatically from the threshold set during cut planning)
- Maximum number of markers
- Maximum plies per marker
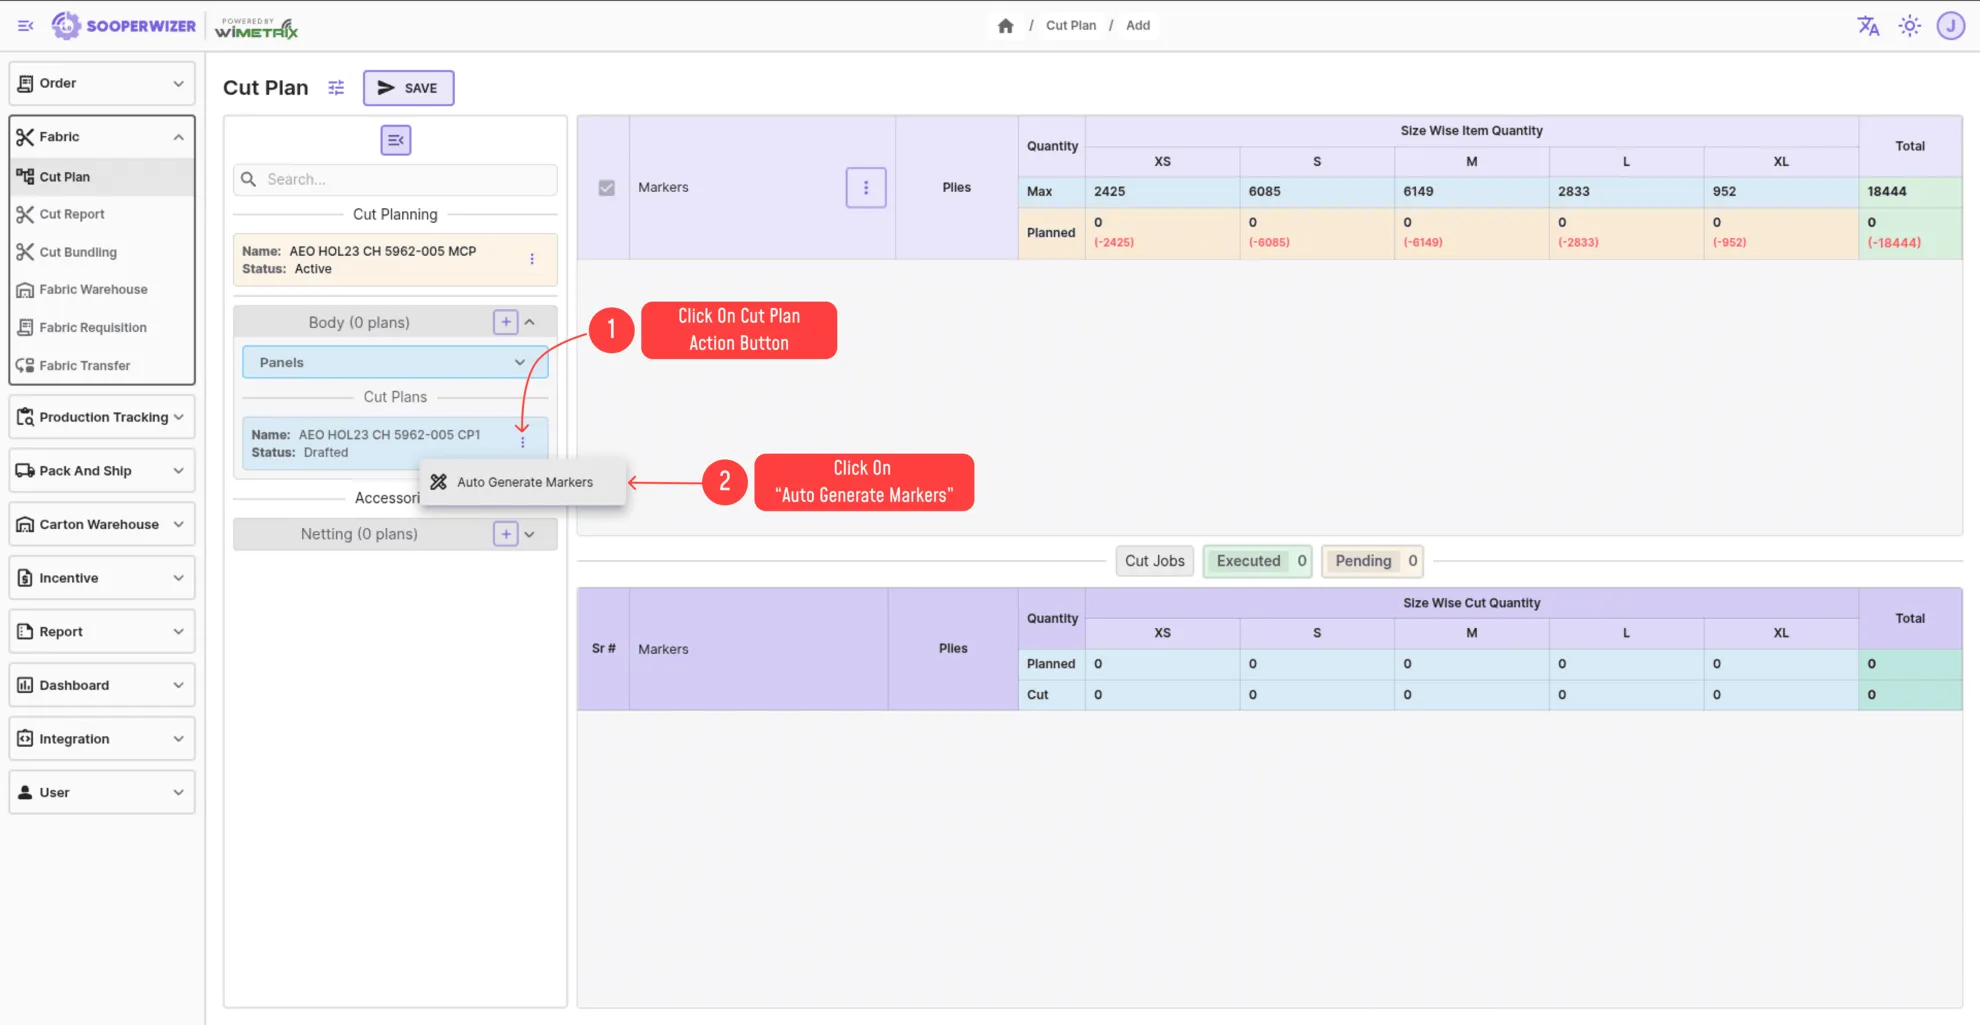
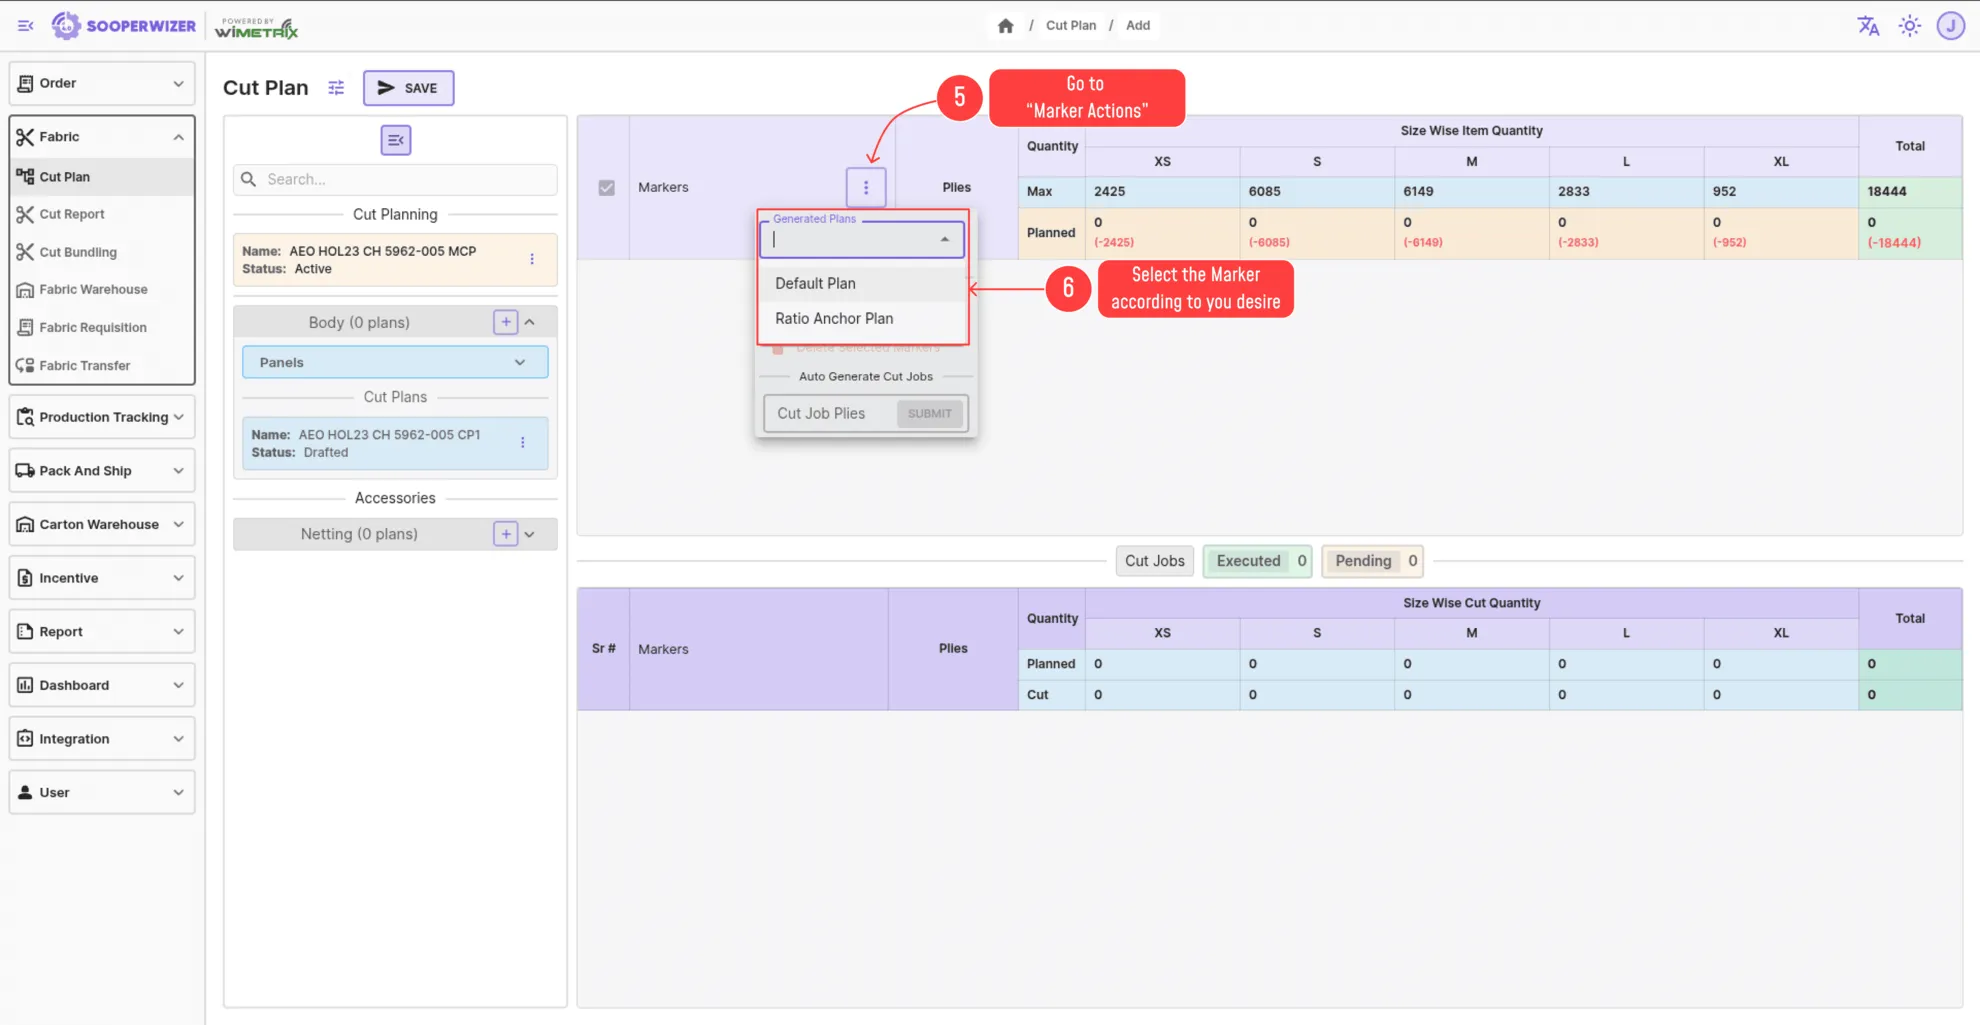
Step to create auto generated markers.
Section titled “Step to create auto generated markers.”-
Click on
Auto Generate Markerbutton at the top of the page. -
Enter the required parameters like
Max MarkersandMax Plies per Markerand hit generate. -
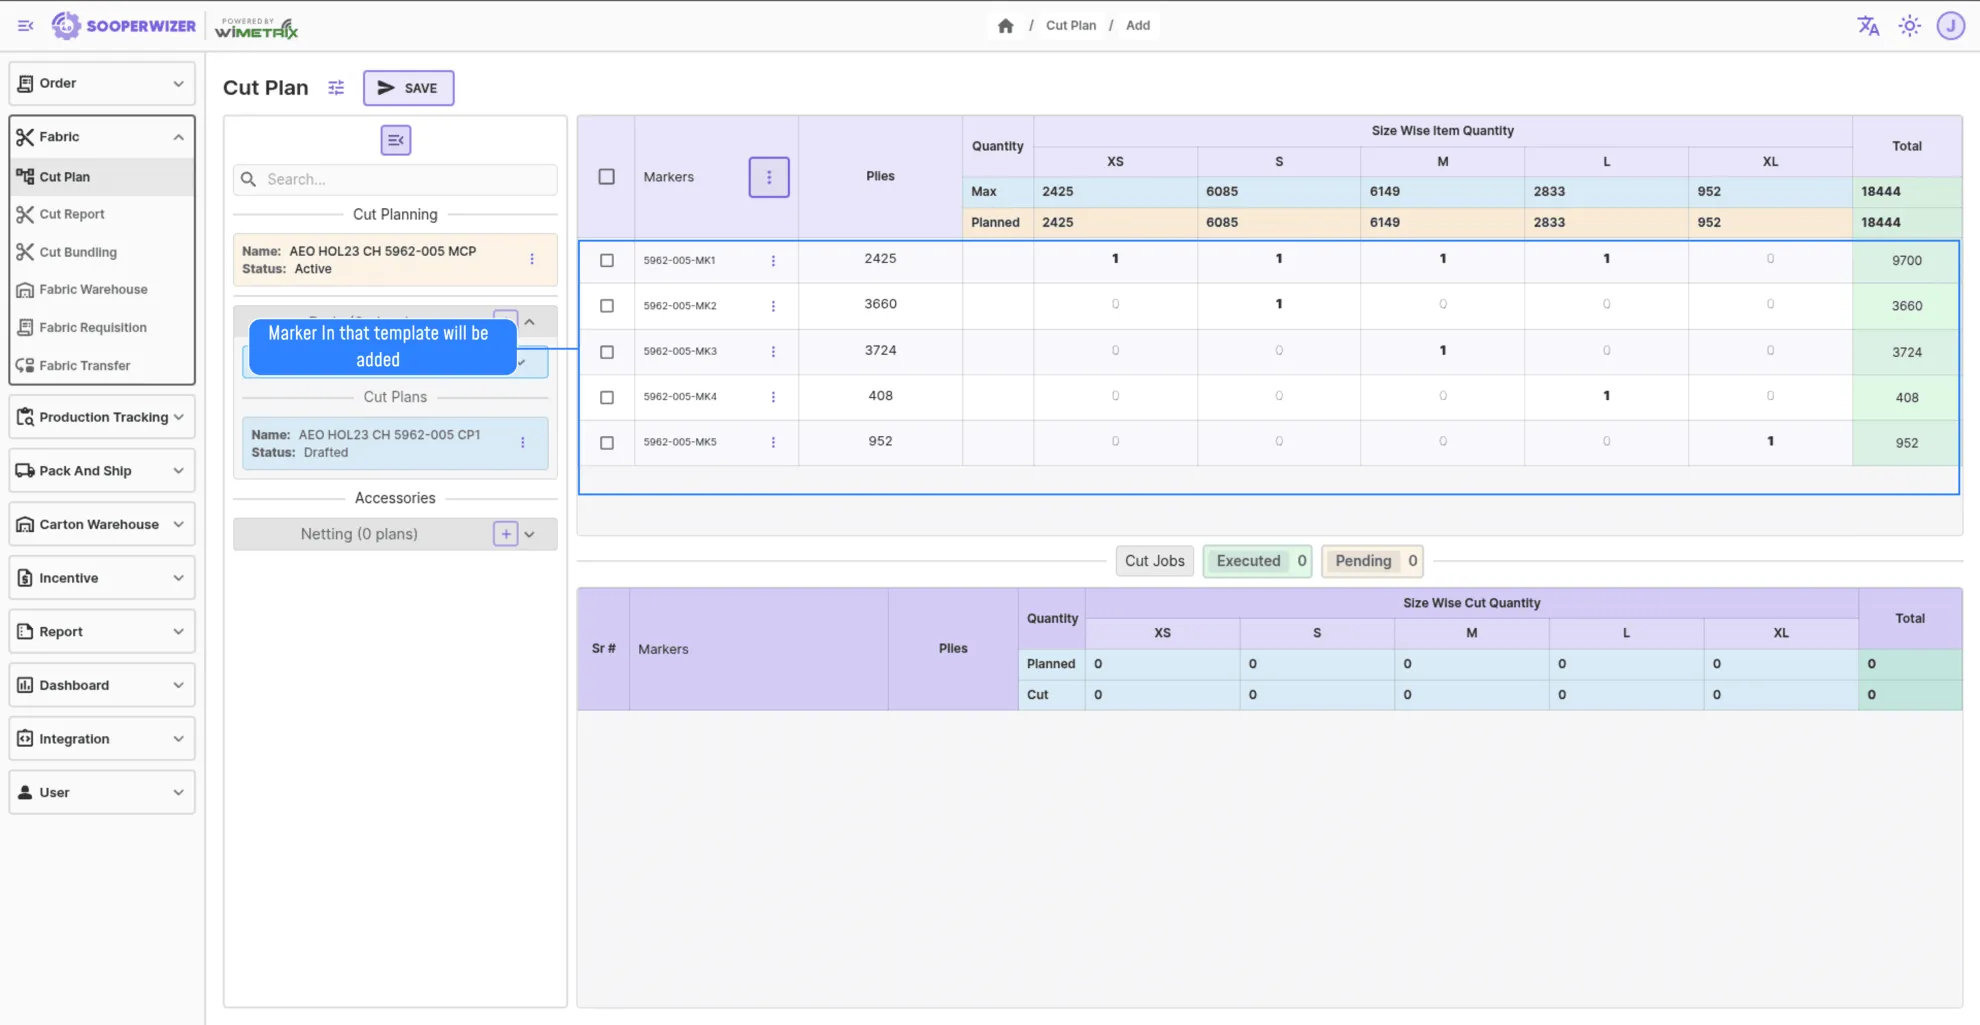
A list of auto-generated templates will appear in the select field next to the button.
-
Choose the desired template from the dropdown.
Screenshots
Manual Marker Addition
Section titled “Manual Marker Addition”Step to create manual markers.
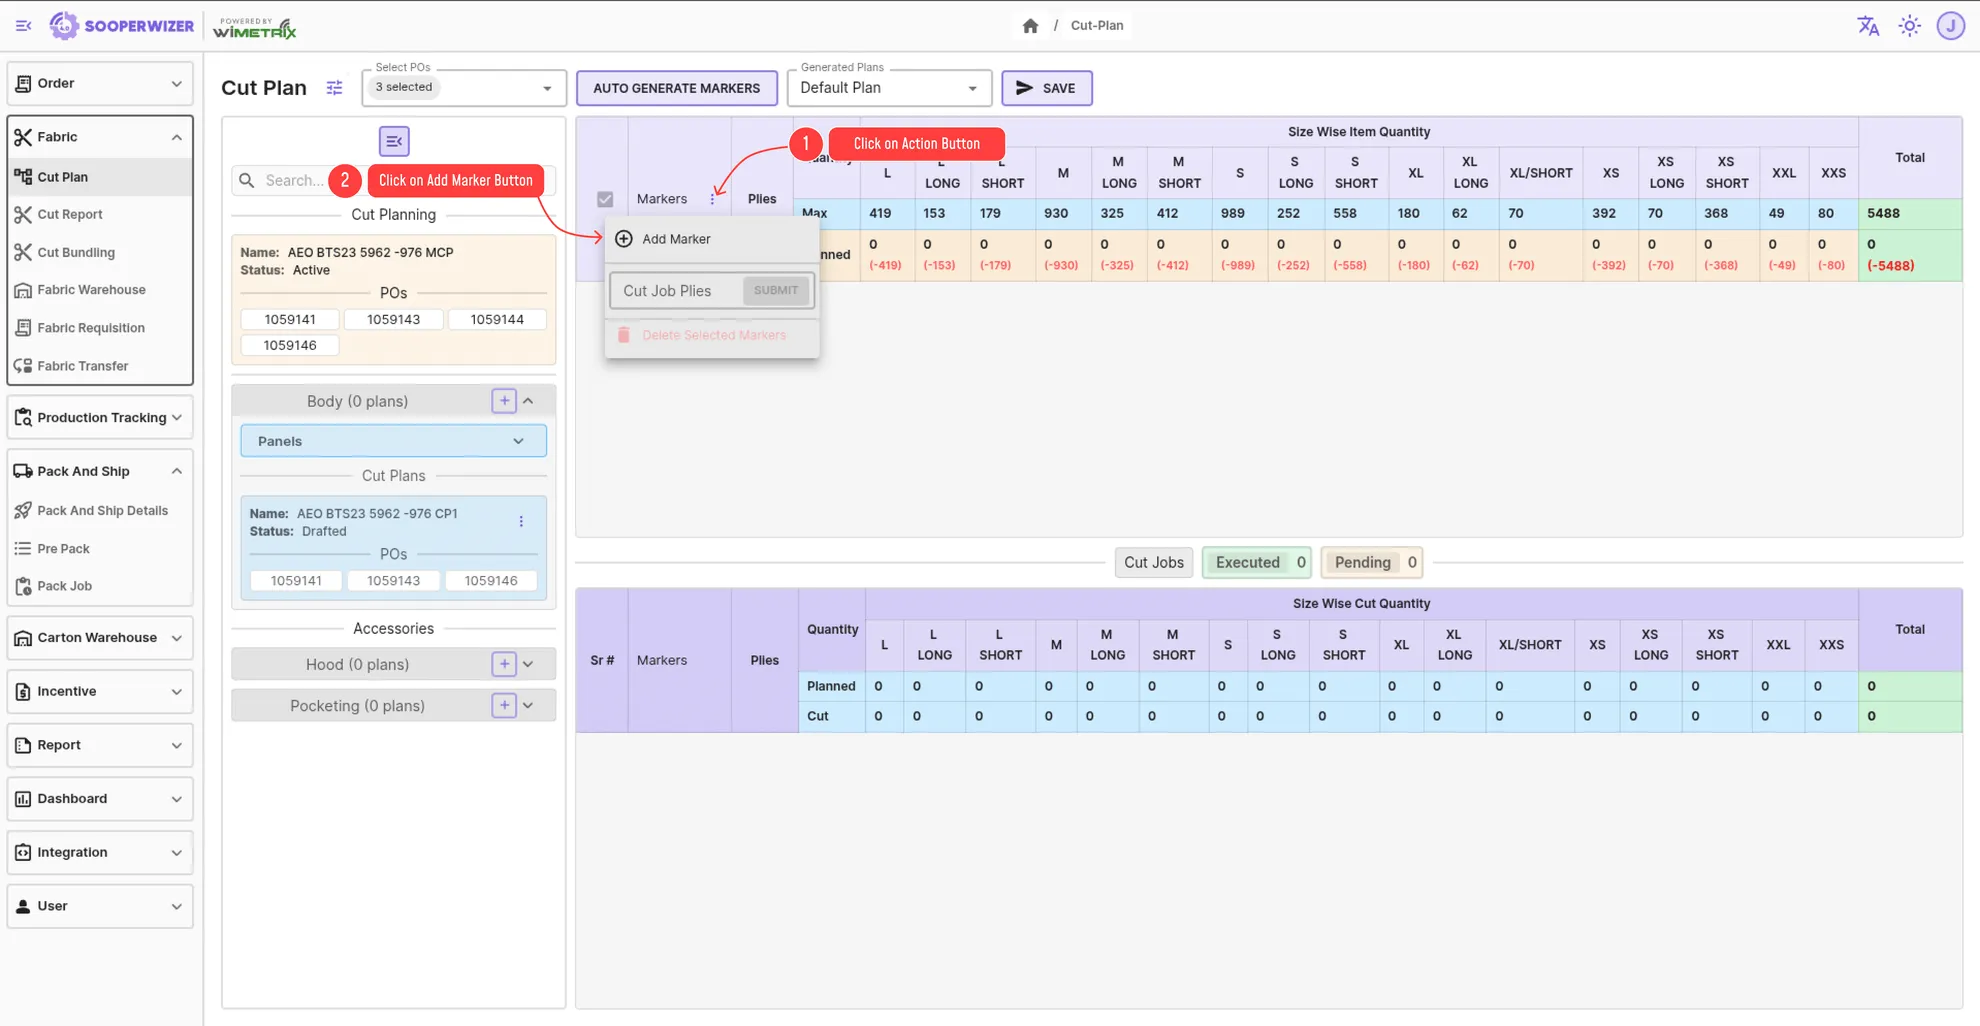
Section titled “Step to create manual markers.”-
Click on
Action Icon(donated by three dots ⋮) at the head of the markers table. -
A action menu will appear containing different action like adding/deleting marker etc.
-
Click on
Add Markerbutton. -
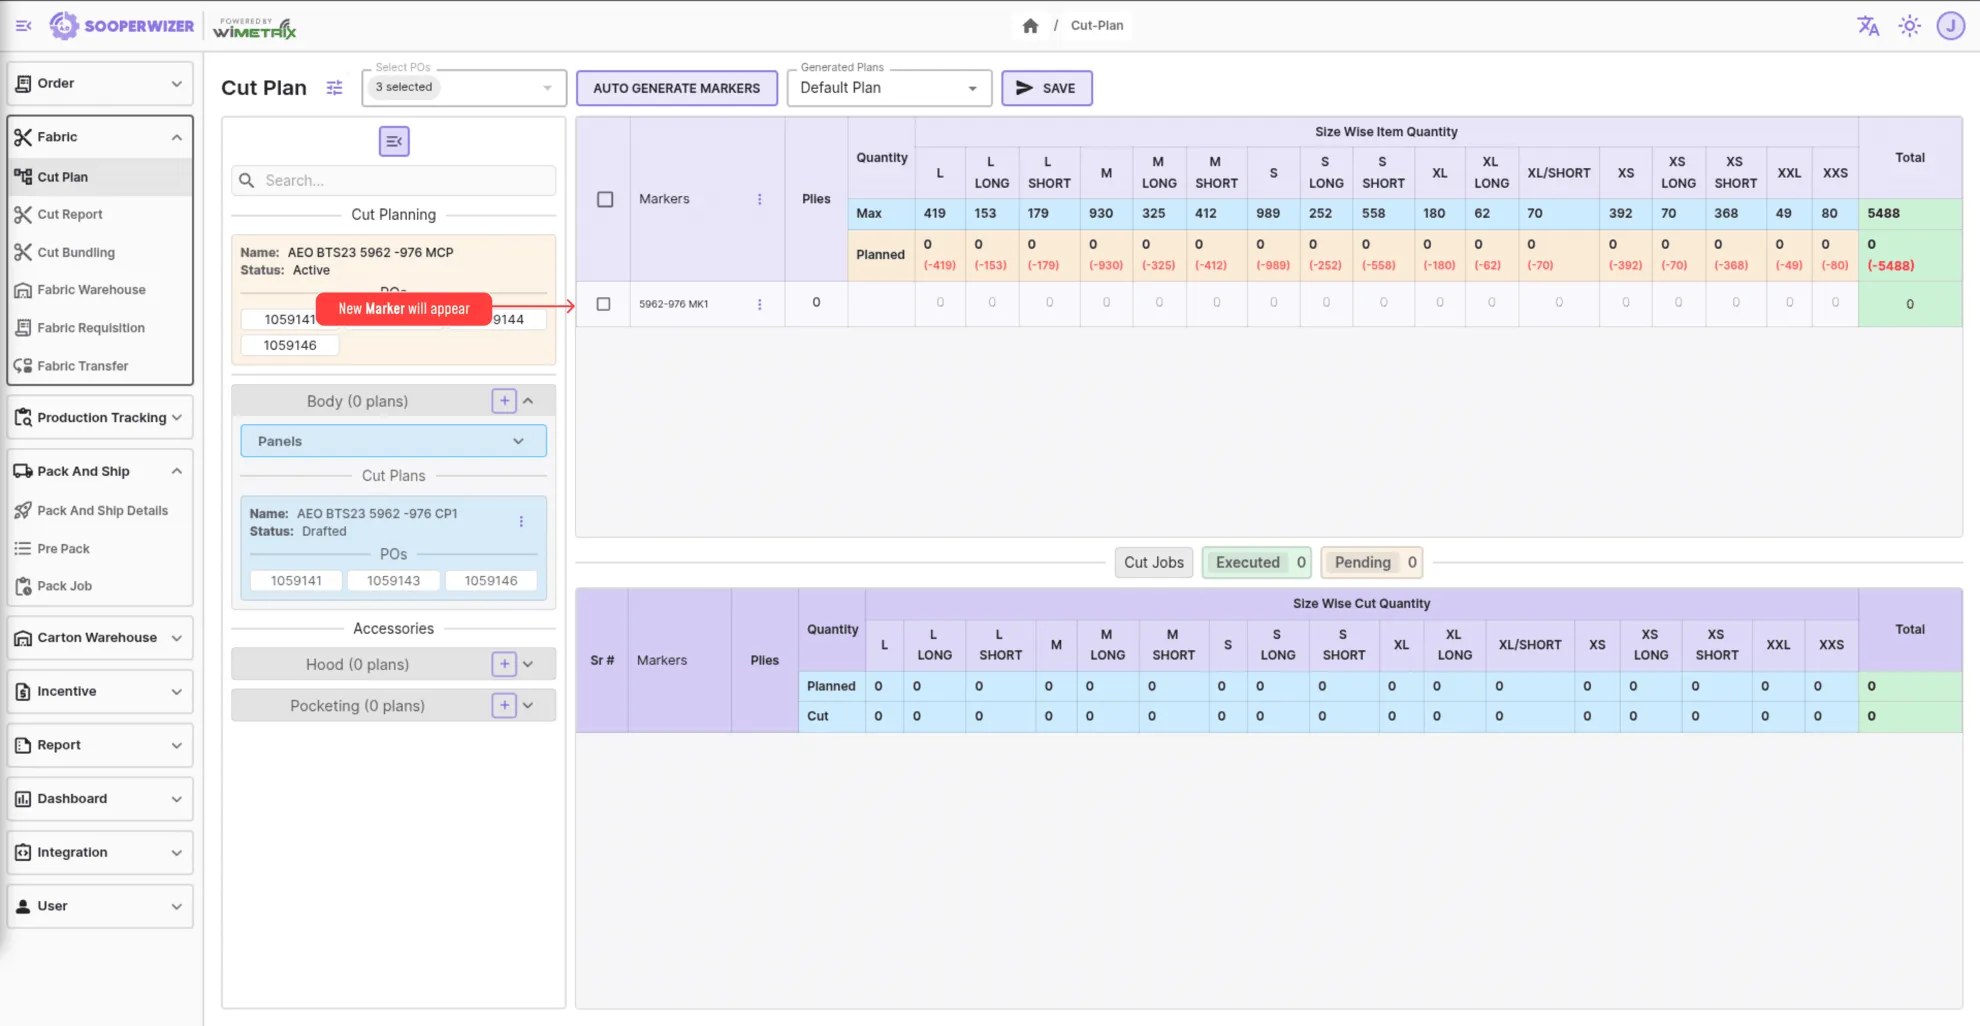
A new row will appear in the marker table with editable Plies and Size Ratio fields.
- The marker name will follow the format:
{OrId}-{ColorCode}-MK{previous MarkerNo + 1}
- The marker name will follow the format:
-
Repeat the above steps to add more markers.
Screenshots
-
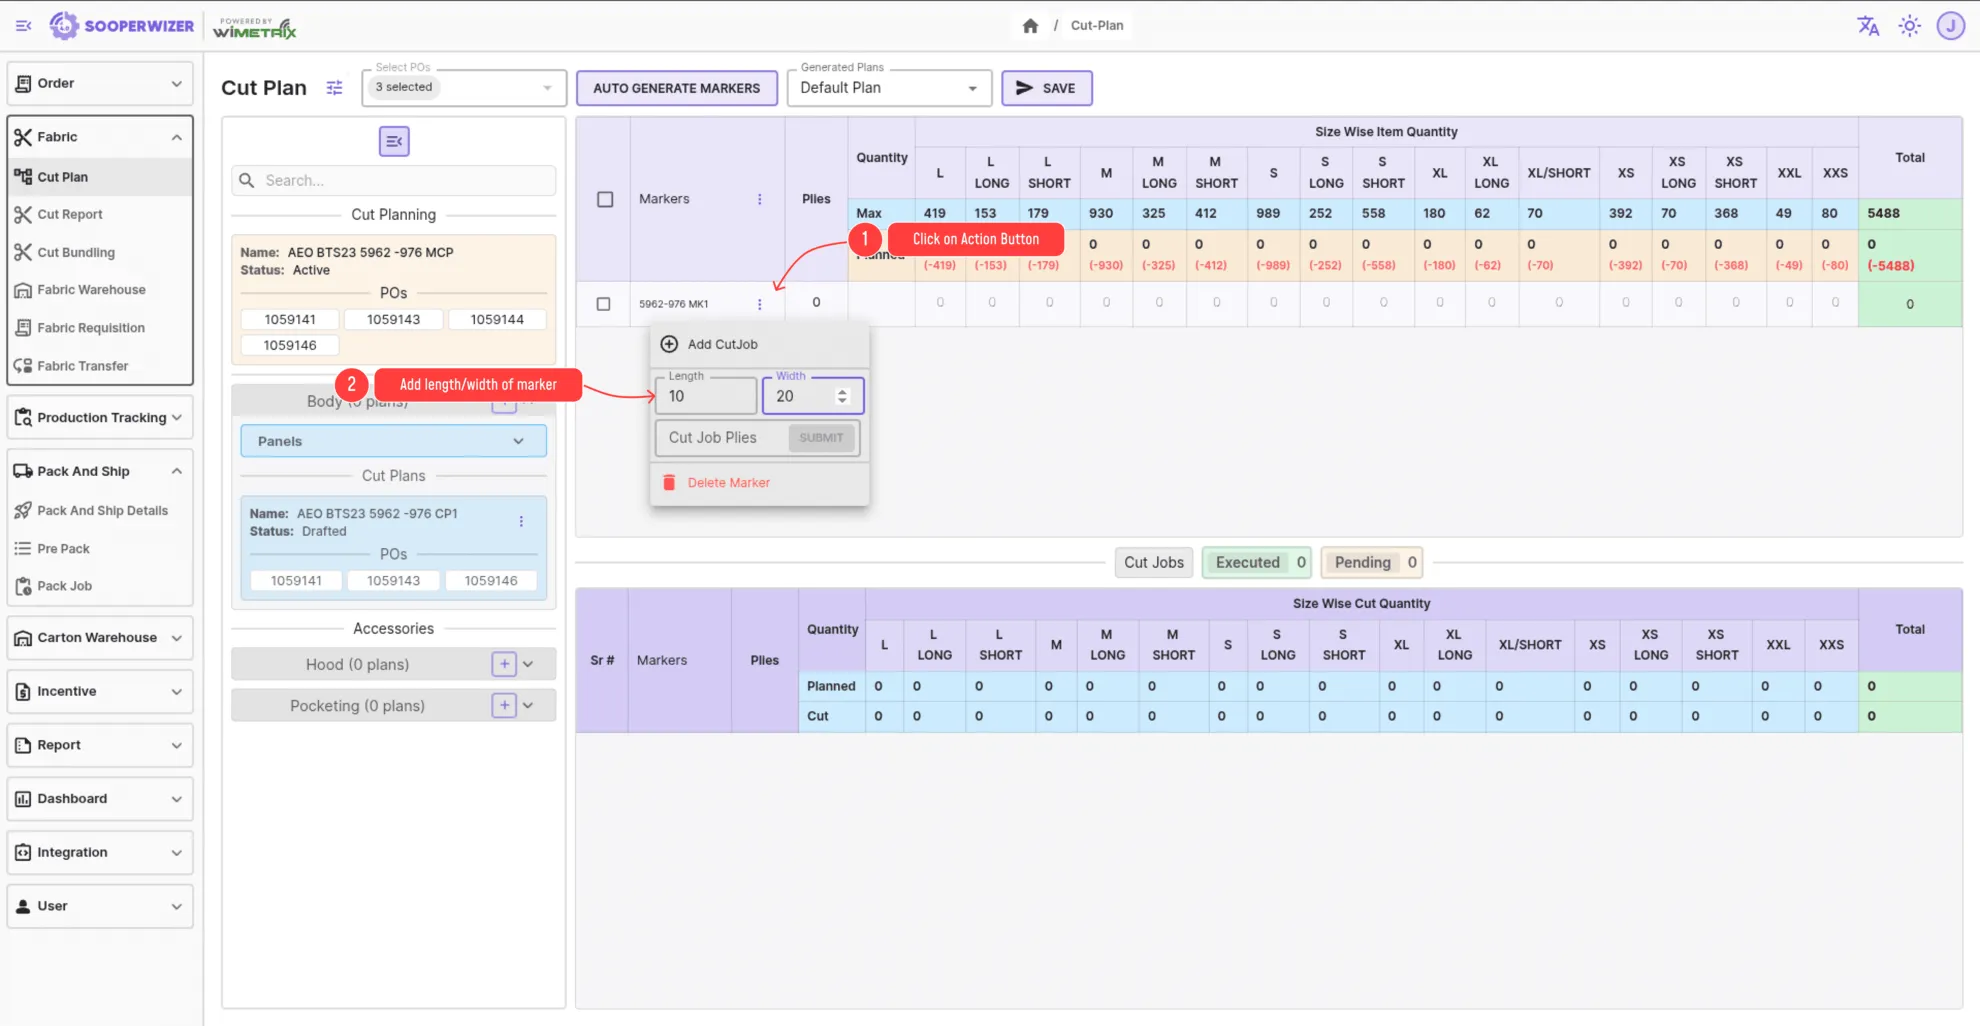
Each Marker row also contains
Action Icon ⋮button that will opens a menu through which additional details like Marker Length and Width can be added.
Adding New Cut Jobs
Section titled “Adding New Cut Jobs”Just like markers, Cut jobs can also be added using two methods:
-
Auto Generate Cut Job.
-
Manual Cut Job Addition.
Auto Generate Cut Job
Section titled “Auto Generate Cut Job”Auto-generating cut plan further have two sub categories:
-
Create cut jobs for all markers.
-
Create cut jobs for a single markers.
Create Cut Jobs for all markers.
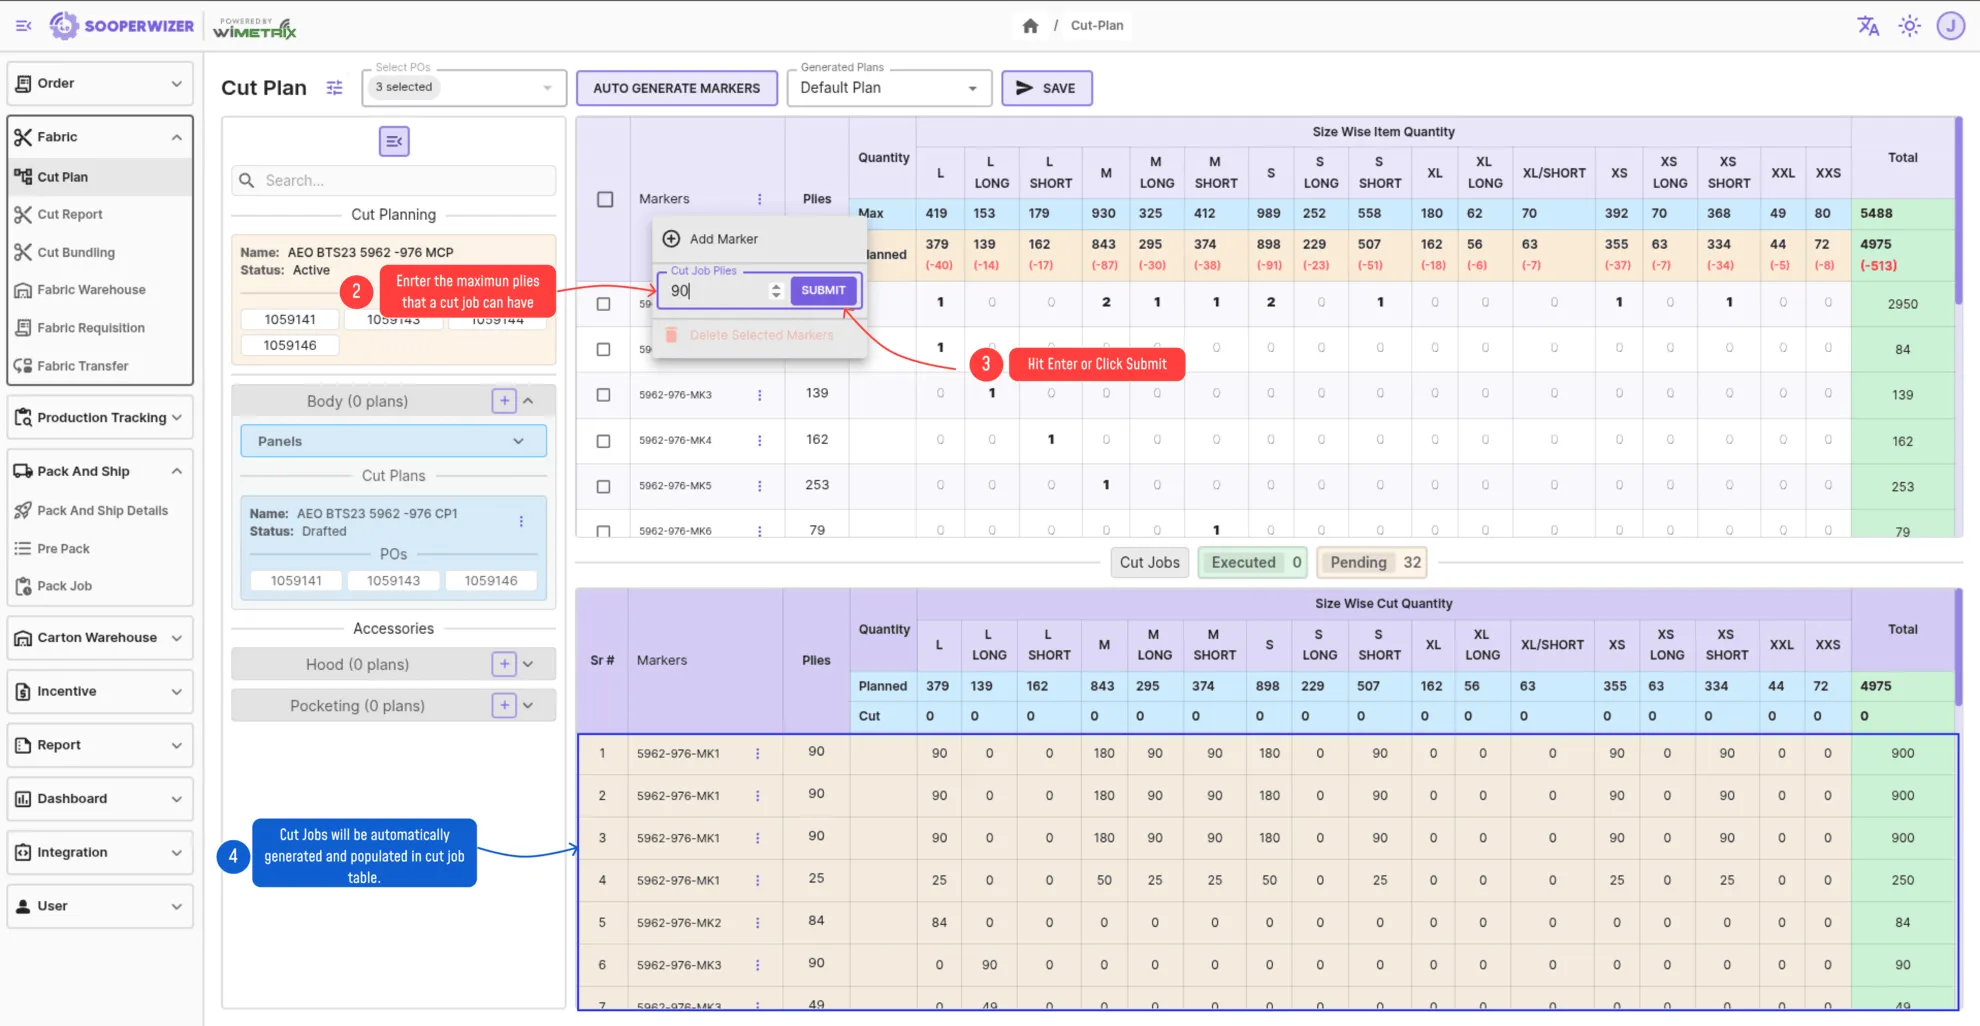
Section titled “Create Cut Jobs for all markers.”In auto-generation, the user needs to specify how many maximum plies a Cut Job can have.
- Click on the main action button (donated by three dots ⋮) at the head of the markers table.
- Here a field will be available named as
Cut Job Pliesin opened menu. - Enter the maximum number of plies that a cut job can have and hit enter.
- Cut Jobs will be automatically created for every marker in the table.
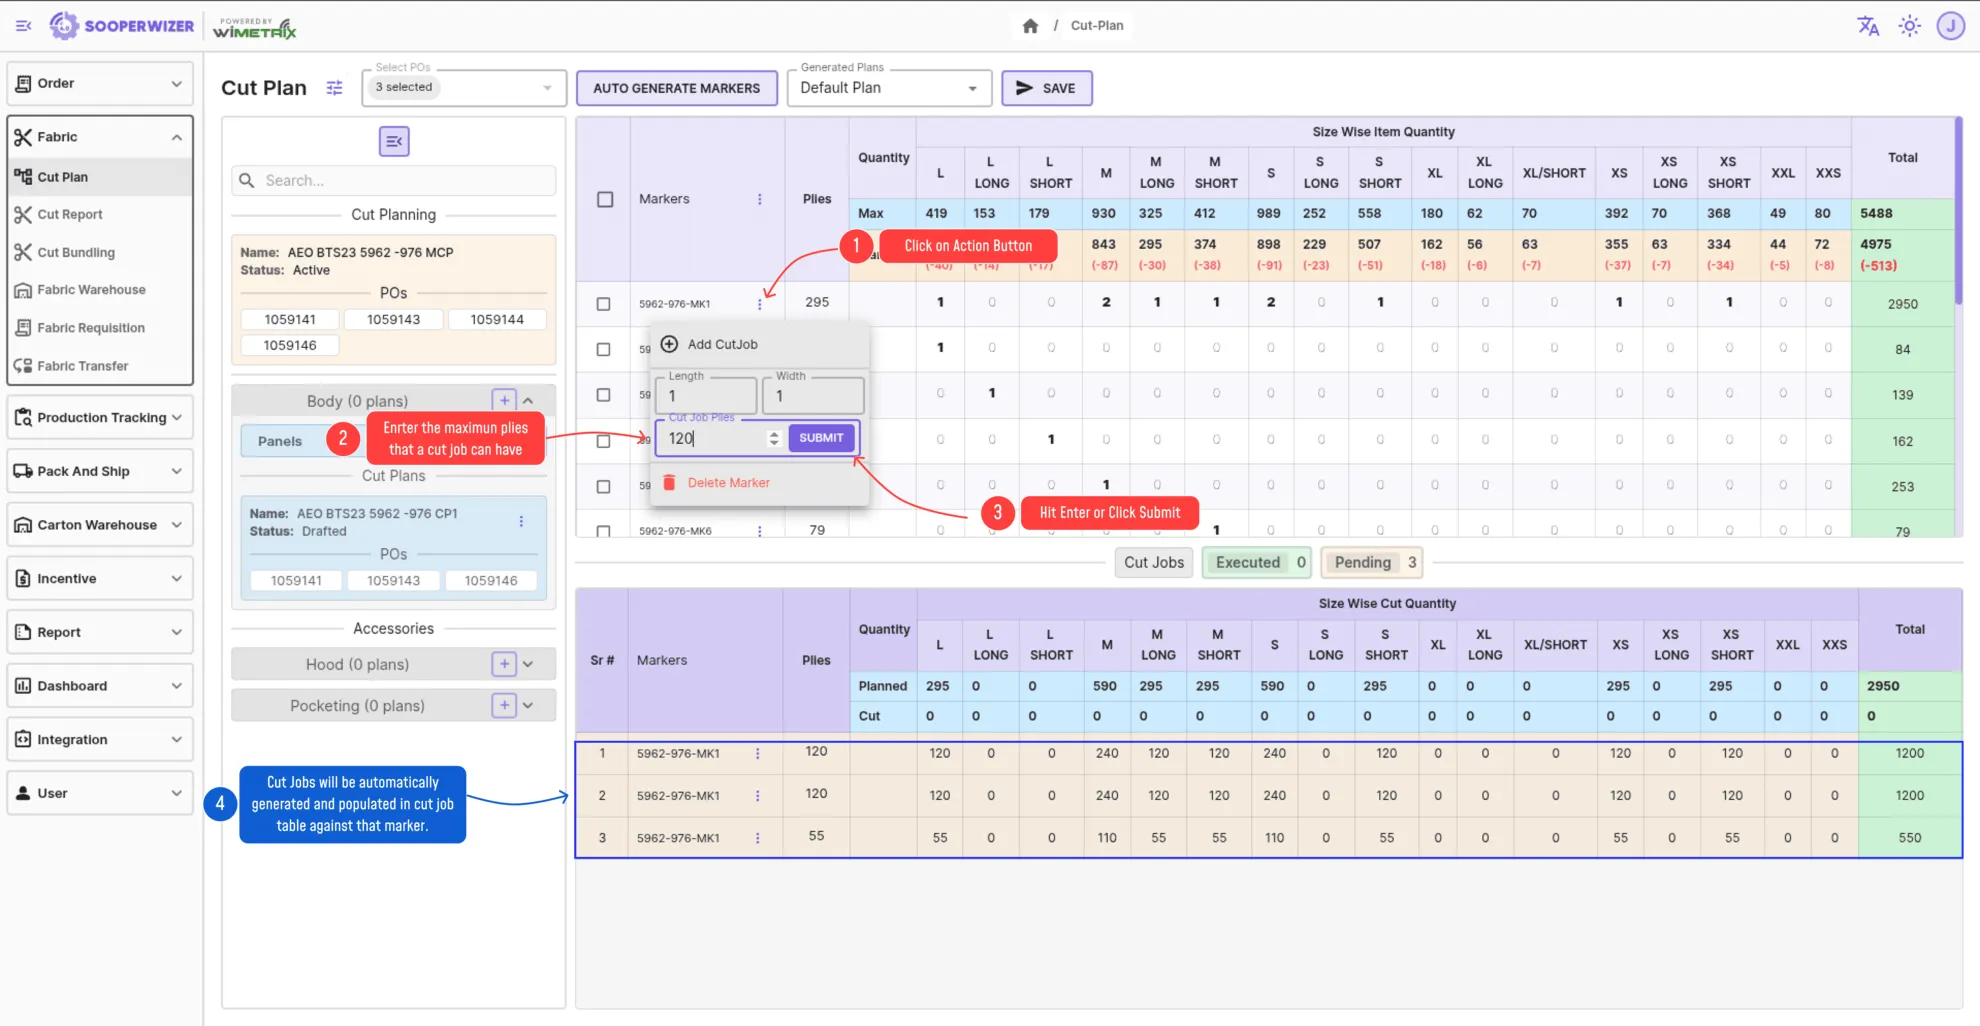
Create cut jobs for single markers.
Section titled “Create cut jobs for single markers.”- Click on the action button (⋮) next to the marker name against which you want to create cut jobs.
- A menu will appear containing the fields named as
Cut Job Plies. - Enter the maximum number of plies that a cut job can have in that field and hit enter.
- Cut Jobs will be created only for that marker.
Manual Cut Job Addition
Section titled “Manual Cut Job Addition”Step to create manual cut jobs.
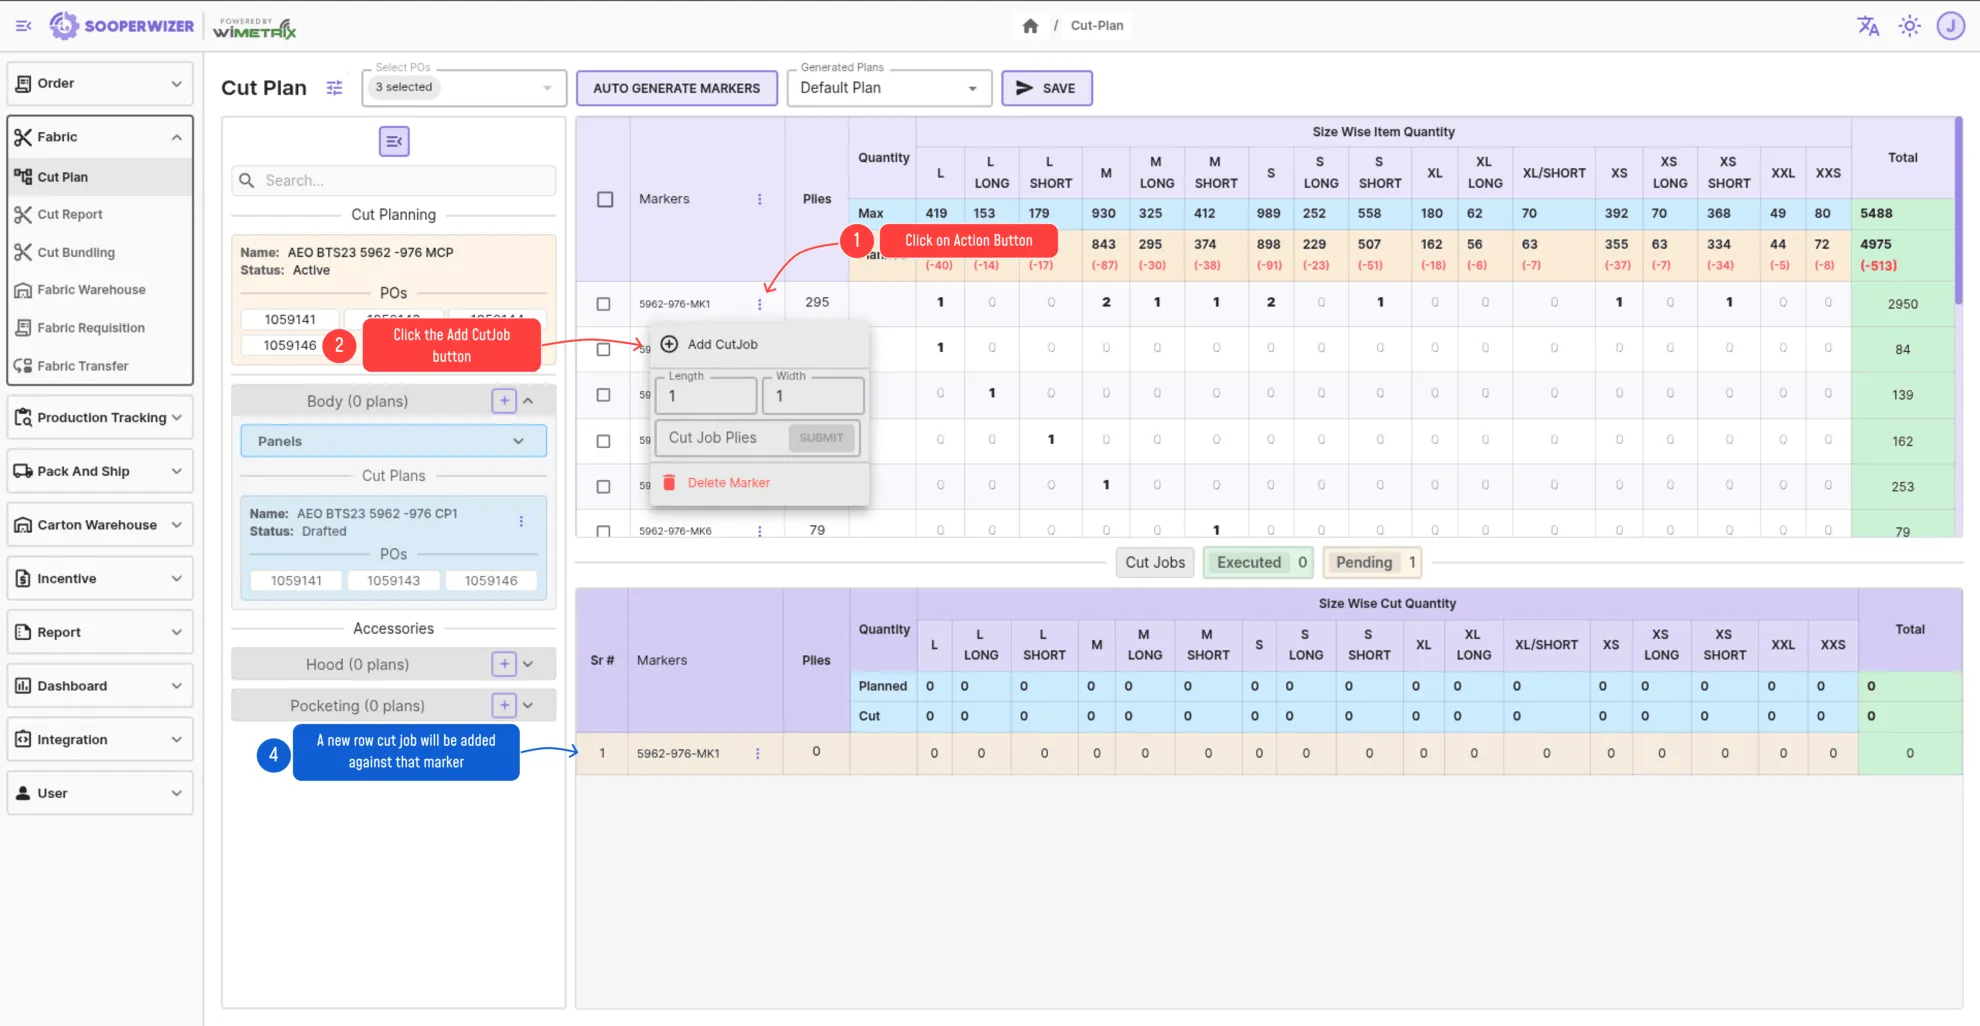
Section titled “Step to create manual cut jobs.”-
Click on the action button (three dots ⋮) next to the marker name against which you want to create cut jobs.
-
A menu will appear containing the action
Add Cut Job. -
Click on
Add Cut Jobbutton. -
A new row will appear in the Cut Job table with:
- Plies (editable)
- Size-wise Quantities (read-only)
-
Each Cut Job row also contains
Action Icon ⋮button that will opens a menu through which additional details like Cutting Table and Planned Date can be set .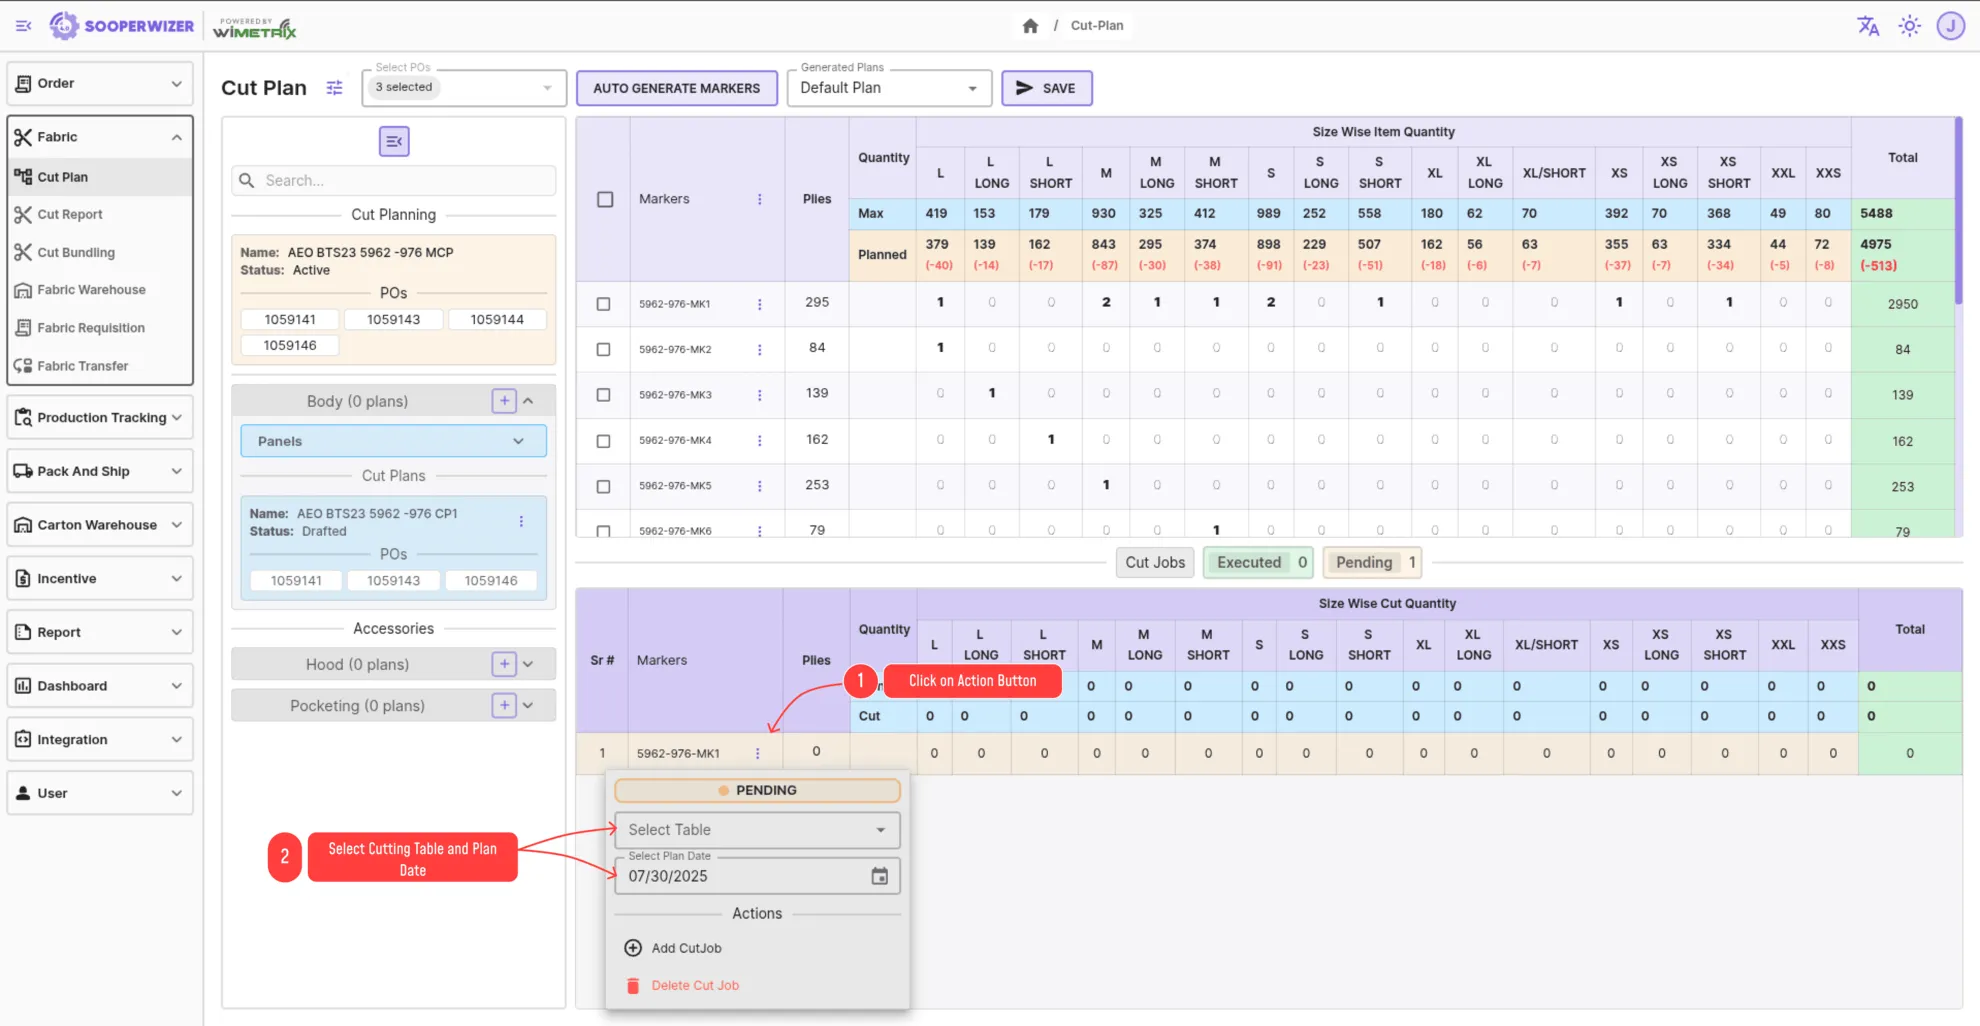
-
The same menu also includes options to:
- Delete the Cut Job
- Add another Cut Job to the same marker
Submission of Cut Plan
Section titled “Submission of Cut Plan”After finalizing the markers and cut jobs, the user can submit the cut plan.
Before submission, the following checks will be performed. If any of these checks fail, the submission will be rejected:
- The cut plan must have at least one marker.
- The sum of all planned quantities across all markers cannot exceed the maximum quantity of that size.
- The sum of all plies in a cut job cannot exceed the total plies of its corresponding marker.
After successfully passing above checks, the user will be able to submit the cut plan and following tables will be populated:
-
CutPlan
- Contains the main cut plan details such as:
CutPlanType[Master, Track, Accessories]CutType[Netting, Pocketing, Facing, Fusing, Hood]CutPlanStatus[Active, ‘Aborted’, ‘Closed’]WorkOrder,StyleNo,BuyMonth,ColorCodeagainst which the cut plan is created
- Contains the main cut plan details such as:
-
CutPlanPoMapping
- Stores all the POs selected for the cut plan
-
CutPlanPanel
- Stores all panels assigned to the selected CutType during cut planning
-
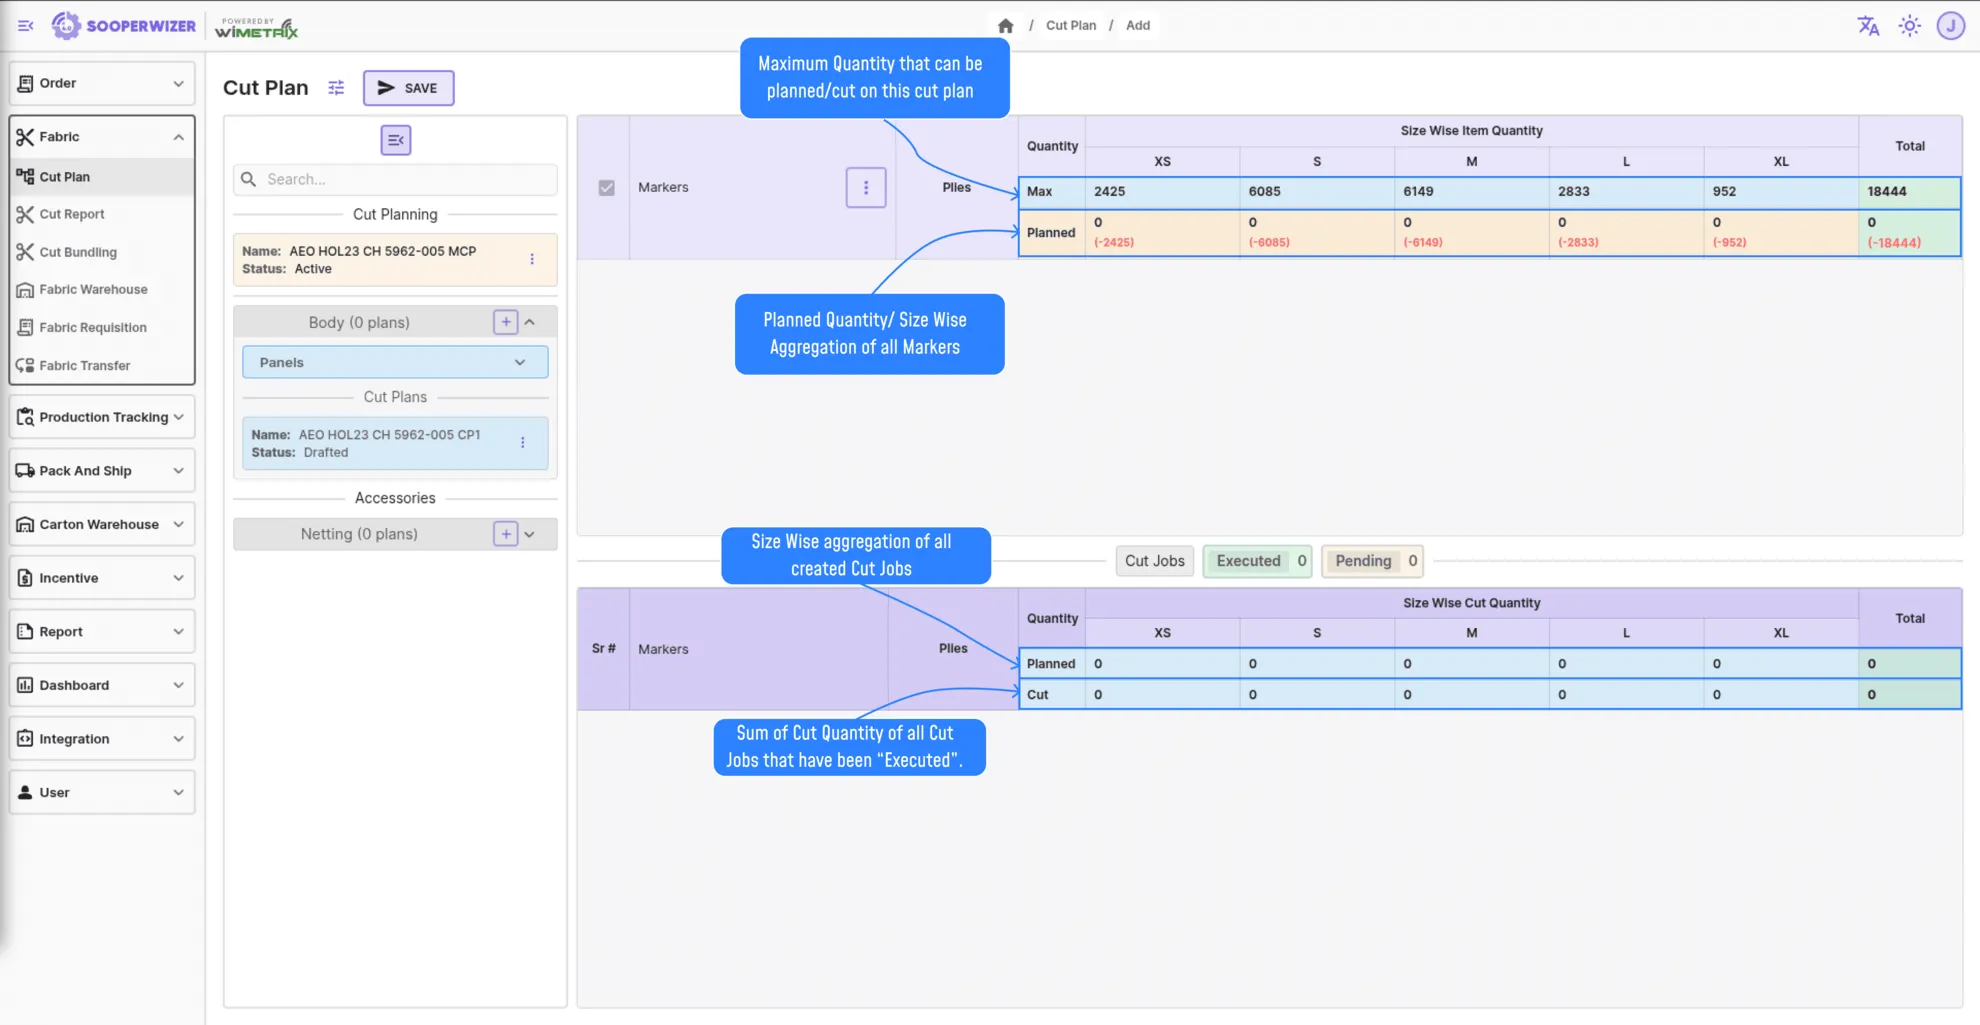
CutPlanSize
- Stores the sum of size-wise quantities (aka Planned Quantity) of all markers in the cut plan
-
Marker
- Store all the markers with their plies.
-
MarkerMapping
- Store the size ratio of every size in that marker
-
CutJob
- This table will store all the cut jobs with following major fields
MarkerIDagainst which the cut job is createdCutPlanIDagainst which the cut job is createdPliesCutNoIncremented based on the previous max CutNo of the same OrId.PlanDateThe date on which user plans to execute this cut job.CuttingTableIDThe table ID of the cutting table on which user plans to execute this cut job.- And other columns like
OrId,ColorCode,StyleNo,CreatedByetc.
- This table will store all the cut jobs with following major fields
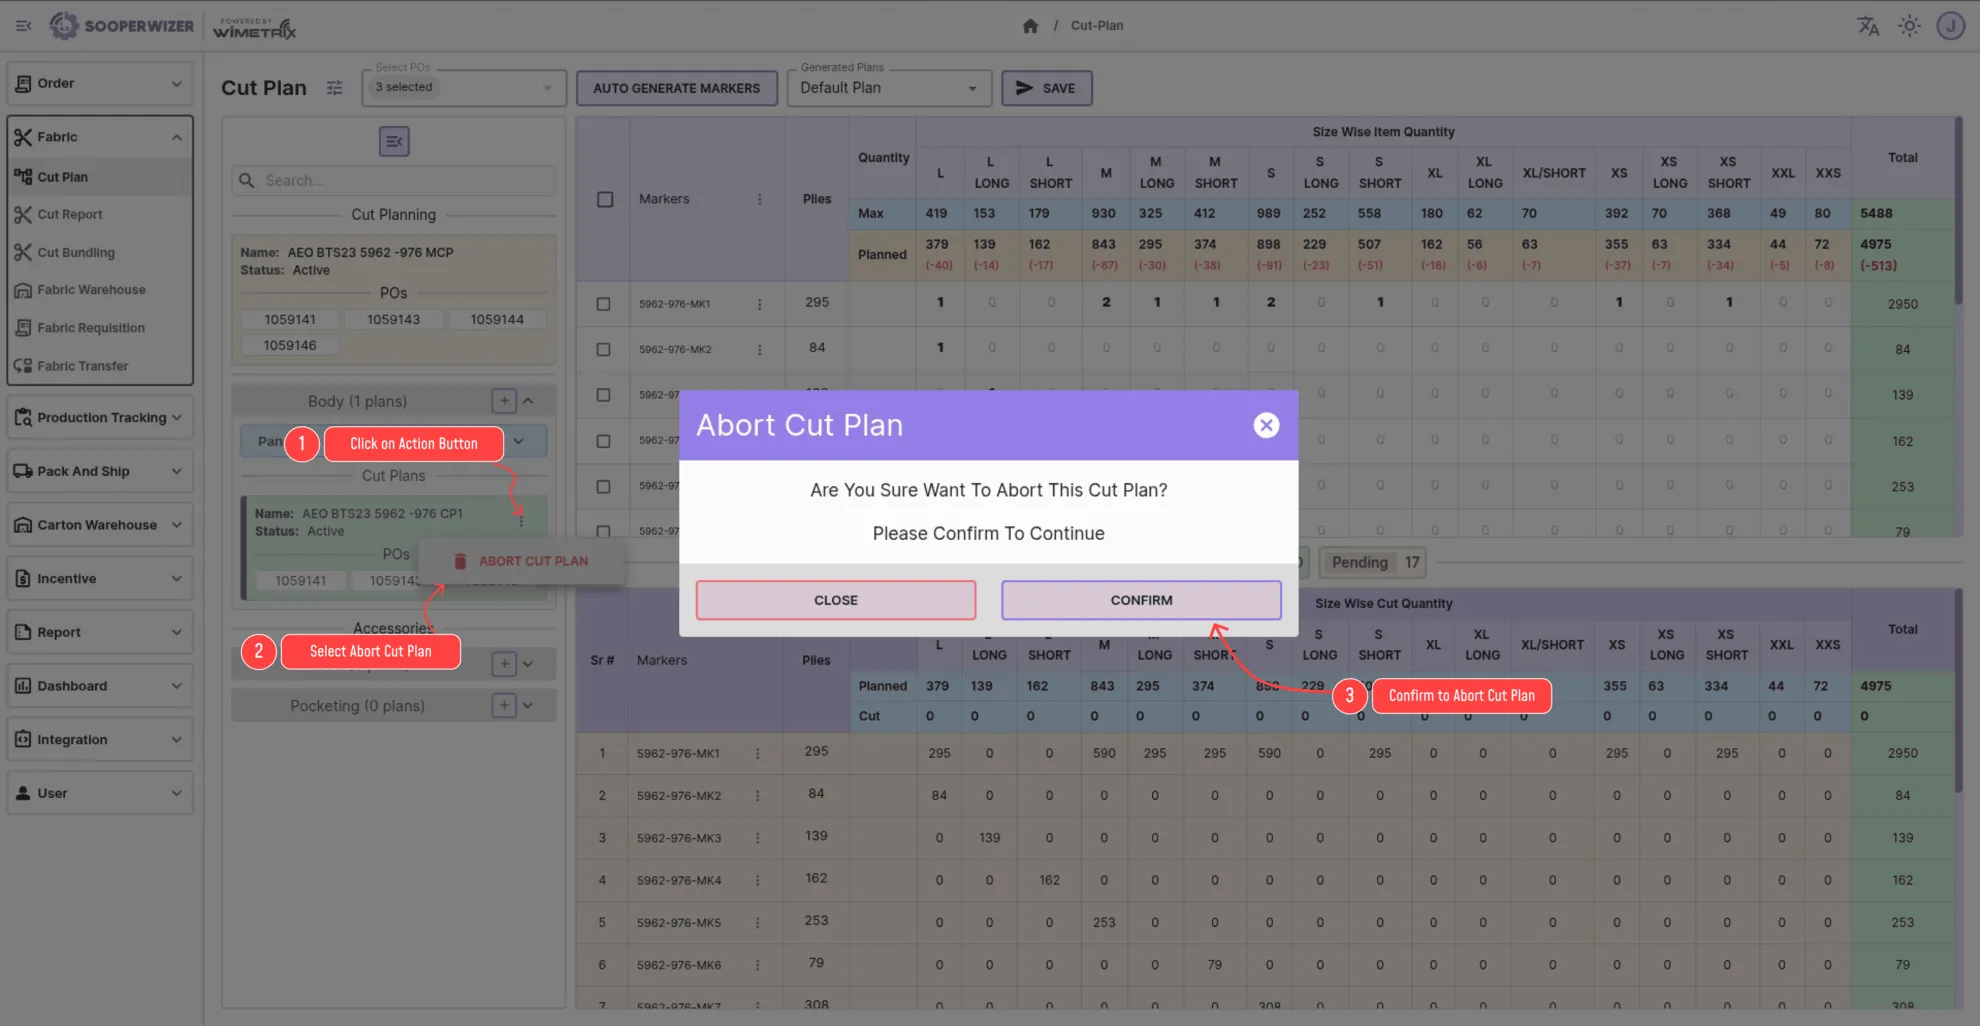
Aborting a Cut Plan
Section titled “Aborting a Cut Plan”On aborting the cut plan, the cut plan will not longer be used.
On aborting following action will be performed:
- The Status of that
CutPlanwill be set toAborted - The
Statusof all pendingCutJobof thatCutPlanwill be set toAborted
Steps to abort a Cut Plan
Section titled “Steps to abort a Cut Plan”- Navigate to left section, here at the top of the selected plan there will be an action icon (⋮) at top right corner of the plan.
- Click on the action icon (⋮) and select
Abort Cut Planfrom the drop down menu. - A prompt will appear asking for confirmation. Click on
Confirmto abort the cut plan.