NiceLabel
NiceLabel is a comprehensive label design and printing software suite, widely used for creating barcode, RFID labels, and other types of labels.
This document aims to guide through the basic functionalities and features of NiceLabel.
Terminology
Section titled “Terminology”An enterprise level nice label software consists of four parts
- NiceLabel Designer
- NiceLabel Automation Builder
- NiceLabel Integration Manager
- NiceLabel Print Service
NiceLabel Designer
Section titled “NiceLabel Designer”NiceLabel Designer is used to make static or dynamic UI of the labels.
Following steps can be followed to generate a new label.
-
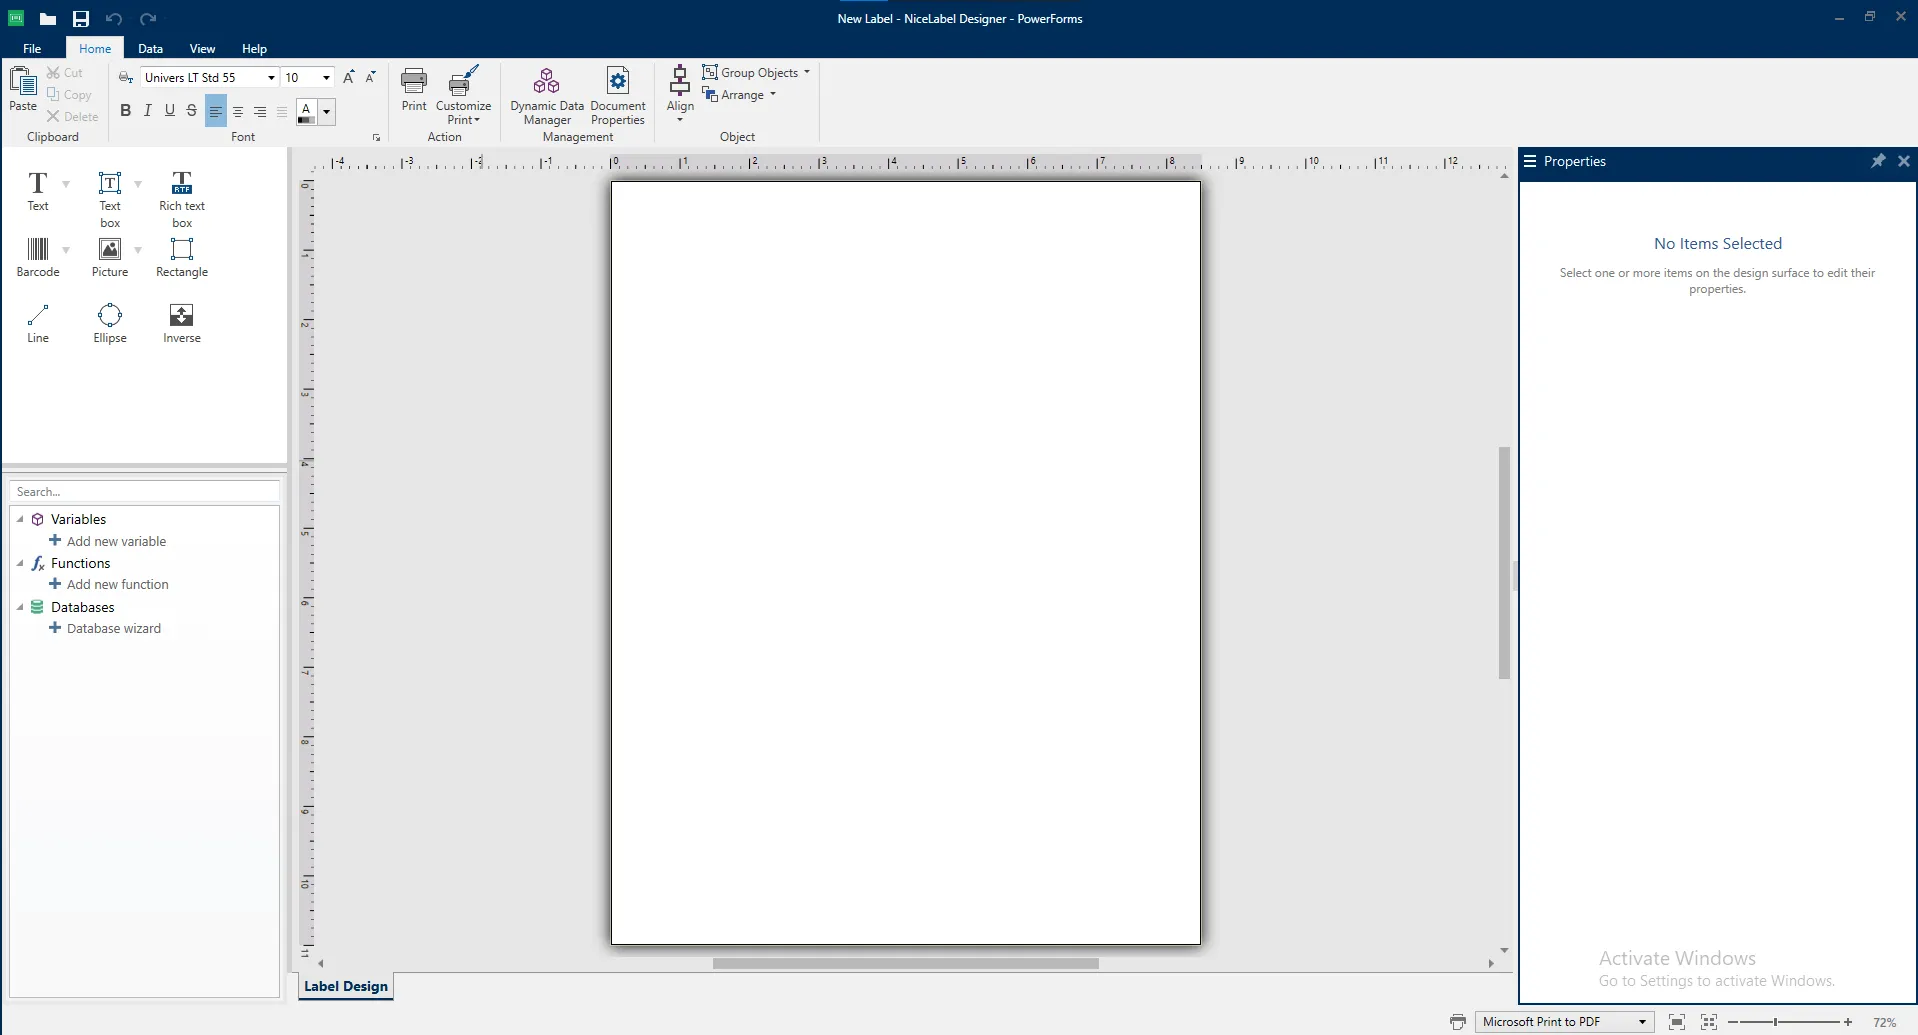
Open Nice label Designer Software and click on new label.
-
Select printer from the dropdown in next screen.
-
You can click the next button at bottom of popup if you want to change like
page orientationorcustom page size.Else click Finish Button and a blank label will be created like below.
Detailed docs about creating new labels
In the top section of left menu there are some items that are used for designing the label And the bottom section in left menu is used to print dynamic data on label
1. Top Section
Section titled “1. Top Section”The top section is straightforward and self-explanatory based on the names of the elements, but let’s briefly discuss them.
Text Field
Section titled “Text Field”Text field is simple field in which any text can be written. It adjust its size according to its content. This is the most used entity in NiceLabel Designer
Text Box
Section titled “Text Box”Text Box is similar to Text Field with only key difference
that it can wrap the text according to its specified width.
Barcode
Section titled “Barcode”Barcode is use to print barcode or QR code of different types.
To change the type of barcode just simply click on barcode option and click on the label a barcode will be printed and on left section under Barcode section you can select other types of barcode.
We use Code128 type barcode with our NiceLabel labels.
Picture
Section titled “Picture”Picture is used to add image on label. To insert the image just simple drag and drop image on label or click on the picture on left menu bar, click on screen and a popup will be opened to select the image.
Basic Shapes
Section titled “Basic Shapes”After picture their are some shapes like circle, rectangle and line that is used to draw any sort of shape or inset borders etc.
Inverse
Section titled “Inverse”At last you can see inverse option that just invert the text color and background color of text.
2. Bottom Section
Section titled “2. Bottom Section”Bottom section is crucial for printing dynamic content in label.
Variables
Section titled “Variables”Variables are used to store dynamic content in them that can be then print on label.
There are four types of variables
-
Variable: Used to store any dynamic data coming from outward source.
-
Current Date: Used to print current date on label.
-
Current Time: Used to print current time on label.
-
Counter: Used to print how many labels have been print.
Steps to create a variable
-
Click on create variable on bottom section of left menu.
-
Enter variable name and hit create.
-
Drag the variable form left menu and drop on screen.
Functions
Section titled “Functions”Function in NiceLabel provides various functionalities for data manipulation.
There are many type of them but we mostly just use the concatenate function.
Concatenate Function
Section titled “Concatenate Function”Concatenate function merges two or more data source values into a single value.
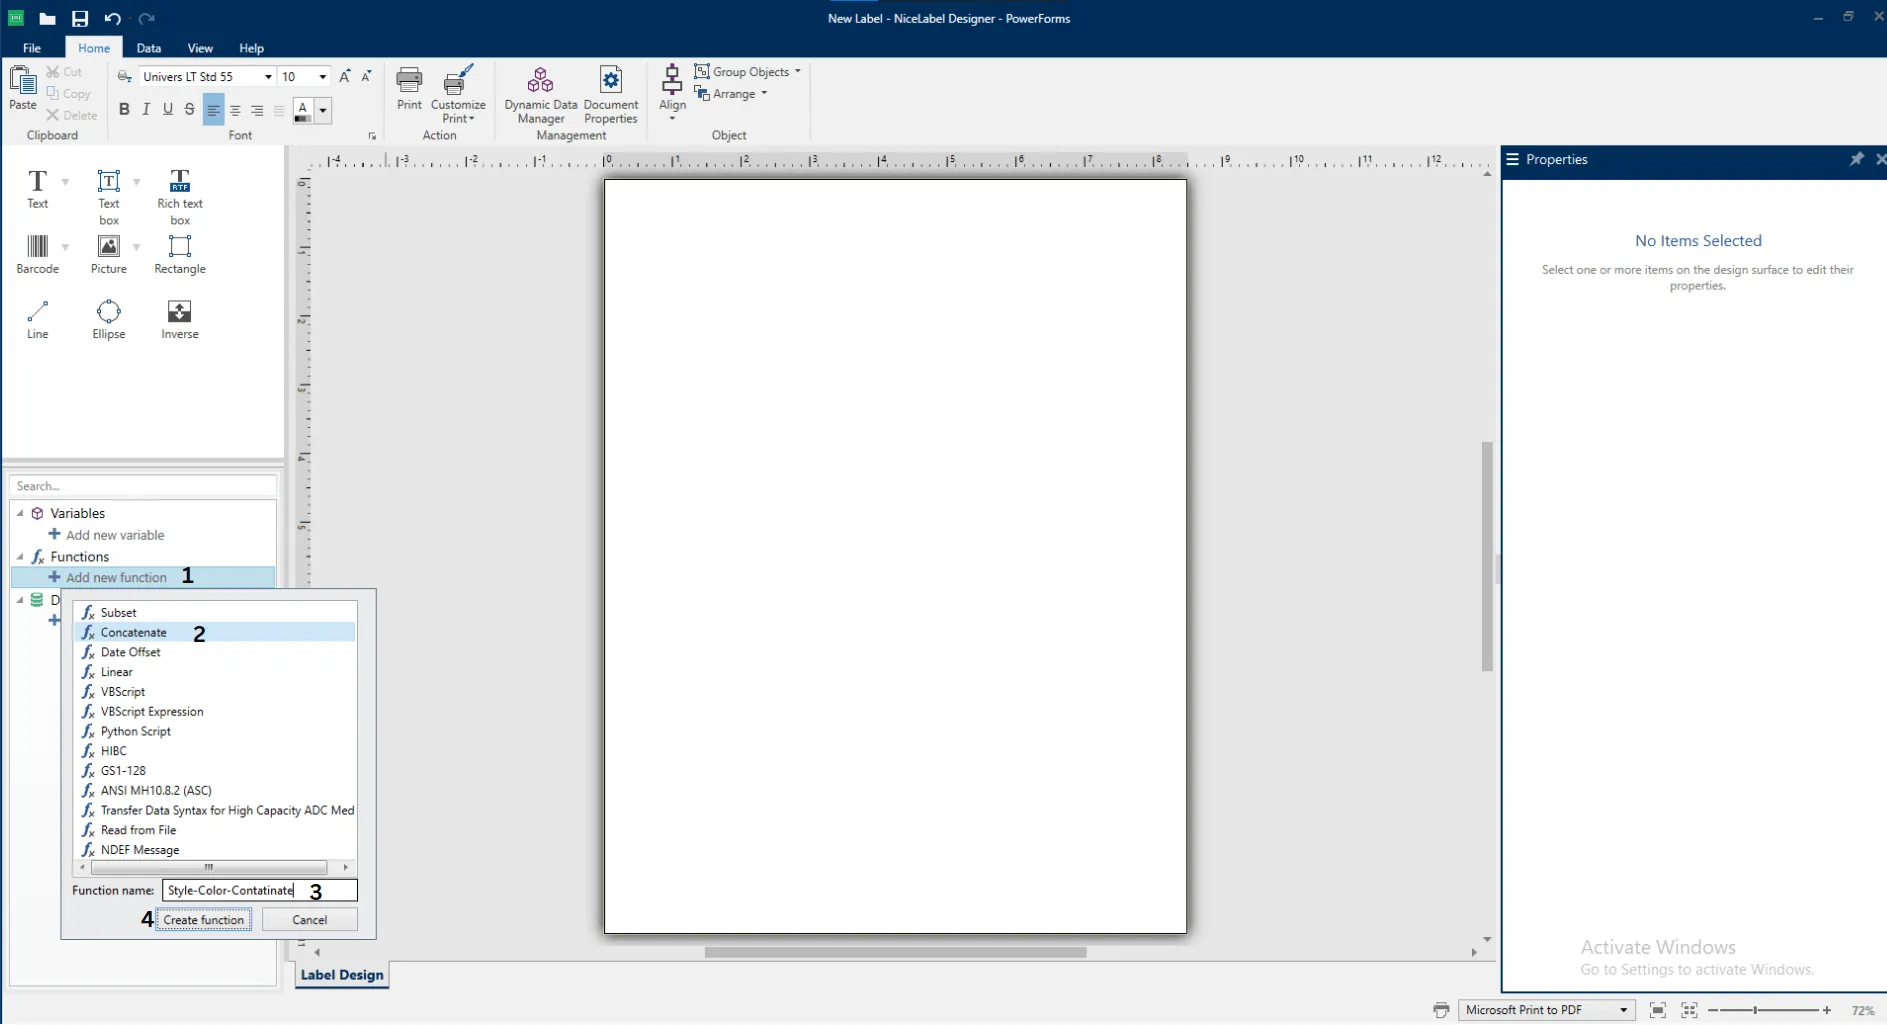
Suppose we have two variables names as Style and Color and we want to concatenate them.
-
Select function option from left menu, click on concatenate function write you function name and click on create
-
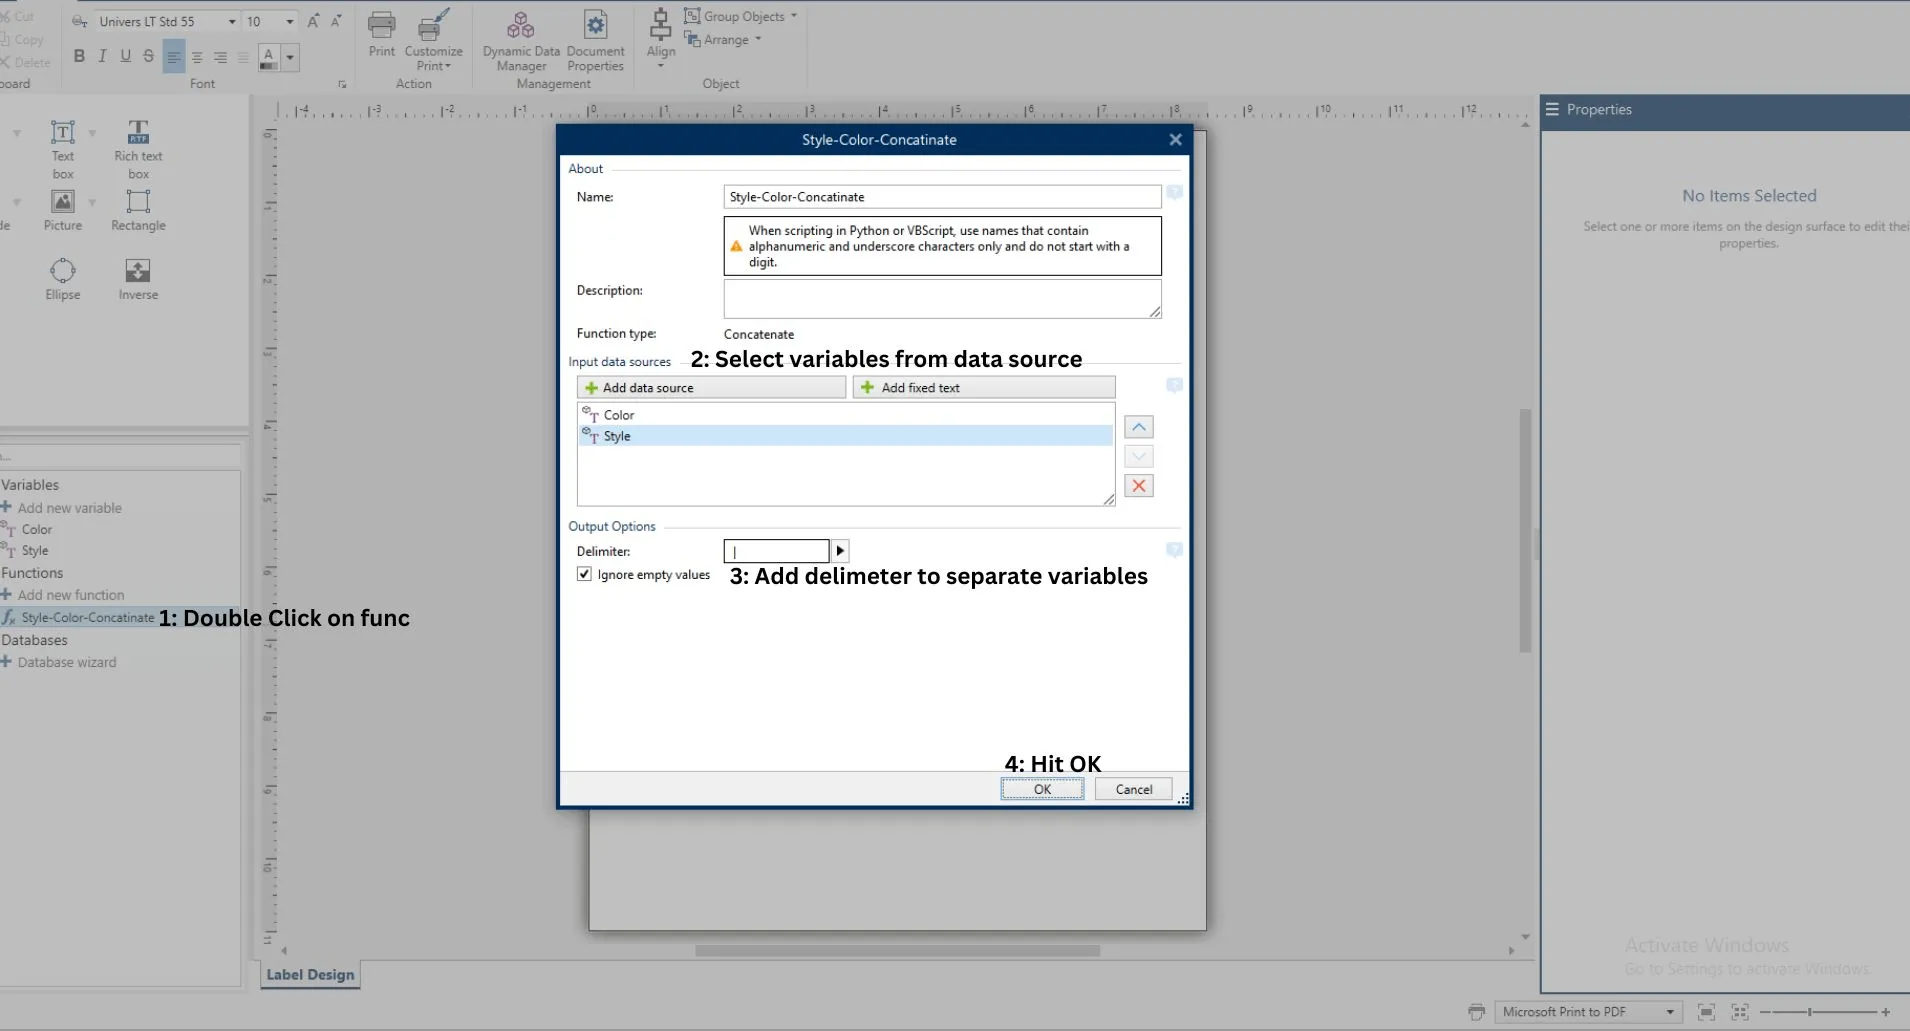
Double click on the created function, a popup will be shown select the variable that we want to concatenate.
-
Select the delimiter that separates the both variables and click ok.
-
Just drag and drop function from the left menu on screen.
Database
Section titled “Database”Databases can be used as a dynamic data source for label.
Database can be any external data source like excel or sql.
We don’t use db directly in the designer as we need to automate our printing process so we use NiceLabel Builder and NiceLabel Integration Manager to print labels.
NiceLabel Automation Builder
Section titled “NiceLabel Automation Builder”NiceLabel Automation Builder is a tool that helps automate label printing processes, making them faster and reducing the need for manual work.
It integrates with existing business systems, including Web Integration, Excel, and database.
In our case we use
- Database Integration
- Web Integration(HTTP Server)
Database Integration
Section titled “Database Integration”Nice Label Builder offers a good range of commonly used databases like sql and oracle etc to integrate and ODBC to integrate with other types of dbs and external resources.
Steps to automate label printing using db integration
Connecting to DB
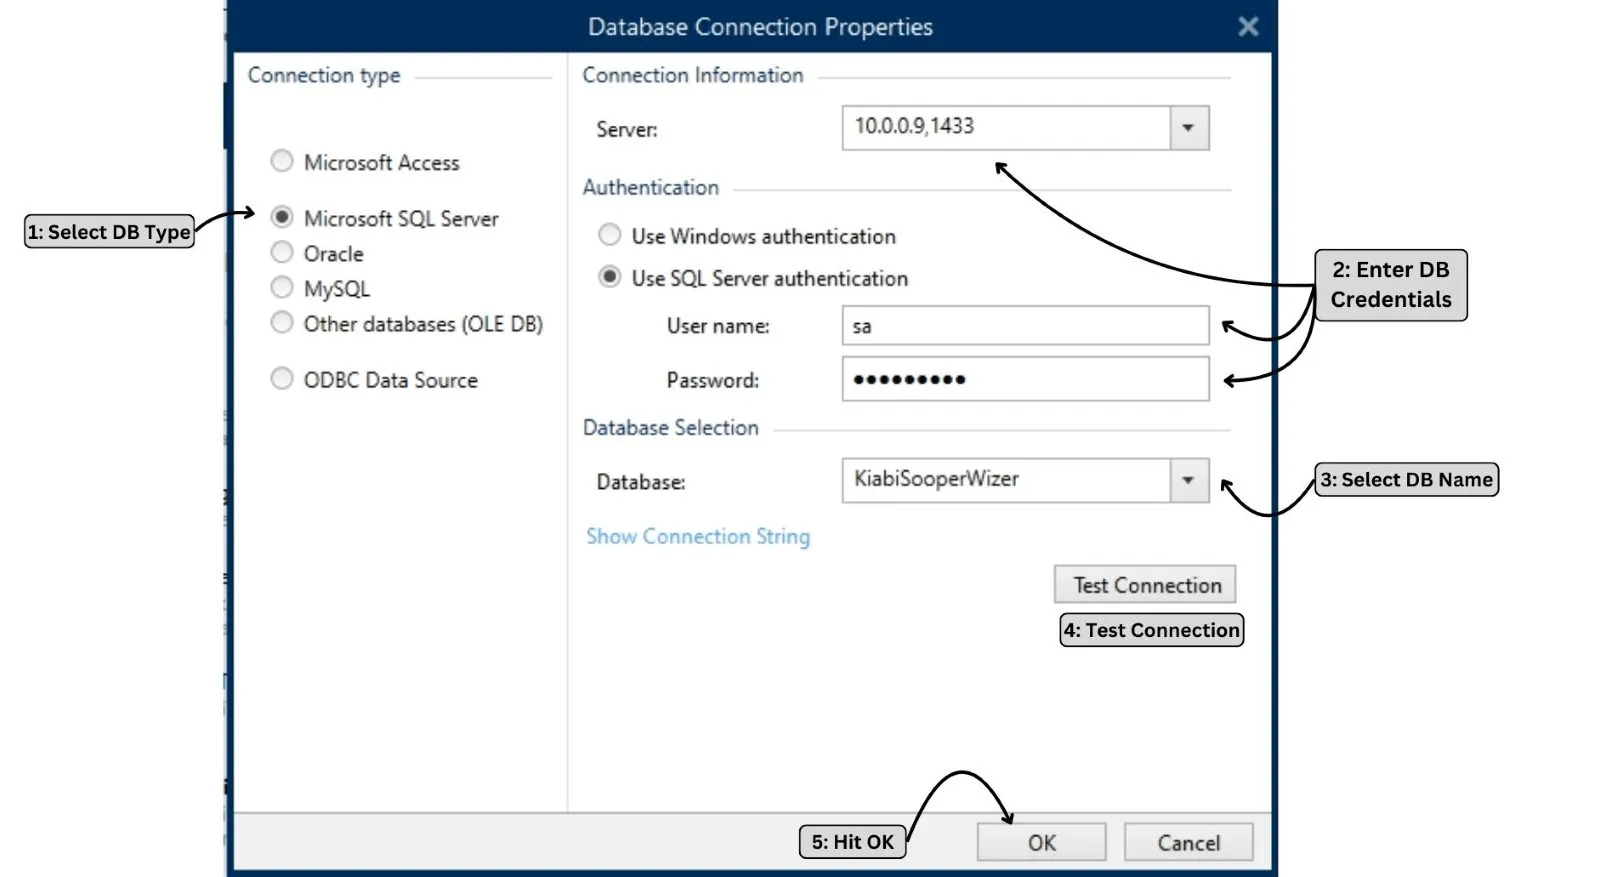
Section titled “Connecting to DB”To connect to SQL DB:
-
Open Nice Label Automation Builder:
Click on
New Configurationand selectDatabase Trigger.You should see the following page.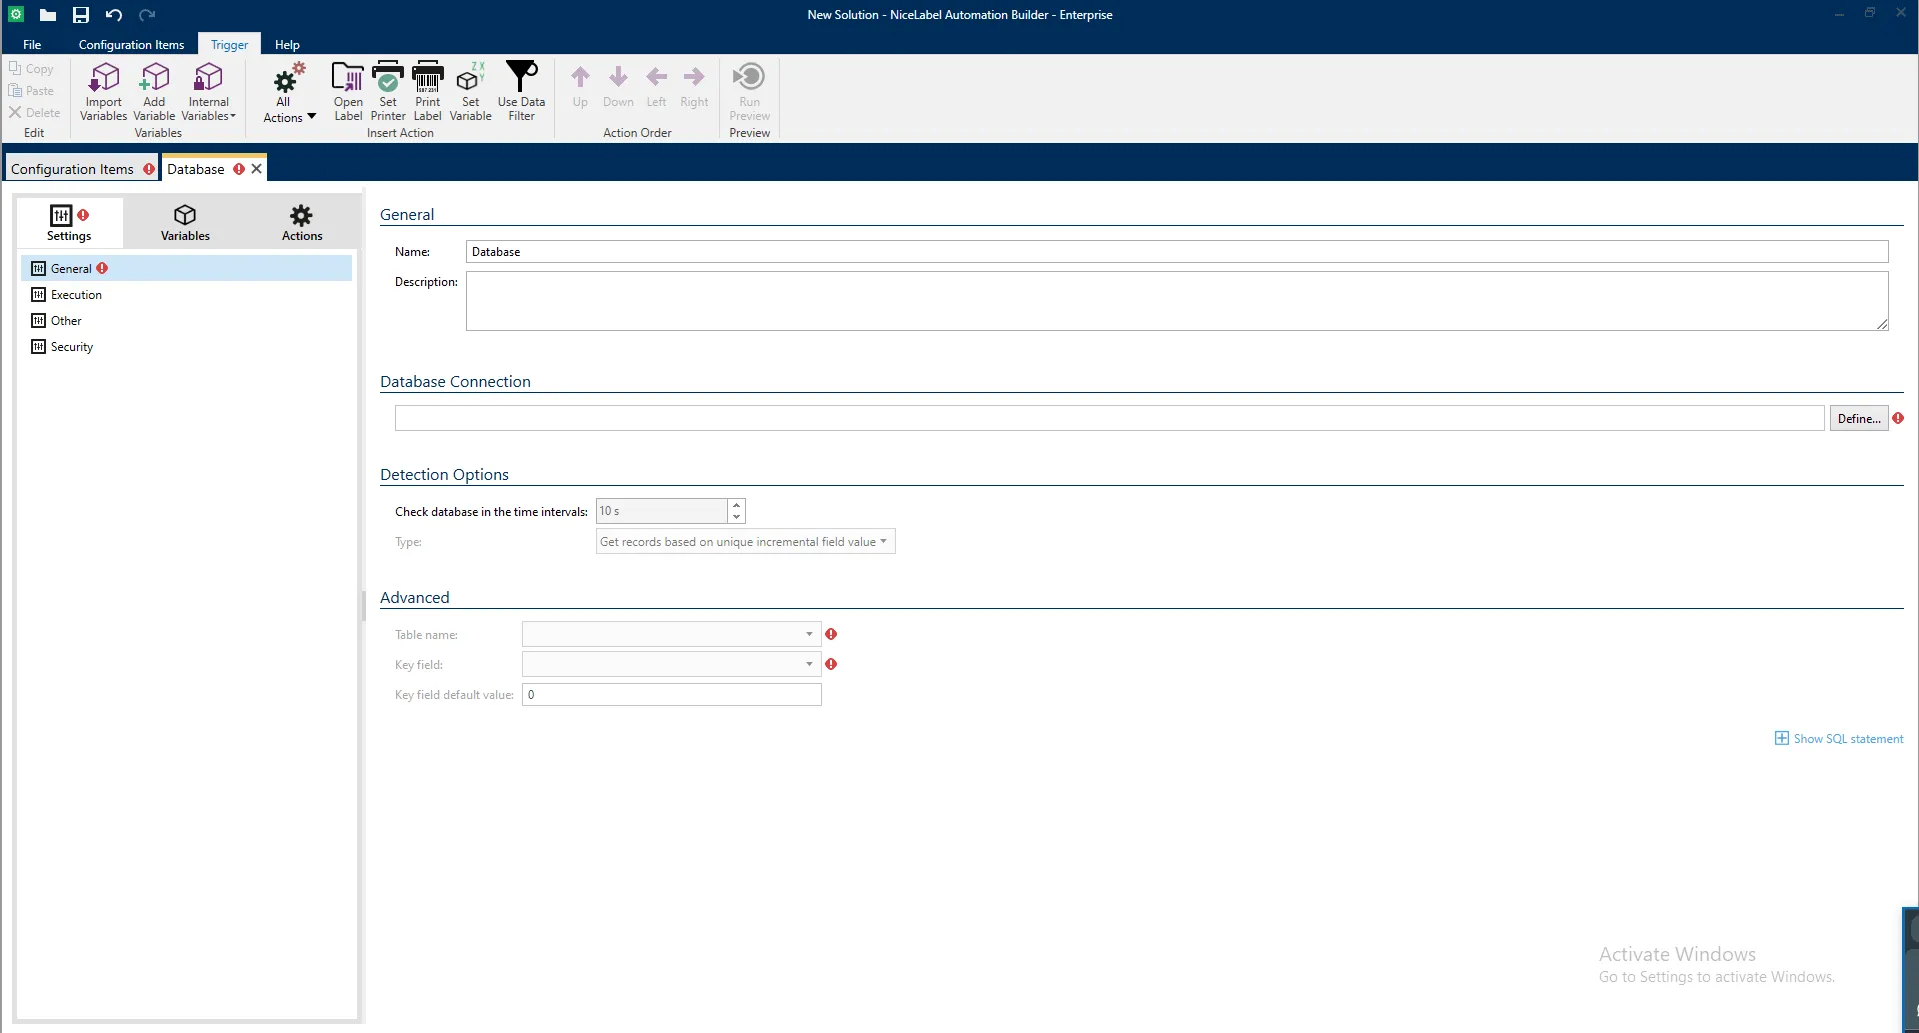
-
Click on
Definebutton under Database Connection. -
Select the
SQL DBfrom left menu, Enter the db credential. -
Click on
Test Connectionto test the connection, then clickOK.
Visual representation of above steps
Print Detection Options
Section titled “Print Detection Options”After following the above procedure, you can configure the conditions under which the builder will print the label on the next screen.
We have the following options to set conditions for printing:
-
Get records on based on unique incremental field
-
Get records and delete them
-
Get records and update them
-
Get and manage records with custom SQL
Get records on based on unique incremental field
Section titled “Get records on based on unique incremental field”Retrieves rows from the database based on a selected incremental field (e.g., Primary Key, CreateAT field) and prints them.
The builder stores the highest ID from the previous prints and on next call, only fetches rows with IDs greater than the previous highest one.
Gets records and delete them
Section titled “Gets records and delete them”Retrieves rows from the database, sends them for printing, and then deletes them.
Get records and update them
Section titled “Get records and update them”Retrieves rows from the database based on your selected field that does not match the value you will update after printing.
Sends them for printing and updates the specified column with a given value.
For instance, after printing, update the isPrinted column to 1 for each printed record to mark it as processed.
Get and manage records with custom SQL
Section titled “Get and manage records with custom SQL”To handle extra cases, nicelabel provide the feature to write the custom queries.
Suppose we have a scenario to print the label from different PCs that need to get the records from same Database and Table.
To handle this scenario we will add some check in database on basis of which we will tell the both PCs which records they needs to fetch.
Suppose we have check in database named as PrinterNo (type int).

- Database stores records with a PrinterNo field.
- Computer checks periodically for new records.
- Computer sends records to Printer 1 and Printer 2 based on their PrinterNo.
Table Selection
Section titled “Table Selection”From the advanced section at the bottom select table from which you want to print the records.
Importing variables from label file
Section titled “Importing variables from label file”Click on second tab Variables. Following screen will appear.
You should see the following page.
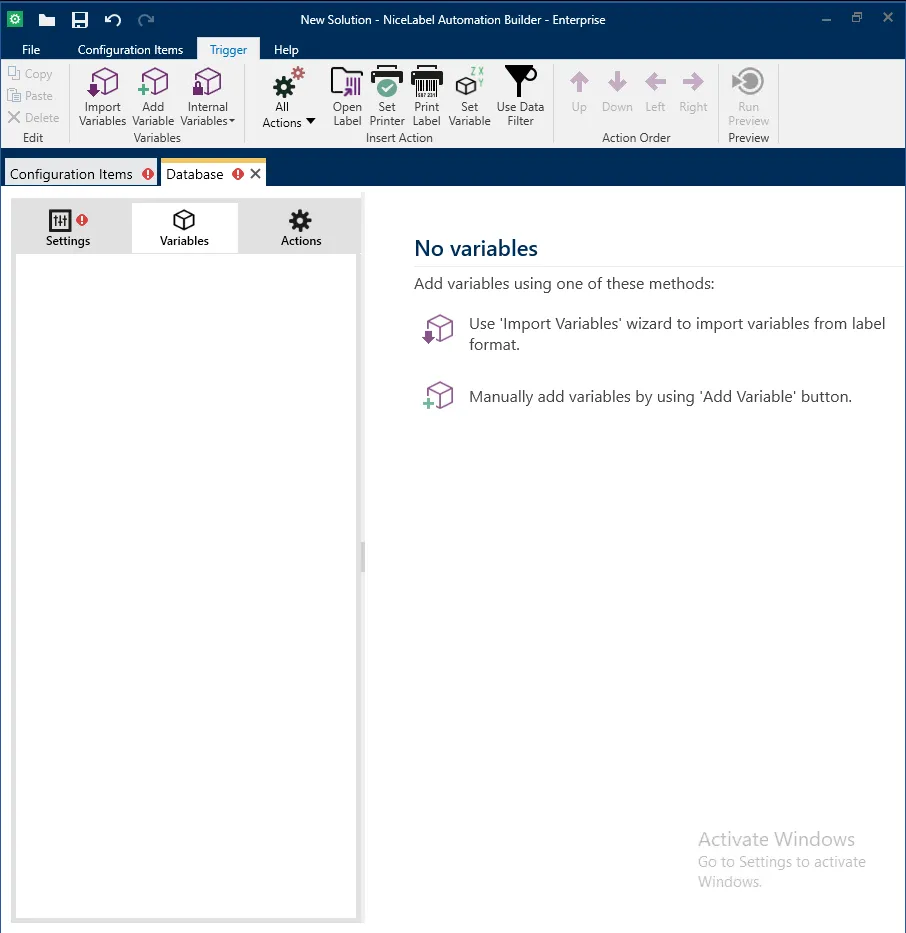
Click on Import button to import variables from label file.
Select the label file from the file explorer and click on Open.
All the variables from the label file will be imported to the automation.
Defining Print Job
Section titled “Defining Print Job”1) Mapping variables with database entries
Section titled “1) Mapping variables with database entries”CLick on third tab Actions
Here you will see all the fields of the table that you selected in the Table Selection step.
If the variable imported from the label file and names of the database columns
are same, then you can directly map the variables by clicking on
Auto Map button at bottom right corner.
Else you can map the variables manually from the selection in front of every database variable.
2) Defining Print Actions
Section titled “2) Defining Print Actions”2.1) Add label file
Section titled “2.1) Add label file”CLick on the Open Label button from the top menu.
A new entry will be added in the list in left sidebar.
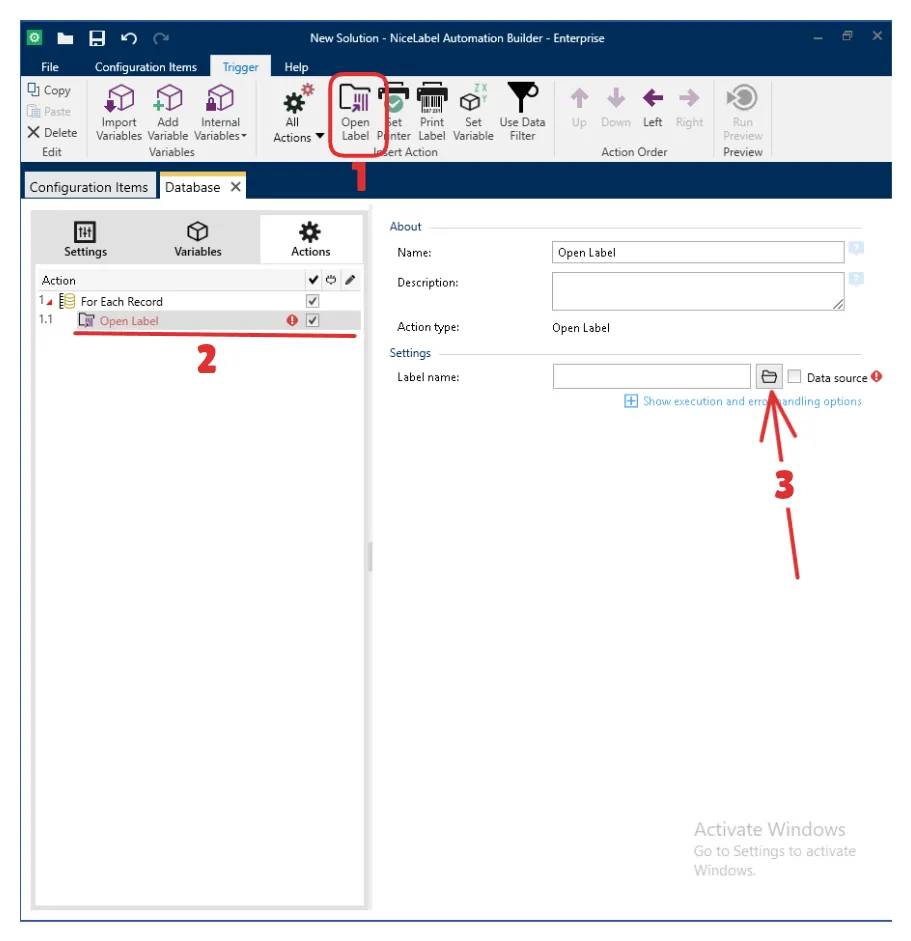
Click on the File Explorer icon to select the label file.
2.2) Set Printer
Section titled “2.2) Set Printer”Click on the Set printer button from the top menu on the right side of Open Label button.
Select the printer from the dropdown in the opened screen.
2.3) Print label
Section titled “2.3) Print label”Add print label job by clicking on Add Print Label button from the
top menu on the right side of Set Printer button.
3) Deploy Configuration
Section titled “3) Deploy Configuration”To deploy the configuration, click on Deploy Configuration button from the
very top menu and then click on the Deploy Configuration button.
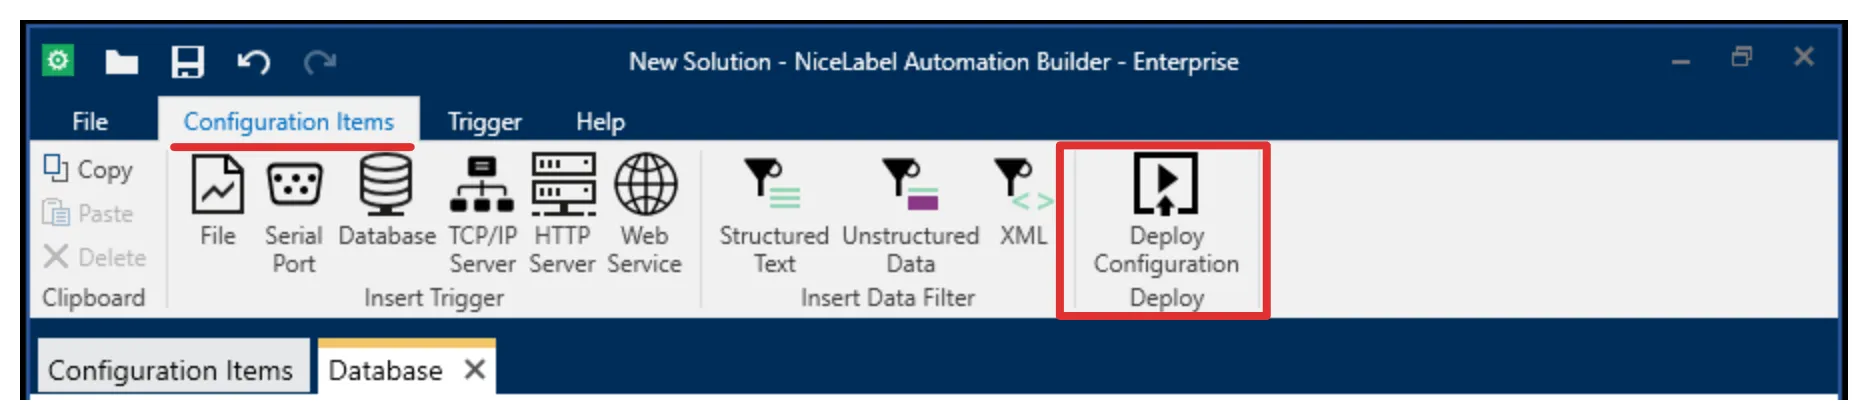
This will deploy and opens the nicelabel manager software.
By default the configuration deployed on the manager will be stopped.
Click on Start button to start the configuration.
To test all of the process simply add a new record in the database. This will trigger the automation and print the label.