New SooperWizer Deployment
Introduction
Section titled “Introduction”This guide outlines the recommended process for deploying the New SooperWizer in a client environment. Two deployment approaches are supported:
- On-Premises Deployment
- Cloud Deployment
On-Premises Deployment
Section titled “On-Premises Deployment”On-premises deployments utilize Docker for service packaging, with port-based service configuration and APISIX for routing. Follow the steps below to prepare the server and install the required components.
-
Clone the Repository
Section titled “Clone the Repository”Clone the deployment repository to the server:
-
Ensure Git is installed:
sudo apt update && sudo apt install -y git -
Clone the repository:
git clone https://github.com/WiMetrixDev/ansible-deployments.git
-
-
Install Prerequisites
Section titled “Install Prerequisites”The prerequisite installation scripts are located in
Pack_And_Ship_Module/Linux.-
Change to the directory:
cd ansible-deployments/Pack_And_Ship_Module/Linux -
Make the installer executable and run it:
sudo chmod +x install_prerequisites.shsudo ./install_prerequisites.sh
This installs Docker, nvm, Node.js, and other required tools.
-
-
Install APISIX
Section titled “Install APISIX”Install and configure APISIX using the provided script.
- Make the script executable and run it:
sudo chmod +x install_apisix.shsudo ./install_apisix.sh
The script will deploy and configure APISIX for routing.
- Make the script executable and run it:
-
Install Keycloak
Section titled “Install Keycloak”Install and configure Keycloak using the provided script.
-
Make the script executable and run it:
sudo chmod +x install_keycloak.shsudo ./install_keycloak.sh -
The installer will prompt for database connection details:
DB_HOST,DB_PORT,DB_NAME,DB_USER,DB_PASS— provide the appropriate values for your environment. -
After installation, access the Keycloak admin console in a browser at:
http://localhost:8080 -
The default username and password are
admin. -
For initial realm and client configuration, refer to the Keycloak initial setup documentation: Keycloak Initial Setup.
-
-
Deploy Frontend and Backend Services
Section titled “Deploy Frontend and Backend Services”For initial configuration, a Jenkins job has been set up to handle the process.
- Navigate to the Jenkins Server.
- Log in using your credentials.
- You will see the following page:
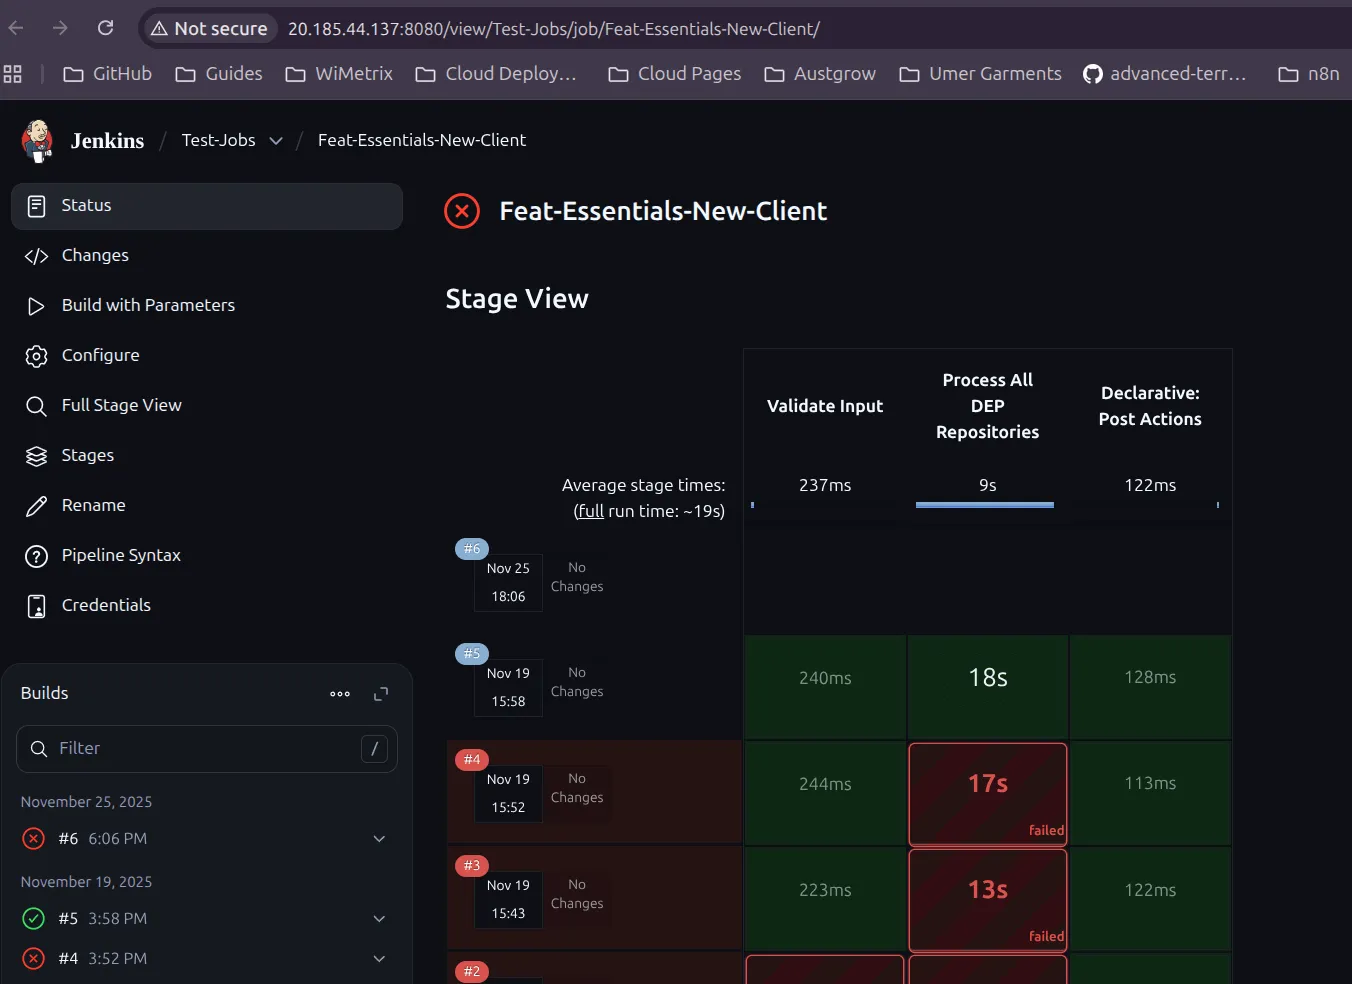
- Click on
Build with Parameters. - You will be prompted for the following details:
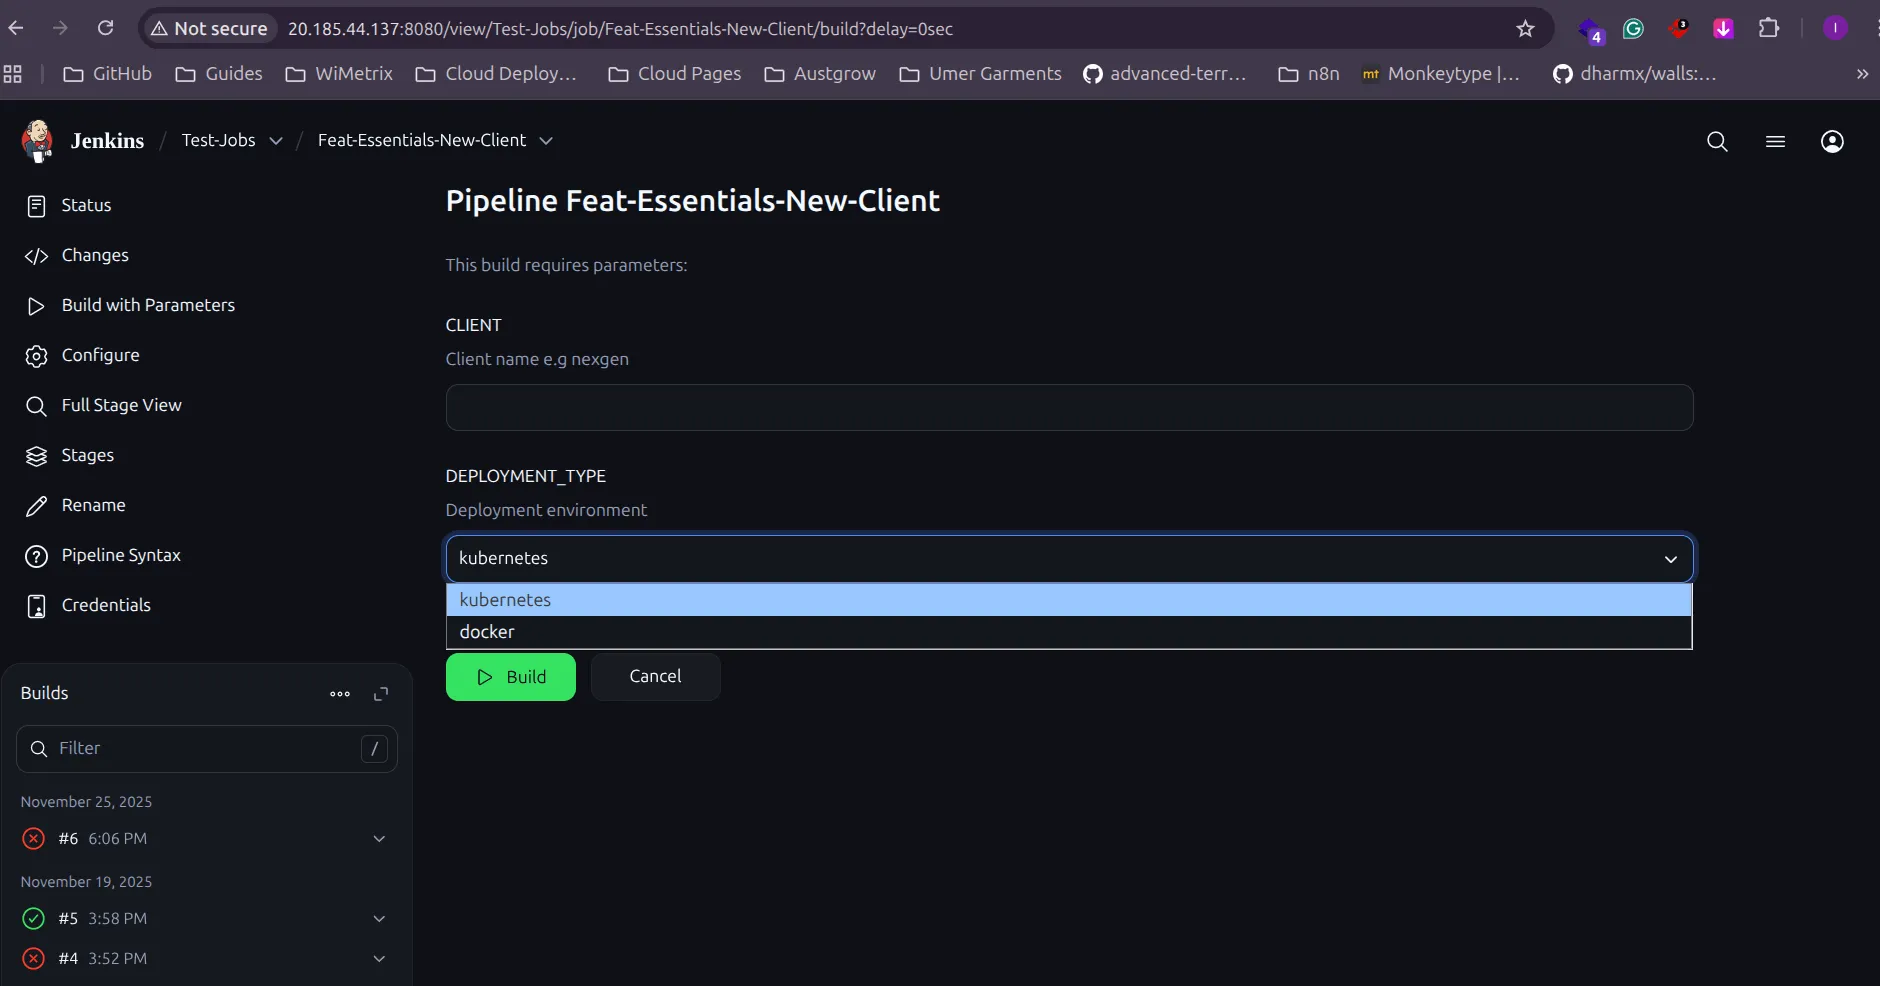
- Provide the
Client Nameand select theDeployment Type(e.g., Docker-based or Kubernetes-based deployment). - Enter the
Client Nameand selectdockerfrom the dropdown menu. This will create a new branch in the deployment repositories. - Next, create a self-hosted runner on the GitHub repository Dep-Sync.
- Ensure you have admin permissions to create a runner in the repository.
- Go to Settings > Actions > Runners and click
New self-hosted runner.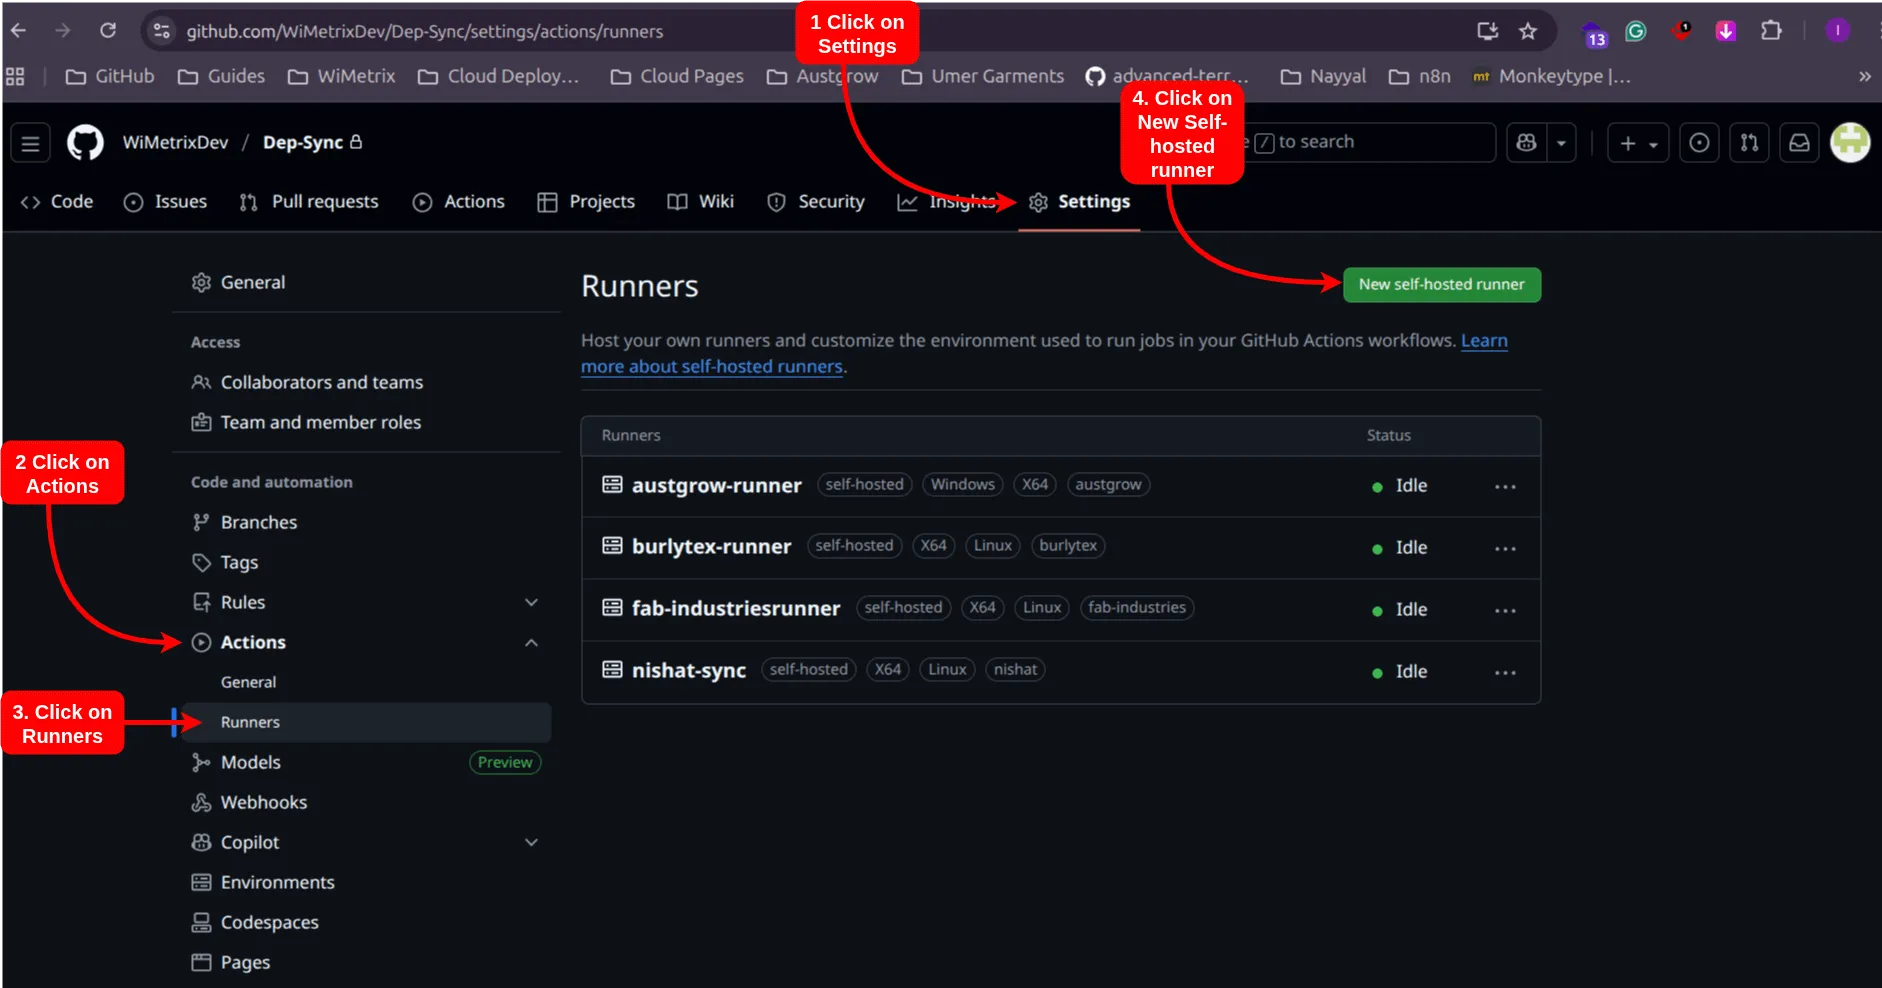
- Clone the repository using the command:
git clone https://github.com/WiMetrixDev/Dep-Sync.giton your local system. - This will provide access to all GitHub Actions jobs.
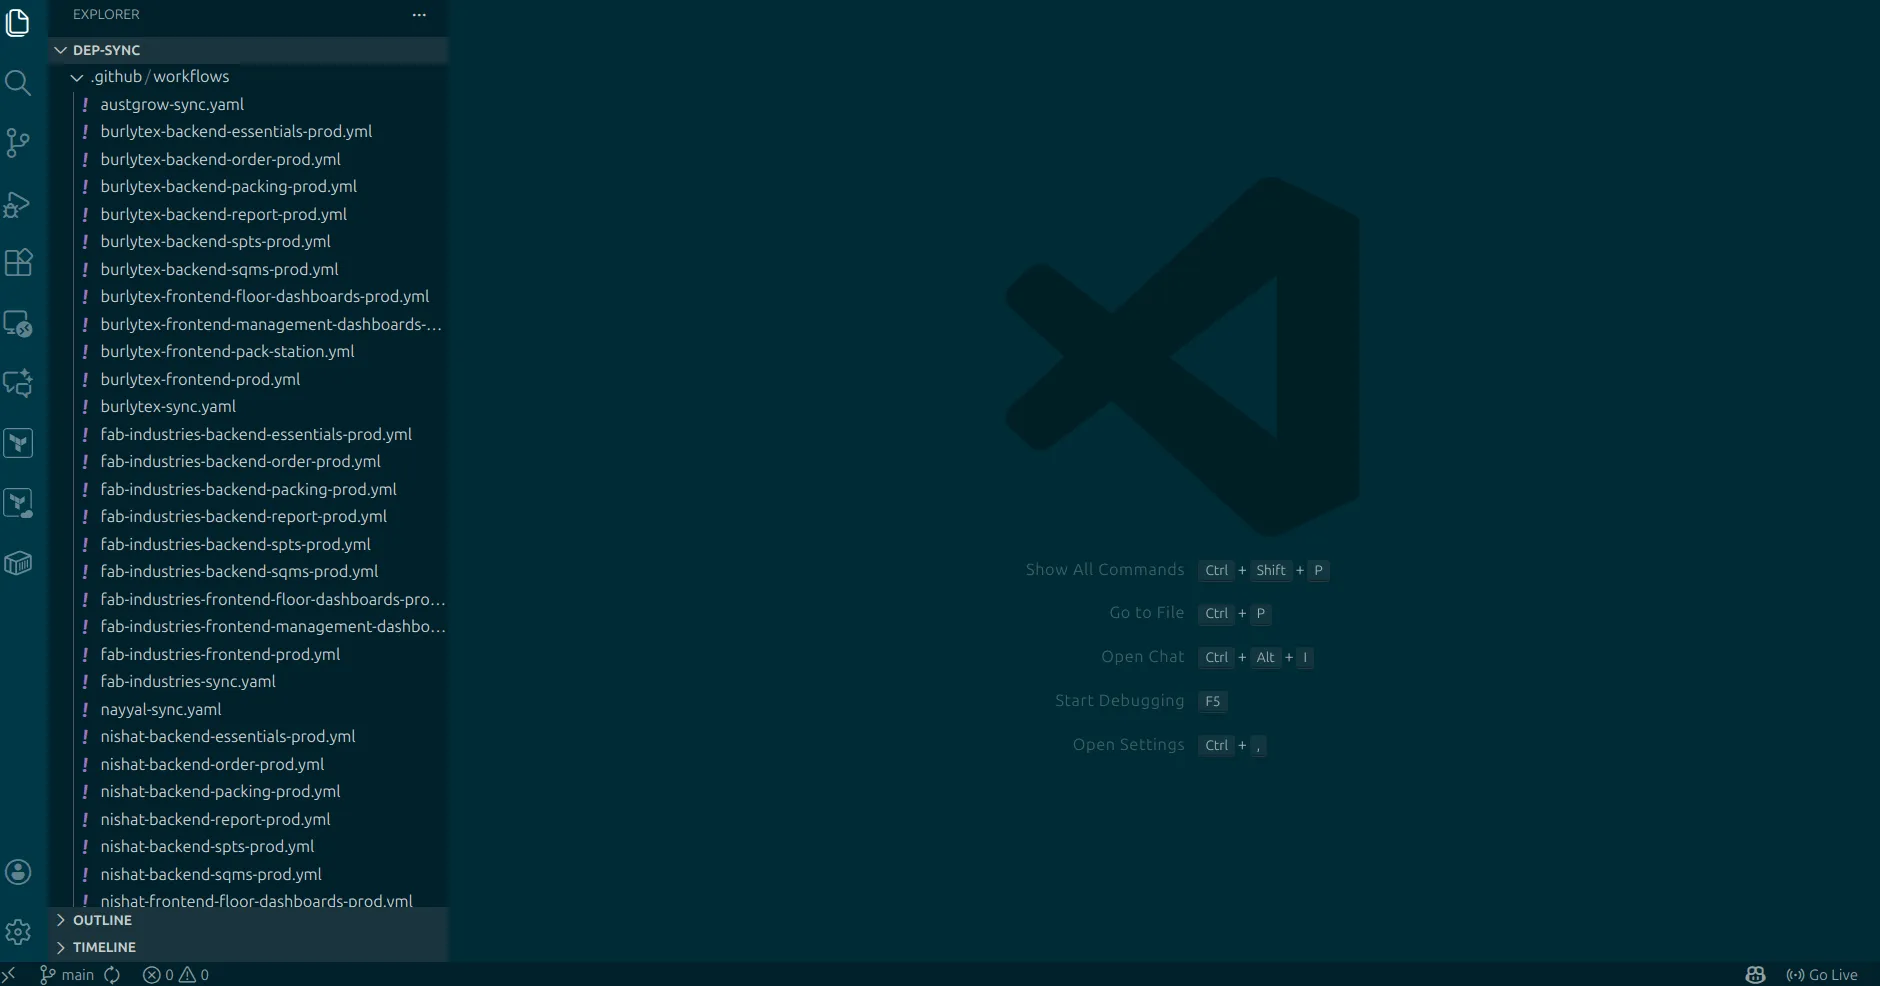
- Make a copy of these jobs and rename them to reflect the client name.
- Edit the container image name and client name accordingly.
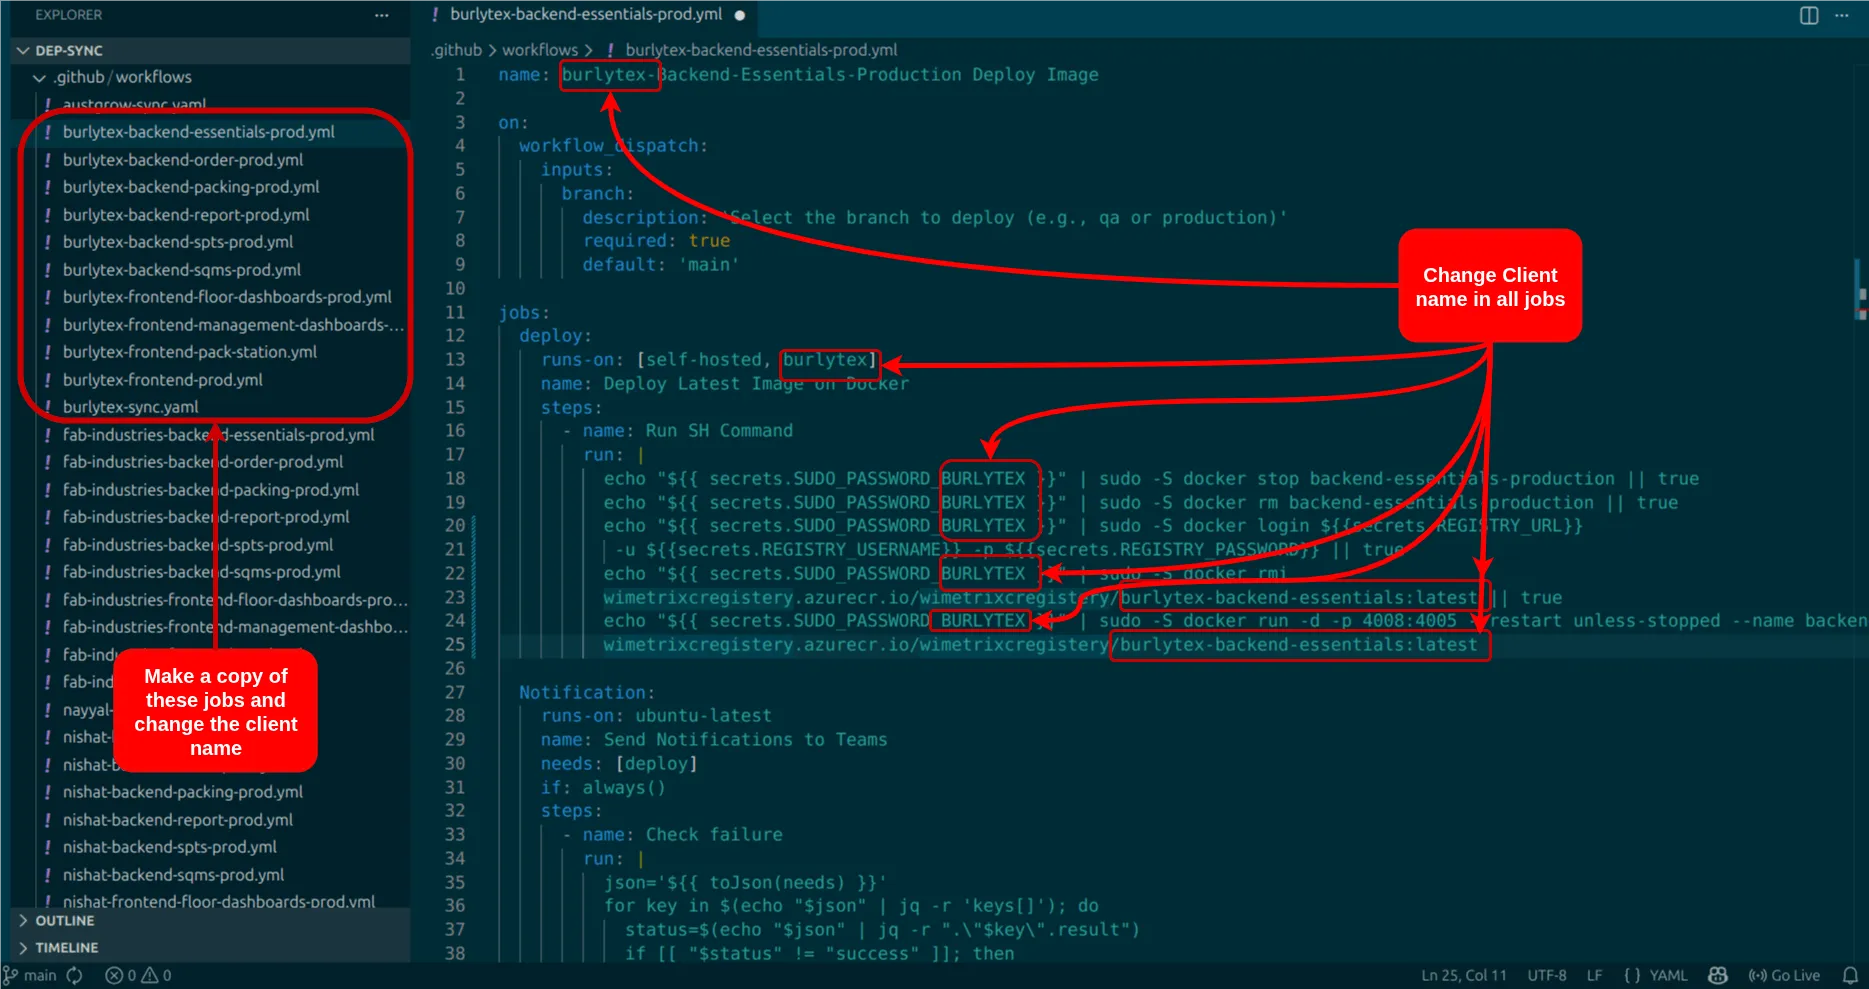
- Create secrets named
SUDO_PASSWORD_CLIENT_NAME,CLIENT_NAME_ENV, andCLIENT_NAME_APISIXfor APISIX and Keycloak synchronization.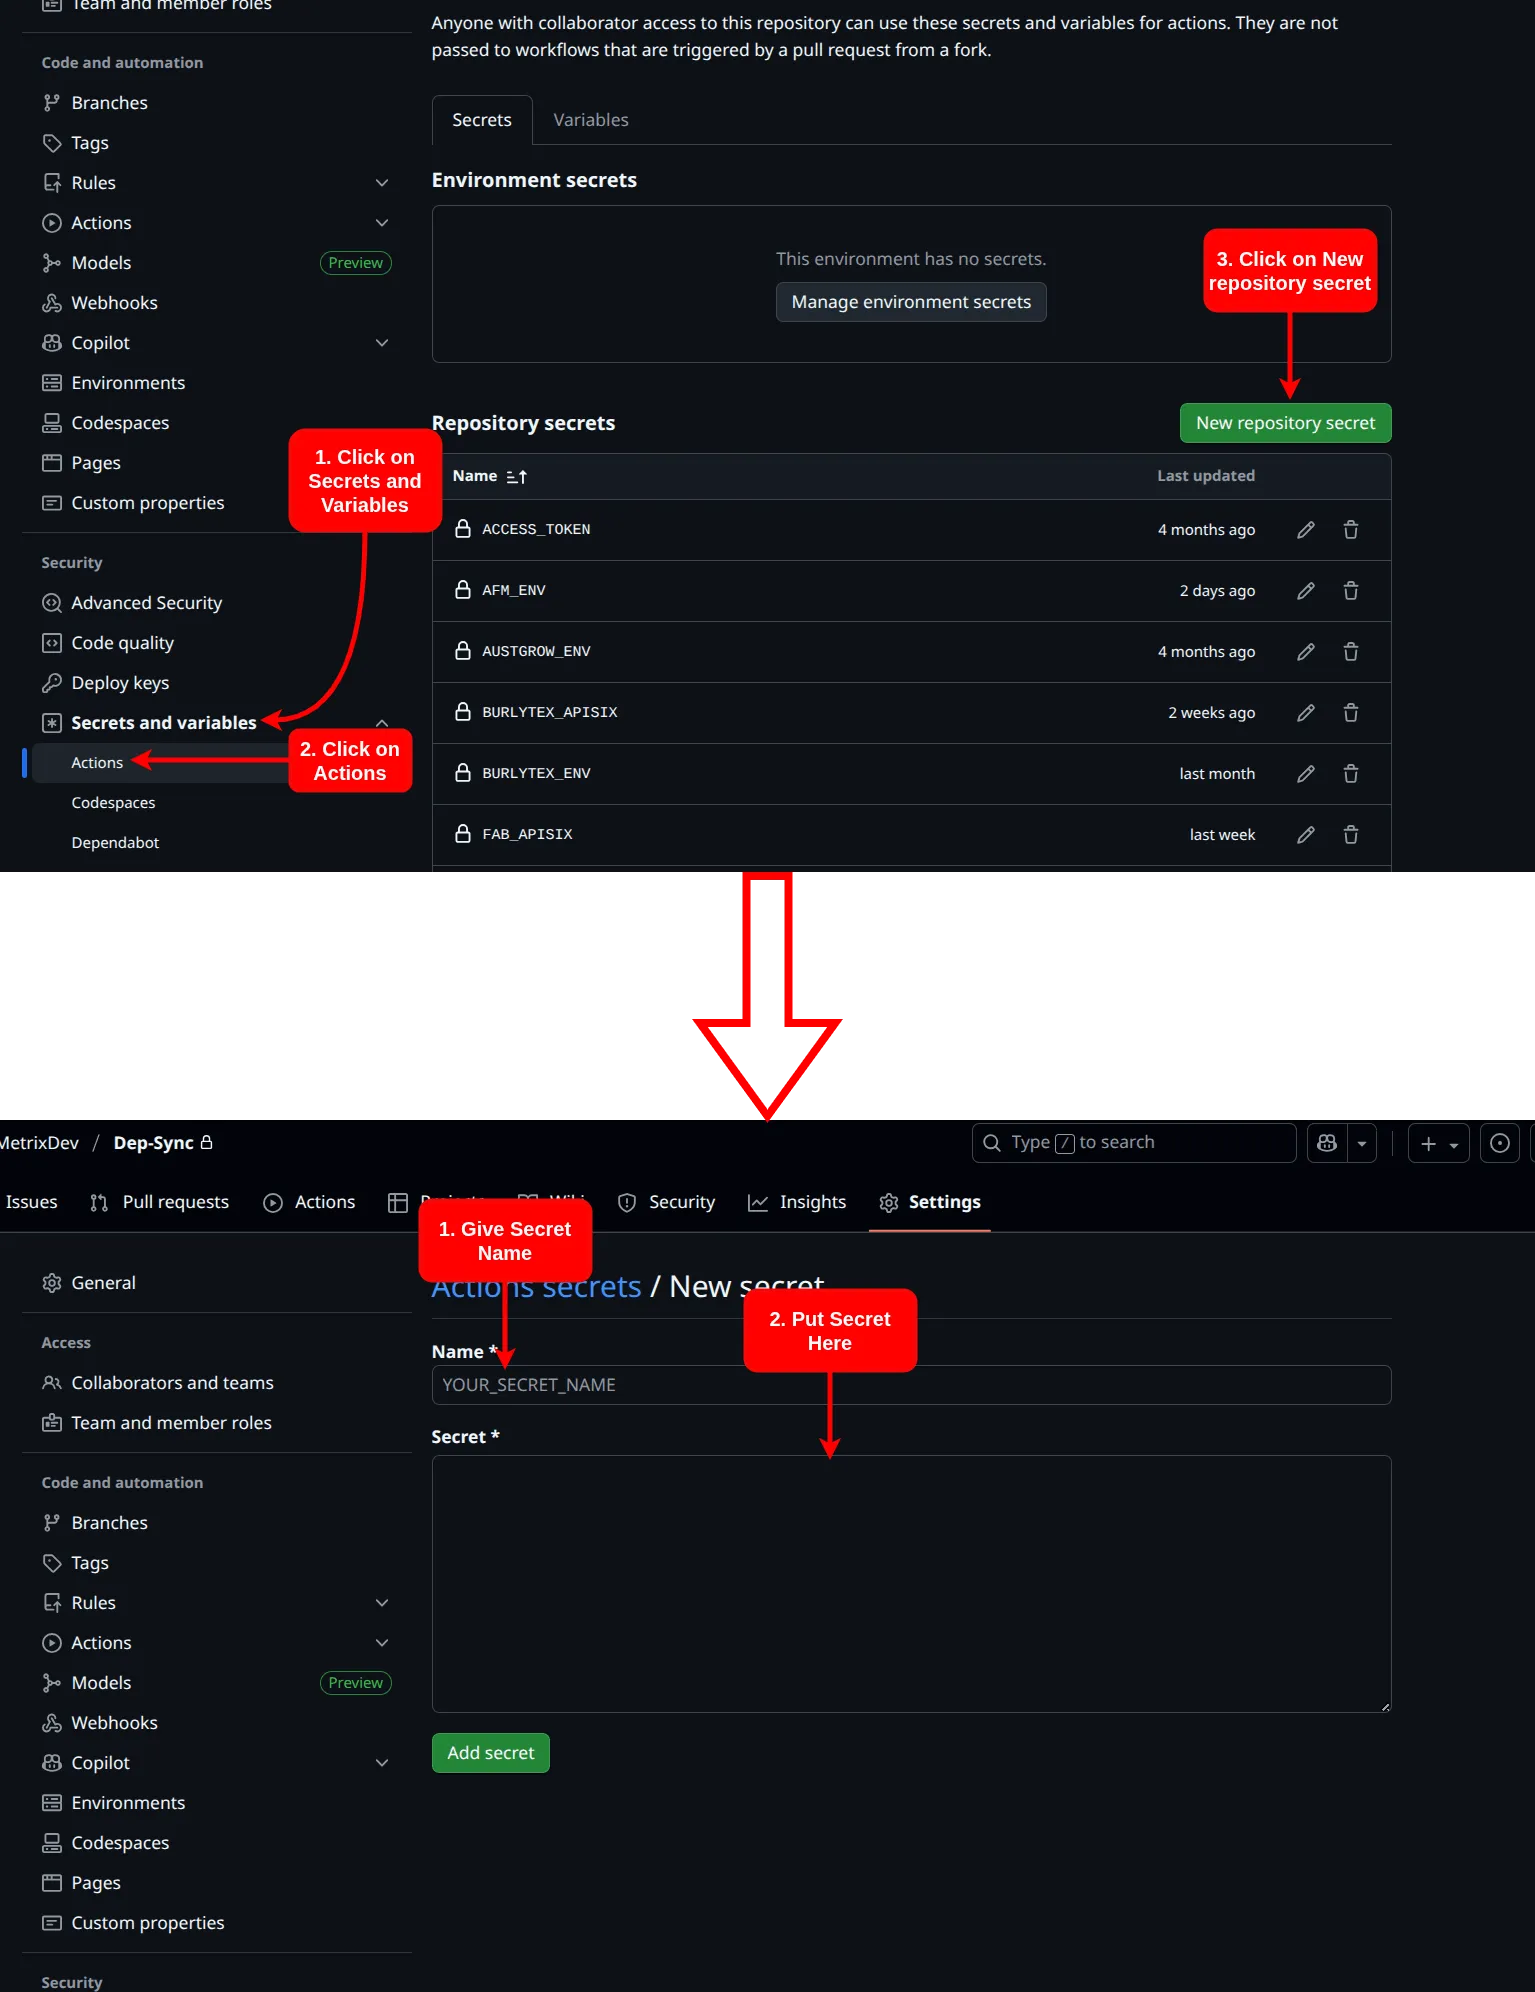
- For
SUDO_PASSWORD_CLIENT_NAME, enter the client’s server sudo password. - For
CLIENT_NAME_ENV, use the following template and adjust the environment variables according to the client:MODE=productionDB_IP=DB_HOSTDB_PORT=DB_PORTDB_NAME="AFMSopperWizer"DB_USER="DB_USERNAME"DB_PASSWORD="DB_PASSWORD"KEYCLOAK_PATH=http://KEYCLOAK_IP_ADDRESS:8080KEYCLOAK_REALM=wimetrixKEYCLOAK_USER=adminKEYCLOAK_PASSWORD=adminKEYCLOAK_CLIENT_SECRET=APISIX_CLIENT_SECRETAPISIX_ADMIN_KEY=edd1c9f034335f136f87ad84b625c8f1APISIX_PATH=http://APISIX_IP_ADDRESS:9180DEV_NODE_SAAD=10.0.0.136DEV_NODE_ABDULLAH=10.0.0.250DEV_NODE_ABUBAKAR=10.0.0.120DEV_NODE_HAMZA=10.0.0.62DEV_NODE_ALI=10.0.0.141 - To obtain the
APISIX_CLIENT_SECRET, navigate to the Keycloak admin portal > wimetrix > clients > apisix > Credentials > Client Secret and copy it.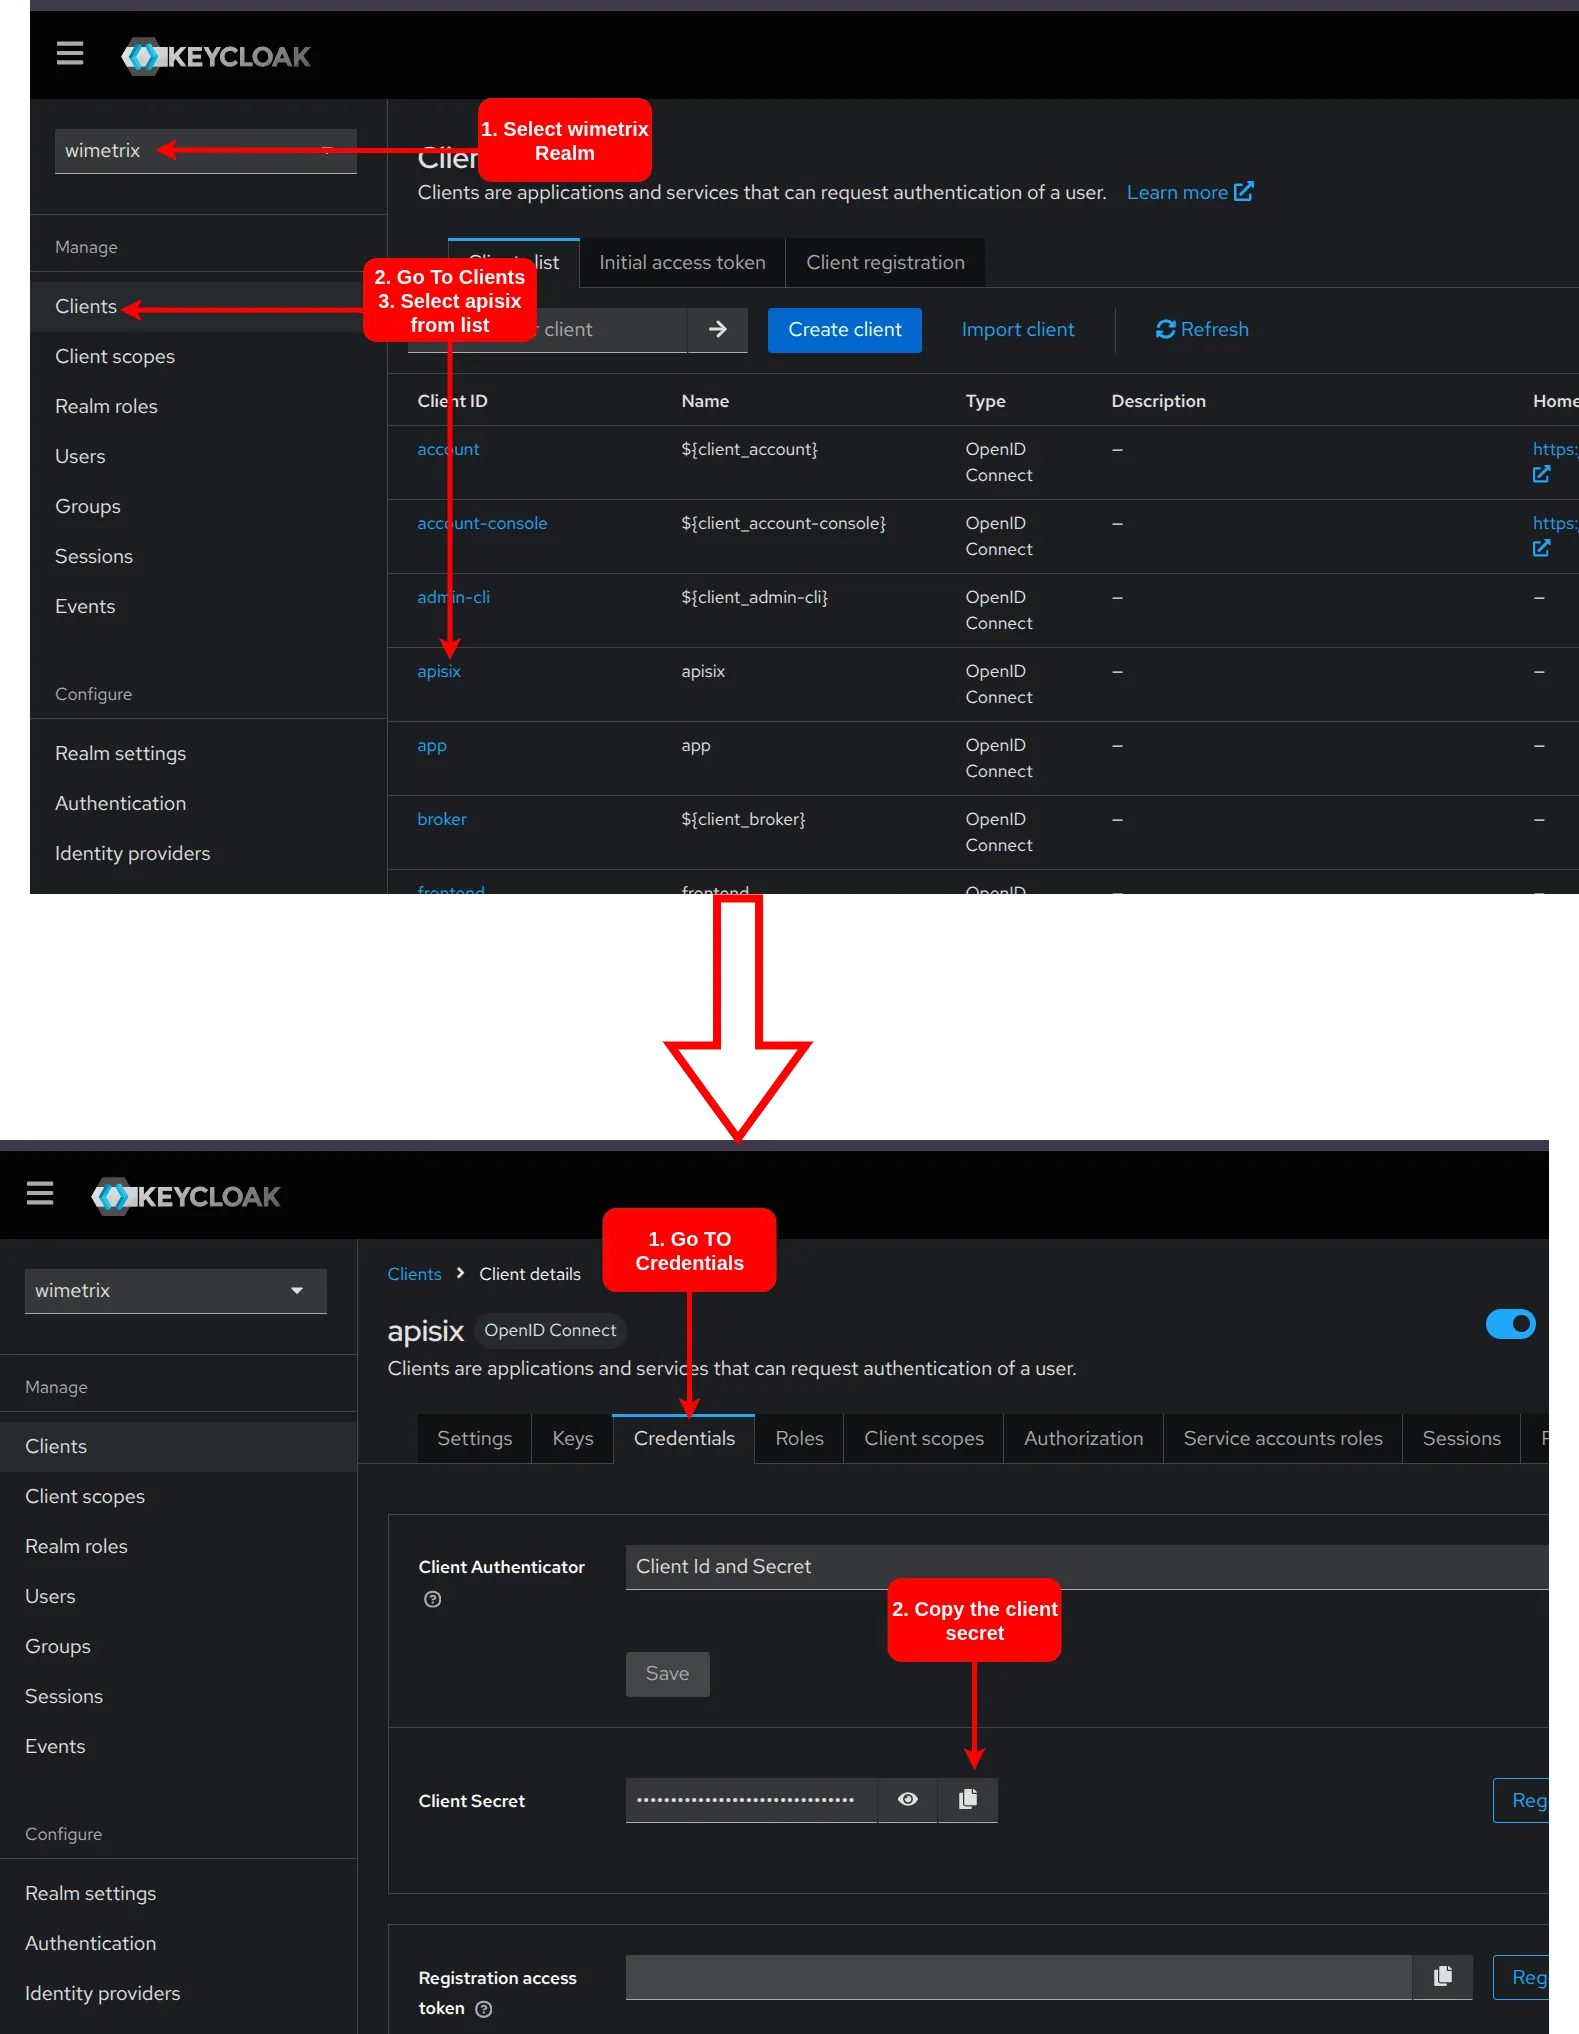
- For
CLIENT_NAME_APISIX, use the following template and update only the IP addresses in theproductionsection according to the client:import { apisSixLabels } from "@pkg/schemas";import { config } from "./config.js";import { logger } from "./logger.js";type TApiSixRoute = {name: string;auth: boolean | { exceptions: string[] };devPort: number;isBeta?: boolean;};type TApiSixConfig = {keycloak: {client_id: string;client_secret: string;url: string;realm_name: string;};devNodes: undefined | Array<{ label: string; ip: string | undefined }>;requestTimeout: number;routes: TApiSixRoute[];};if (config.devNodes) {logger.info(`Dev Nodes: `);logger.info(config.devNodes);}const apisSixConfig: TApiSixConfig = {keycloak: {url: config.keycloak.path,realm_name: config.keycloak.realm,client_id: "apisix",client_secret: config.keycloak.clientSecret,},devNodes: config.devNodes? apisSixLabels.map((label) => ({label,ip: config.devNodes?.[label] ?? undefined,})): undefined,requestTimeout: 100,routes: [{name: "essentials",auth: {exceptions: ["/user/get-access", "/config/get-feature-flags"],},devPort: 4008,},{name: "order",auth: true,devPort: 4006,},{name: "packing",auth: true,devPort: 4005,},{name: "report",auth: {exceptions: ["/line-dashboard", "/insights"],},devPort: 4010,},{name: "spts",auth: {exceptions: ["/dhu-panel", "/wage-station"],},devPort: 4009,},{name: "sqms",auth: true,devPort: 4011,},],};if (config.env === "production") {apisSixConfig.routes = [...apisSixConfig.routes,...apisSixConfig.routes.map((route) => ({...route,isBeta: true,})),];}logger.info("Syncing ApiSix routes...");const headers = { "X-API-KEY": config.apisSix.adminKey };const prefix = `${config.apisSix.path}/apisix/admin`;const existingRes = await fetch(`${prefix}/routes`, {method: "GET",headers,});if (!existingRes.ok)throw new Error(`Apisix Admin API Error: ${existingRes.statusText}`);const existingJson = (await existingRes.json()) as {total: number;list: { value: { id: string } }[];};logger.info(`Deleting ${existingJson.total} existing routes...`);for (const route of existingJson.list) {const id = route.value.id;const res = await fetch(`${prefix}/routes/${id}`, {method: "DELETE",headers,});if (!res.ok) throw new Error(`Failed to delete route. ${res.statusText}`);}for (const route of apisSixConfig.routes) {const name = `${route.isBeta ? `beta-` : ""}${route.name}`;const uriPrefix = `${route.isBeta ? "/beta" : ""}/${route.name}`;const env = route.isBeta ? "beta" : config.env;logger.info(`Adding ${name} route...`);const host = {development: "10.0.0.8",qa: `backend-${route.name}-qa-service`,beta: `beta-backend-${route.name}-service.beta.svc.cluster.local`,production: `192.168.0.50`,}[env];const port = {development: route.devPort,qa: 4005,beta: 4005,production: route.devPort,}[env];const body = {name,uri: `${uriPrefix}/*`,plugins: {cors: {_meta: {disable: false,},allow_credential: false,allow_headers: "*",allow_methods: "*",allow_origins: "*",expose_headers: "*",max_age: 5,},"proxy-rewrite": {regex_uri: [`^${uriPrefix}/(.*)$`, "/$1"],},"serverless-pre-function": {functions: ['return function()\n local core = require "apisix.core";\n local token = "token";\n core.request.set_header("x-apisix-token", token);\nend',],phase: "before_proxy",},} as Record<string, unknown>,upstream: {nodes: [{ host, port, weight: 1 }],timeout: { connect: 6, send: 6, read: 100 },type: "roundrobin",scheme: "http",pass_host: "pass",keepalive_pool: {idle_timeout: 60,requests: 1000,size: 320,},},status: 1,};if (route.auth) {const exceptions = [`^${uriPrefix}/ping$`];if (route.auth !== true)exceptions.push(...route.auth.exceptions.map((e) => `^${uriPrefix}${e}(/.*)?$`),);body.plugins["authz-keycloak"] = {_meta: {disable: false,filter: exceptions.map((e) => ["request_uri", "!", "~~", e]),},client_id: apisSixConfig.keycloak.client_id,client_secret: apisSixConfig.keycloak.client_secret,discovery: `${apisSixConfig.keycloak.url}/realms/${apisSixConfig.keycloak.realm_name}/.well-known/uma2-configuration`,lazy_load_paths: true,permissions: [],};}if (env === "development" && apisSixConfig.devNodes?.length) {const rules: Record<string, unknown>[] = [];for (const node of apisSixConfig.devNodes) {if (!node.ip) continue;rules.push({match: [{ vars: [["http_apisix-label", "==", node.label]] }],weighted_upstreams: [{upstream: {nodes: { [`${node.ip}:${port}`]: 1 },type: "roundrobin",},weight: 1,},],});}if (rules.length) body.plugins["traffic-split"] = { rules };}const res = await fetch(`${prefix}/routes`, {method: "POST",headers: { ...headers, "Content-Type": "application/json" },body: JSON.stringify(body),});if (!res.ok) throw new Error(`Failed to add route. ${res.statusText}`);}logger.info(`${apisSixConfig.routes.length} routes added!`); - You only need to modify the following section in the above file:
const host = {development: "10.0.0.8",qa: `backend-${route.name}-qa-service`,beta: `beta-backend-${route.name}-service.beta.svc.cluster.local`,production: `192.168.0.50`,}[env];
Note: This step is required only for on-premises deployments.
Cloud Deployment
Section titled “Cloud Deployment”Cloud deployment is simpler and utilizes an EKS cluster with a service-based structure. For a detailed understanding of the cloud infrastructure, refer to the following documentation: Cloud Infrastructure.
-
Deploy Frontend and Backend Services
Section titled “Deploy Frontend and Backend Services”For initial configuration, a Jenkins job has been set up to handle the process.
- Navigate to the Jenkins Server.
- Log in using your credentials.
- You will see the following page:
- Click on
Build with Parameters. - You will be prompted for the following details:
- Provide the
Client Nameand select theDeployment Type(e.g., Docker-based or Kubernetes-based deployment). - Enter the
Client Nameand selectKubernetesfrom the dropdown menu. This will create initial environment files in Passbolt and set up the client in the main branch of the deployment repositories.
-
Set Up APISIX, Keycloak, and Ingress
Section titled “Set Up APISIX, Keycloak, and Ingress”To set up APISIX, Keycloak, and ingress rules, clone and configure the Terraform Infra Config repository on your local machine. Read the
README.mdto set up the repository.- After setting up the initial repository, copy the existing
Kubernetes-deployment-client-nameconfiguration and create a new one with the client name. Create a namespace with the client name usingkubectl create namespace client_name. - In the parent folder, you will see multiple folders containing deployments for
APISIX,KEYCLOAK,CRYSTALREPORTS, andINGRESS_RULES. - Go through each folder and replace the old client name with the new client name. If using VS Code, this can be done easily with Find & Replace.
-
Navigate to the
To Set Up APISIX:
Section titled “To Set Up APISIX:”apisixdirectory in the terminal. Runkubectl apply -f etcd.yaml, thenkubectl apply -f apisix.yaml, and finallykubectl apply -f apisix-dashboard.yaml. Ensure all pods are in theRunningstate by runningkubectl get pods --namespace client_name. -
Navigate to the
To Set Up Keycloak:
Section titled “To Set Up Keycloak:”keycloakdirectory and then to thecertsdirectory in the terminal. Runkubectl create secret tls wild-card-cert --cert=registry.crt --key=registry.key --namespace client_name. Then, go back to thekeycloakdirectory and runkubectl apply -f keycloak.yaml. Ensure you have updated theKC_DB_URL_DATABASEvalue in thekeycloak.yamlfile before applying it. -
Crystal Reports are hosted on a private database server that is not accessible from outside the network or without a VPN. Therefore, set up a headless service and endpoints in Kubernetes to create an access point to Crystal Reports hosted on the private database server. First, navigate to the CrystalReports directory in the terminal and run
To Set Up Crystal Reports:
Section titled “To Set Up Crystal Reports:”kubectl apply -f crystalSolution-service.yaml, thenkubectl apply -f crystalSolution-endpoints.yaml, and finallykubectl apply -f crystalSolution-ingress.yaml. This will create a headless service and endpoint. The port used needs to be allowed in the RDS instance. To do this, go tomodules/RDS/main.tfand add:in thedynamic "ingress" {for_each = data.aws_subnet.privatecontent {description = "Allow Crystal Reports CLIENT_NAME PORT from ${ingress.value.availability_zone} private subnet"from_port = 8084to_port = 8084protocol = "tcp"cidr_blocks = [ingress.value.cidr_block]}}resource "aws_security_group"section. After that, runterraform planand thenterraform apply. -
Ingress rules are used to create endpoints for accessing the frontend or applications hosted inside the Kubernetes cluster. Apply the ingress rules using
To Set Up Ingress Rules:
Section titled “To Set Up Ingress Rules:”kubectl apply -ffor the following files:apisix-admin-http.yaml,apisix-dashboard.yaml,apisix-http.yaml,factory-performance-frontend.yaml,frontend-pack-station.yaml,frontend.yaml,ingress-keycloak.yaml. -
To deploy NATS, first create a new namespace using
To Set Up NATS:
Section titled “To Set Up NATS:”kubectl create namespace nats-client-name. Then, updatenats-config.yaml,nats-manifest.yaml, andnats-websocket-svc.yamlby replacing the namespace name with the newly created namespace. Apply the files usingkubectl apply -fin the following order:nats-config.yaml,nats-manifest.yaml,nats-websocket-svc.yaml.
- After setting up the initial repository, copy the existing
-
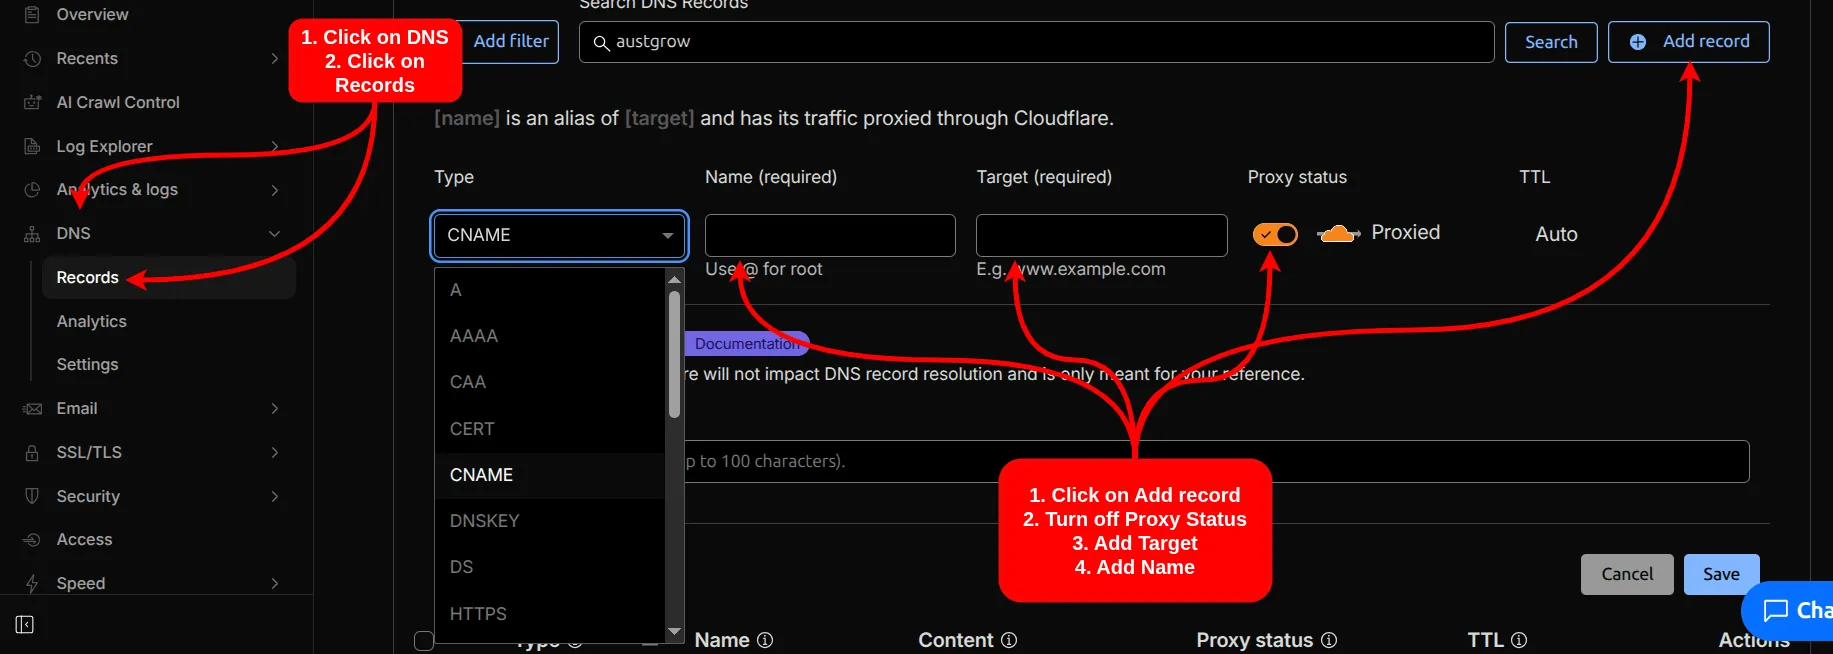
Set Up DNS Rules in Cloudflare
Section titled “Set Up DNS Rules in Cloudflare”- Set up a
CNAMErecord in Cloudflare to allow access via the public internet. - Use the AWS Admin Cloudflare Account.
- After logging in, go to Domain > DNS > Records.
- Click
Add Record, selectCNAME, turn off Proxy, and set the target toa8e57a1a839d64502b37a57dae962cd4-ef9bd05e5a126845.elb.ap-southeast-1.amazonaws.com. - In the name field, enter the subdomain.
- Set up a