Application Architecture
This document breaks down WiMetrix’s application architecture. We will describe the pieces that make up our architecture. We will also detail how these pieces fit in together to create make sure our web applications are fast, secure, and reliable.
The Pieces
Section titled “The Pieces”- ApiSix: Api gateway, Ingress controller
- KeyCloak: Authentication and Authorization provider
- REST Services: Microservice based REST API network
- Frontend Applications: React based Single Page Applications (SPA)
- Mobile Apps: React native based mobile and tablet applications
- Desktop Applications: Electron based desktop applications written with web technologies
Architecture Diagram
Section titled “Architecture Diagram”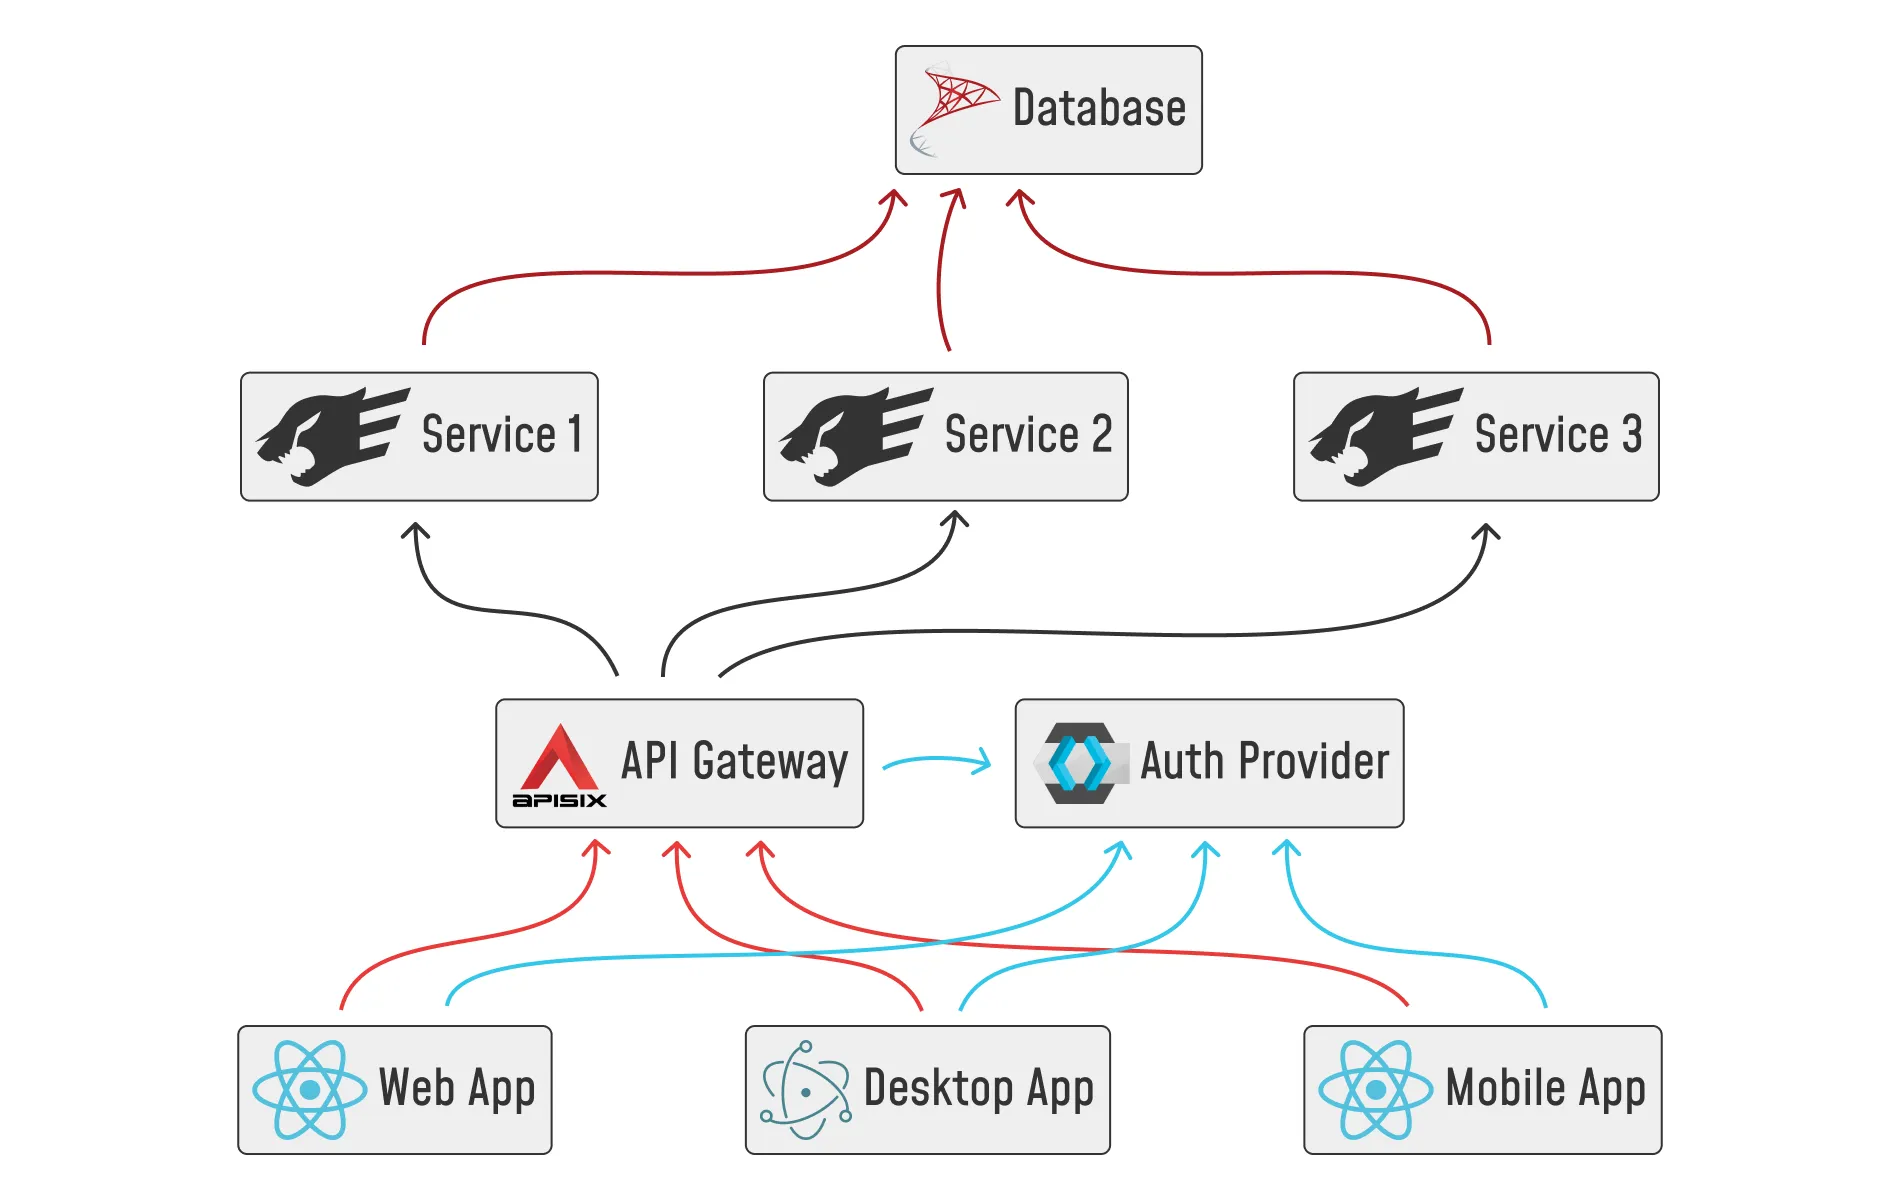
ApiSix
Section titled “ApiSix”Apache ApiSix is being used as an API Gateway.
ApiSix provides rich traffic management features like:
- Load Balancing
- Rate Limiting
- Authentication
- Authorization
- Logging
- Dynamic Upstream
- Circuit Breaking
- Observability
- Canary Release
ApiSix offers these features by integrating with popular 3rd party libraries. This modular design enables us to integrate existing tools and workflows into ApiSix with ease.
ApiSix can be configured through a REST API, and it also comes with a web-based dashboard.
Where ApiSix fits in
Section titled “Where ApiSix fits in”- Enables a singular pathway for cross application communication (frontend-to-backend, backend-to-backend)
- Exposes our backend services and frontend applications over the network securely
- Secure backend service calls through an Auth Provider (See: KeyCloak)
- Enable zero config load balancing
- Provide simple setups for logging, monitoring, and observability
Setting up a route with ApiSix
Section titled “Setting up a route with ApiSix”ApiSix routes can be created a few different methods:
- With the ApiSix Admin UI
- Through hitting the REST Api
PUT /apisix/admin/routes - Passing the route yaml config as part of the the docker compose file
ApiSix routes have a lot of builtin plugins and config available to them.
Read the official docs for a full breakdown
Example Route config using a few plugins and setting up a single upstream:
uri: /${{PREFIX}}/*name: ${{NAME}}plugins: authz-keycloak: _meta: disable: false filter: - - request_uri - "!" - ~~ - ^/[^/]*/ping$ client_id: apisix client_secret: ${{CLIENT_SECRET}} discovery: http://${{KEYCLOAK_IP:PORT}}/realms/wimetrix/.well-known/uma2-configuration lazy_load_paths: true cors: _meta: disable: false allow_credential: false allow_headers: "*" allow_methods: "*" allow_origins: "*" expose_headers: "*" max_age: 5 proxy-rewrite: regex_uri: - ^/[^/]*/(.*)$ - /$1 serverless-pre-function: functions: - |- return function() local core = require "apisix.core"; local token = "token"; core.request.set_header("x-apisix-token", token); end phase: before_proxy traffic-split: rules: - match: - vars: - - http_apisix-label - "==" - ${{LABEL}} weighted_upstreams: - upstream: nodes: ${{UPSTREAM_IP}}:${{UPSTREAM_PORT}}: 1 type: roundrobin weight: 1upstream: nodes: - host: ${{UPSTREAM_IP}} port: ${{UPSTREAM_PORT}} weight: 1 type: roundrobinstatus: 1KeyCloak
Section titled “KeyCloak”KeyCloak is an Identity and Access Management solution. It is based on open standards like OpenID Connect, UMA, OAuth 2.0, and SAML.
KeyCloak provides:
- Single-Sign On
- User federation
- Strong authentication
- User management
- Fine-grained authorization
- Integrations with 3rd party auth/identity providers
- Social Login
KeyCloak can be managed through an Admin UI, as well as through a REST API.
Where KeyCloak fits in
Section titled “Where KeyCloak fits in”KeyCloak handles every aspect of user authentication and authorization in our architecture. All applications authenticate directly or indirectly through KeyCloak.
Auth Flow
Section titled “Auth Flow”Frontend applications authenticate directly with KeyCloak through Openid-compliant REST API interfaces.
- Users login with a familiar username/password method from the login page
- Upon successful authentication, The application receives an
Access Token, aRefresh Token, andUser Infofor the authenticated user Access Tokenhas a short default expiry time of1 minuteRefresh Tokenhas an idle expiry time30 minutesRefresh Tokenhas a maximum expiry time of5 Hours- When
Access Tokenexpires, the application uses theRefresh Tokento obtain a new one Refresh Tokenexpiry reset with every refresh, allowing the user to stay logged-in when they are actively working on the frontend- The user is logged out after
Refresh Tokenexpires (which happens after user is inactive for the duration of the token’s expiry period) - Active user sessions are visible and can be revoked from the KeyCloak admin dashboard at any time
Access Tokenis forwarded in the Authorization header as a bearer token with every call to the backend services- The API Gateway redirects the request to
KeyCloakto be authorized - The request is forwarded only if the token is valid and the user is authorized to access the route
- ApiSix which sits between the user/client and the services and redirects to KeyCloak for auth
- Backend services are only accessible through ApiSix
User Access Management With KeyCloak
Section titled “User Access Management With KeyCloak”KeyCloak is an un-opinionated and general purpose tool and allows many different general purpose entities. These entities can be mixed and matched to fit specific organizational structures.
Initial Setup For KeyCloak
Section titled “Initial Setup For KeyCloak”Read here for a detailed breakdown of KeyCloak
Starting Up KeyCloak
Section titled “Starting Up KeyCloak”- Deploy the KeyCloak container
- Access the admin UI (the default port is
8080) - Create a realm called
wimetrix. We will use this realm for our auth - Setup
Users,Groups, andRealm Roles. (See: User Access Management)
Make First Name Required For Users
Section titled “Make First Name Required For Users”- Go to
Realm Settings>User profile>firstName - Set
Required fortoBoth users and admins
Allow Updating Username
Section titled “Allow Updating Username”- Go to
Realm Settings>Login - Go to
User info settingssection - Set
Edit usernametotrue
Configure Tokens
Section titled “Configure Tokens”- Go to
Realm Settings>Token>Access Tokens - Set
Access Token Lifespanto1 Minute - Go to
Realm Settings>Token>Refresh Tokens - Set
Revoke Refresh Tokentofalse - Go to
Realm settings>Sessions>SSO Session Settings - Set
SSO Session Idleto1 Hours - Set
SSO Session Maxto30 Days
Adding access attribute to User Profile
Section titled “Adding access attribute to User Profile”- Go to
Realm Settings>User Profile - Click
Create attributebutton - Enter
accessforAttribute [Name] - Enter
AccessforDisplay Name - Go down to the
Validationssection and click+ Add validator - Select
lengthas theValidator Type - Set
Minto0 - Set
Maxto10000 - Click
Saveto add the validator - Click on
Create - The attribute should show in
User Profilelist
Adding phone attribute to User Profile
Section titled “Adding phone attribute to User Profile”- Go to
Realm Settings>User Profile - Click
Create attributebutton - Enter
phoneforAttribute [Name] - Enter
PhoneforDisplay Name - Click on
Create - The attribute should show in
User Profilelist
Configuring Client Scopes
Section titled “Configuring Client Scopes”Add a mapper to include access in user info and tokens
Section titled “Add a mapper to include access in user info and tokens”- Go to
Client scopes - Click on the
Profilescope - Go to
Mapperstab - Click on
Add mapperbutton and selectby configuration. A modal should show - Select
User Attributefrom the list in the modal and clickAdd. A form should open to add mapper - Enter
accessforName - Select
accessfrom theUser Attributedropdown - Enter
accessforToken Claim Name - Set
Claim JSON TypetoJSON - Set
Add to access tokentotrue - Set
Add to Userinfototrue - Click
Save - The new mapper should show in the
Mapperstab
Add a mapper to include phone in user info and tokens
Section titled “Add a mapper to include phone in user info and tokens”- Go to
Client scopes - Click on the
Profilescope - Go to
Mapperstab - Click on
Add mapperbutton and selectby configuration. A modal should show - Select
User Attributefrom the list in the modal and clickAdd. A form should open to add mapper - Enter
phoneforName - Select
phonefrom theUser Attributedropdown - Enter
phoneforToken Claim Name - Set
Claim JSON TypetoString - Set
Add to access tokentotrue - Set
Add to Userinfototrue - Click
Save - The new mapper should show in the
Mapperstab
Add a mapper to include email in user info and tokens
Section titled “Add a mapper to include email in user info and tokens”- Go to
Client scopes - Click on the
Profilescope - Go to
Mapperstab - A mapper named as
emailshould already exist. Click on it to edit. - Enter
emailforName - Select
emailfrom theUser Attributedropdown - Enter
emailforToken Claim Name - Set
Claim JSON TypetoString - Set
Add to access tokentotrue - Set
Add to Userinfototrue - Click
Save - The new mapper should show in the
Mapperstab
Add a mapper to include groups in user info and tokens
Section titled “Add a mapper to include groups in user info and tokens”- Go to
Client scopes - Click on the
Create client scopebutton - Enter
groupsas the name - Set Type to
Default - Set
Display on consent screentofalse - Create the mapper and select it
- Go to
Mapperstab - Click on
Configure a new mapperbutton. A modal should show - Select
Group Membershipfrom the list in the modal and clickAdd. A form should open to add mapper - Enter
groupsforName - Enter
groupsforToken Claim Name - Set
Full group pathtofalse - Set
Add to ID tokentofalse - Set
Add to access tokentotrue - Set
Add to lightweight access tokentofalse - Set
Add to Userinfototrue - Set
Add to token introspectiontotrue - Click
Save - The new mapper should show in the
Mapperstab
Add a mapper to include user_id in user info and tokens
Section titled “Add a mapper to include user_id in user info and tokens”- Go to
Client scopes - Click on the
Create client scopebutton - Enter
user_idas the name - Set Type to
Default - Set
Display on consent screentofalse - Create the mapper and select it
- Go to
Mapperstab - Click on
Add mapperbutton and selectby configuration. A modal should show - Select
User Propertyfrom the list in the modal and clickAdd. A form should open to add mapper - Enter
user_idforName - Enter
idforProperty - Enter
user_idforToken Claim Name - Set
Claim JSON TypetoString - Set
Add to ID tokentofalse - Set
Add to access tokentotrue - Set
Add to lightweight access tokentofalse - Set
Add to Userinfototrue - Set
Add to token introspectiontotrue - Click
Save - The new mapper should show in the
Mapperstab
Add realm roles to user info and tokens, and client roles to tokens
Section titled “Add realm roles to user info and tokens, and client roles to tokens”- Go to the
Client Scopecalledroles - Open the
realm rolesmapper - Set
Add to access tokentotrue - Set
Add to userinfototrue - Open the
client rolesmapper - Set
Add to access tokentotrue - Set
Add to token introspectiontotrue
Create A client for the frontend applications
Section titled “Create A client for the frontend applications”- Go to the
Clientspage - Click on the
Create Clientbutton - Set
Client IDandNametofrontend - Click
Next - Make sure
Client AuthenticationandAuthorizationStay off - Keep
Standard flowandDirect access grantschecked inAuthentication flow - Click
Next - Set
Valid redirect URIsto your frontend url (Set/*in dev) - Set
Web originsto your frontend url (Set*in dev) - Click
Save. You should be taken the added client’s page - Go to
Client scopestab - Check if
user_idandgroupsare already in the assigned list. Skip the next steps if they are. - Click on
Add client scopebutton - Select
user_idandgroupsif they are available in the modal. - Click on
Addbutton and selectDefaultfrom the dropdown. The scopes should show in the assigned list
Or alternatively, you can import the frontend.json file to create the client.
Create A client for mobile apps
Section titled “Create A client for mobile apps”- Go to the
Clientspage - Click on the
Create Clientbutton - Set
Client IDandNametoapp - Click
Next - Make sure
Client AuthenticationandAuthorizationStay off - Keep
Standard flowandDirect access grantschecked inAuthentication flow - Click
Next - Set
Valid redirect URIsto your frontend url (Set/*in dev) - Set
Web originsto your frontend url (Set*in dev) - Click
Save. You should be taken the added client’s page - In
Advancedtab, go toAdvanced Settingsand setAccess Token Lifespanto1 Minute, setClient Session Idleto365 Day, and setClient Session Maxto365 Days. - Go to
Client scopestab - Check if
user_idandgroupsare already in the assigned list. Skip the next steps if they are. - Click on
Add client scopebutton - Select
user_idandgroupsif they are available in the modal. - Click on
Addbutton and selectDefaultfrom the dropdown. The scopes should show in the assigned list
Or alternatively, you can import the app.json
Create A client for ApiSix
Section titled “Create A client for ApiSix”- Go to the
Clientspage - Click on the
Create Clientbutton - Set
Client IDandNametoapisix - Click
Next - Set
Client AuthenticationandAuthorizationtotrue - Uncheck everything in
Authentication flow - Click
Next - Click
Save. You should be taken the added client’s page - Go to the
Authorizationtab - In the settings tab:
Policy Enforcementshould beEnforcingDecision Strategyshould beUnanimousRemote Resource Managementshould beoff
- In the
Resourcestab- Delete
Default Resource
- Delete
- Go to
Client scopestab - Check if
user_idandgroupsare already in the assigned list. Skip the next steps if they are. - Click on
Add client scopebutton - Select
user_idandgroupsif they are available in the modal. - Click on
Addbutton and selectDefaultfrom the dropdown. The scopes should show in the assigned list - Running the Keycloak Sync Script (
pnpm gen:keycloak) will add the requiredResources,Policies, andPermissions.
Disable default authentication actions
Section titled “Disable default authentication actions”- Go to
Authentication>Required actionsand uncheck all required actions
This Postman collection
can be used to test the auth flow (Make sure to update the Variables like url and client_secret for the collection)
REST Services
Section titled “REST Services”The Backend applications are divided into many independent REST microservices. Each microservice has a narrow scope and can be independently deployed.
The backend services use the following tech stack:
- JavaScript: Our backend programming language of choice
- TypeScript: Type-safe JavaScript
- Node.js: JavaScript Runtime for the backend services
- Fastify: Node.js framework for the backend services
Frontend Applications
Section titled “Frontend Applications”Frontend Web applications are written in react as Single Page Applications. They access the server/db through the backend services. The frontend is decoupled from the server side logic and can be deployed independently of the backend services.
The frontend applications use the following tech stack:
- JavaScript: The programming language of the web
- TypeScript: Type-safe JavaScript
- React: Frontend library for JavaScript
- Tanstack Router: Routing framework
- Material UI: Component Library and Design System
- Apache ECharts: Chart and Visualization components
- Material React Table: Data Grid and table component and hook
- Vite: Dev Server and Bundler
Mobile Applications
Section titled “Mobile Applications”Mobile and Tablet applications are developed in React Native. This enables easy cross-platform availability and code reuse with the web frontend. It also allows us to streamline our tech stack and unify on a JavaScript/TypeScript Stack. This also enables us to integrate the mobile applications tightly into the monorepo architecture.
The apps use the following tech stack:
- JavaScript: The programming language of the web
- TypeScript: Type-safe JavaScript
- React: Frontend library for JavaScript
- React Native: Native components and JS-Native bridge to translate javascript into native code
- Expo: React Native meta-framework providing builtin workflows and libraries
- React Native Paper: Component Library and Design System
Desktop Applications
Section titled “Desktop Applications”We aim to avoid desktop applications, preferring instead to go with web applications. For use-cases where a desktop applications is required, we develop them with Electron.js. This enables us to use web technologies to build the application, which keeps our tech stack unified.
The desktop applications use the following tech stack:
- Uses the frontend tech stack. (See: Frontend Applications)
- Electron: Cross-platform desktop apps with web technologies
- Electron Forge: Tool to scaffold, build, and publish electron applications